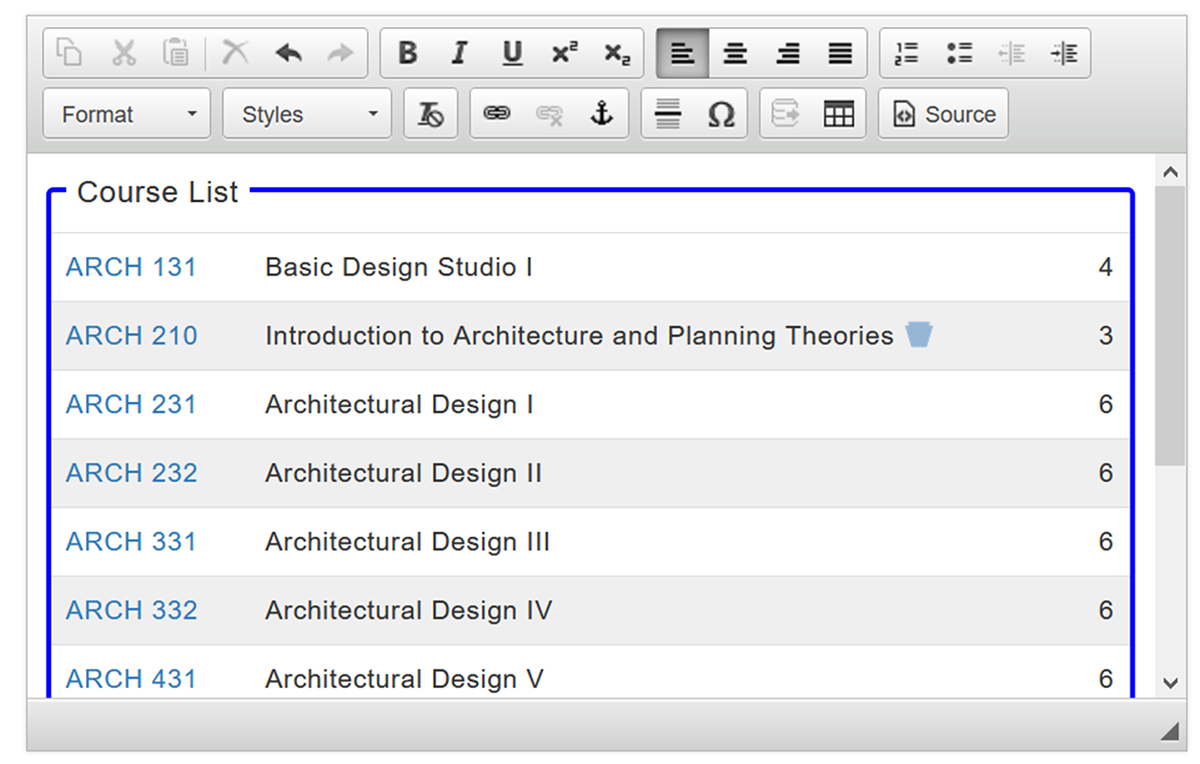
A program's course requirements (i.e., prescribed, additional, and supporting courses) should be entered in a Course List. A course list provides the requirements in a pre-formatted table structure. The listed courses are linked to the Course Catalog data exported from LionPATH to provide viewers with immediate access to course information.
Below are instructions on how to use the Course List Editor to build your program's course list. This includes how to start a new course list; edit an existing course list; appropriate formatting for prescribed, additional, and supporting courses; how to designate C or better courses, how to add plain text, how to use headings and footnotes, and more.
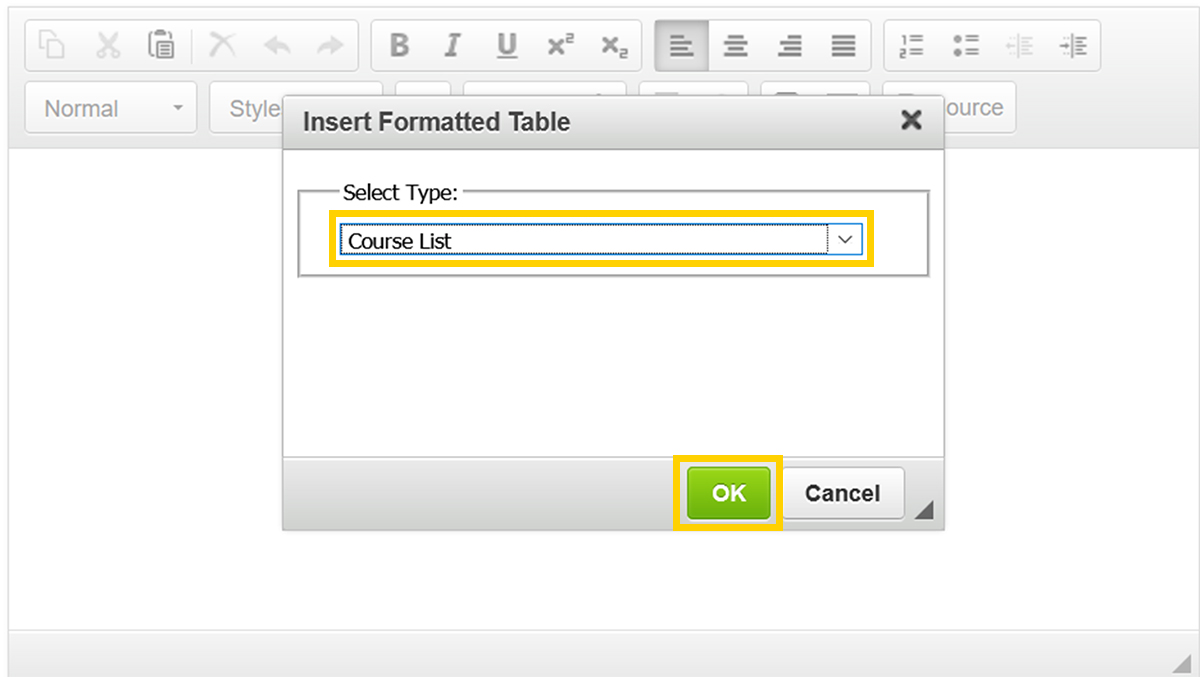
In the Page Body Editor toolbar, click the Insert/Edit Formatted Table icon.
In the Insert Formatted Table selection tool pop-up, select Course List from the dropdown menu and click the OK Button.
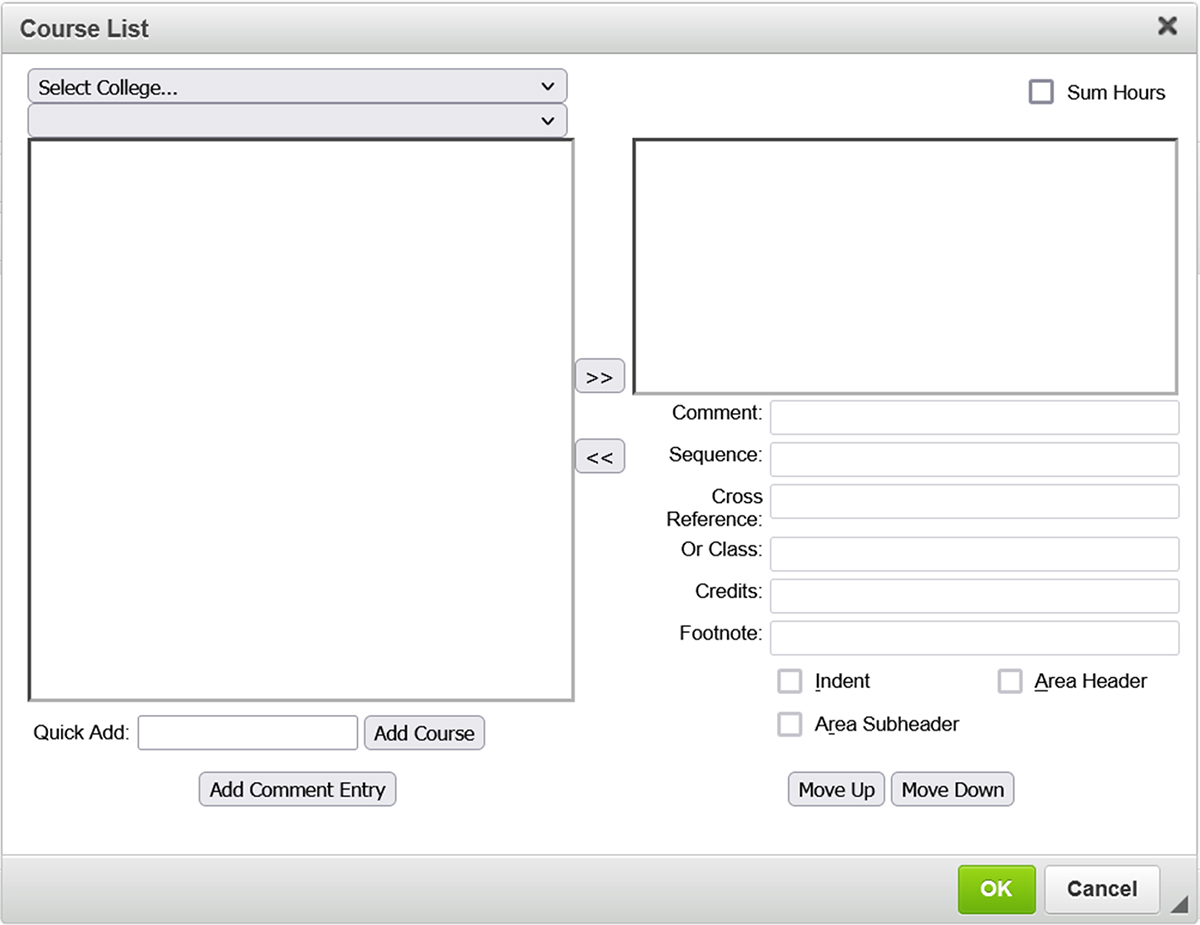
The Course List Editor will open for you to begin building your course list.
In the Page Body Editor, double click inside the blue box of the course list you want to edit.

The Course List Editor will open with the existing course list information pre-loaded in the tool.
In the Page Body Editor, single click inside the blue box of the course list you want to delete.
Press the Delete key on your keyboard to remove the course list from the Page Body Editor.
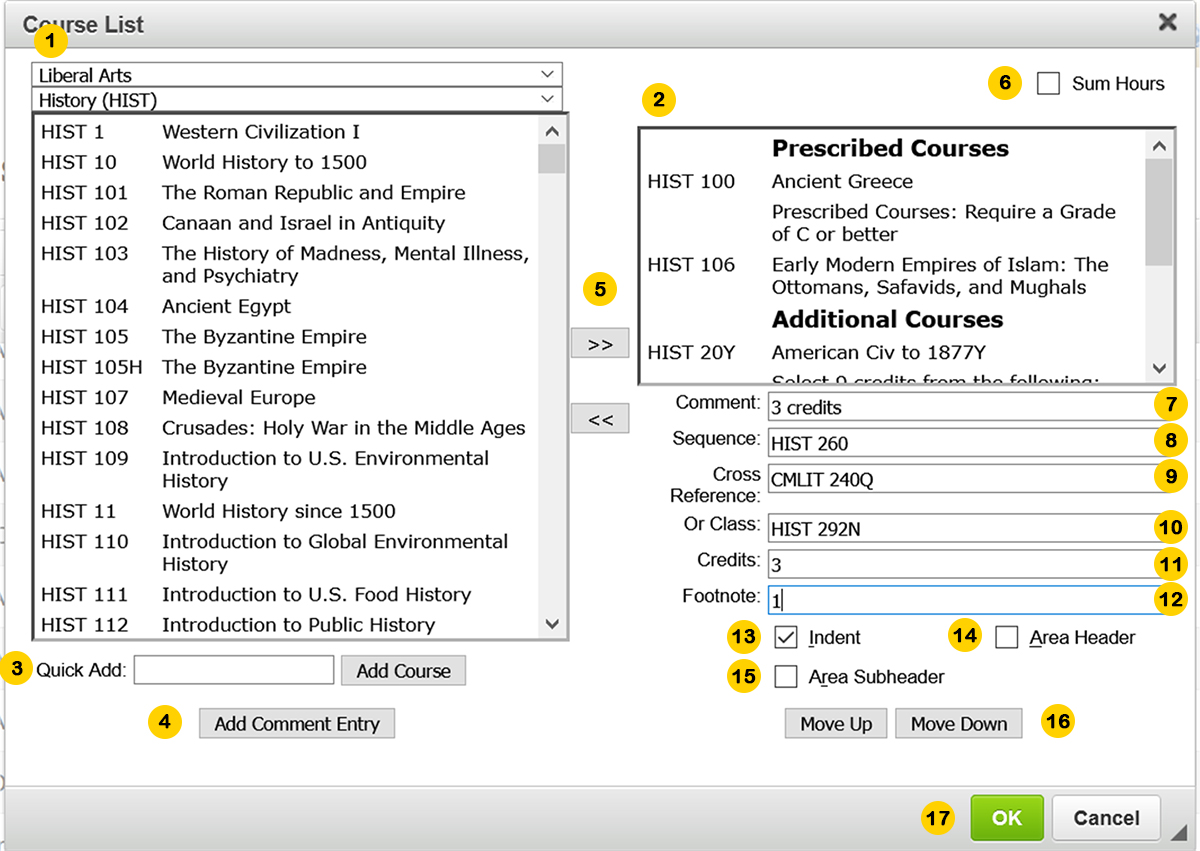
The Course List Editor has several different components that will allow you to construct your program requirements in a consistent, easy-to-understand format.
The fields within the Course List Editor allow users to assign specific information to individual courses. Below is a description of every available field and component within the Course List Editor.
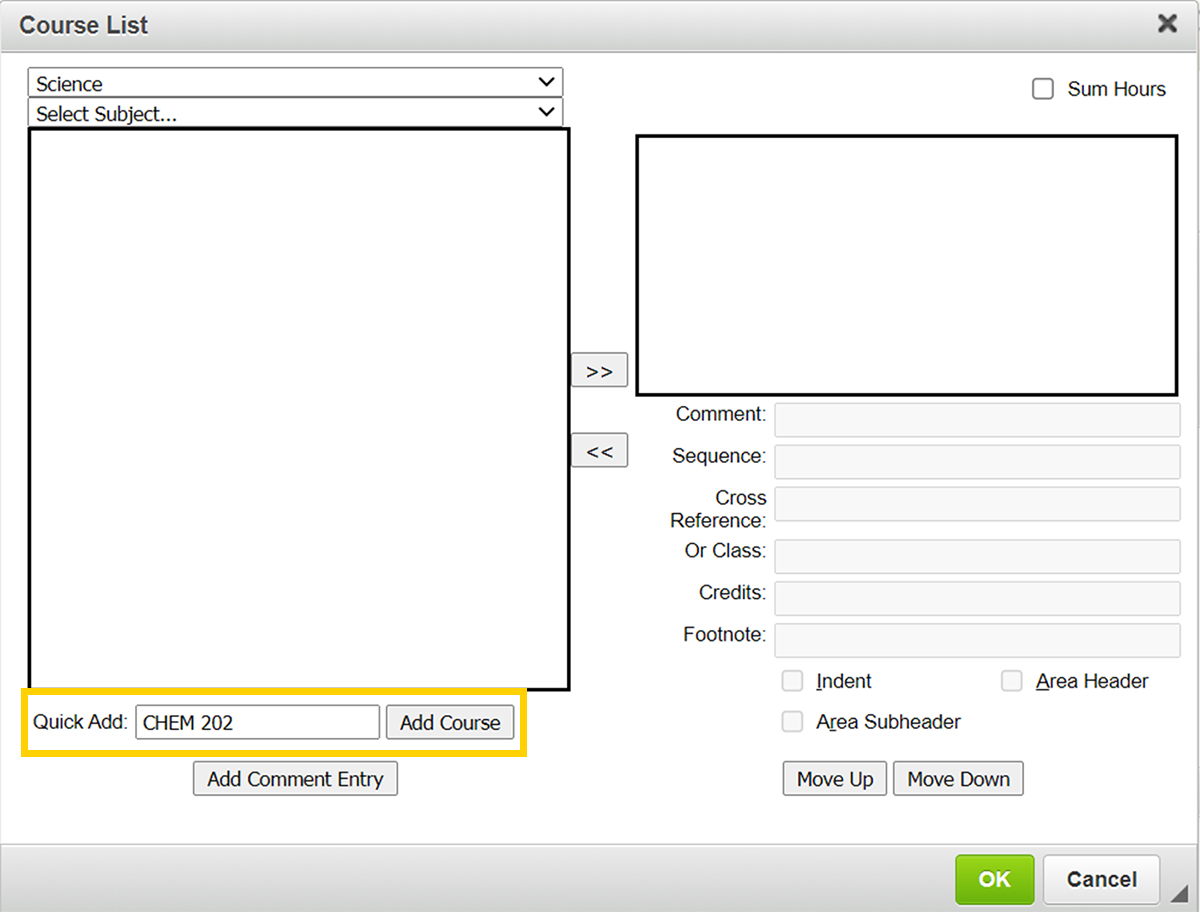
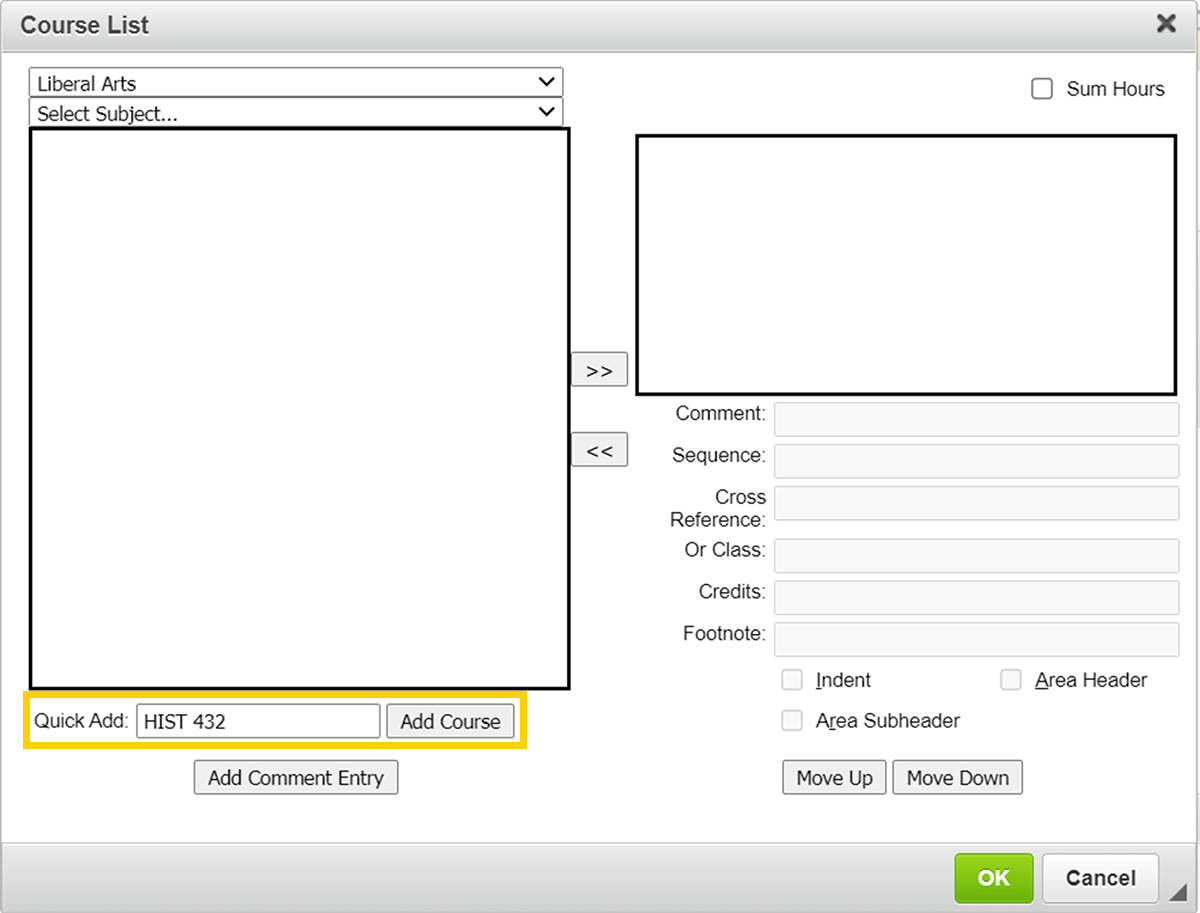
You can insert courses into a course list using one of the following methods:
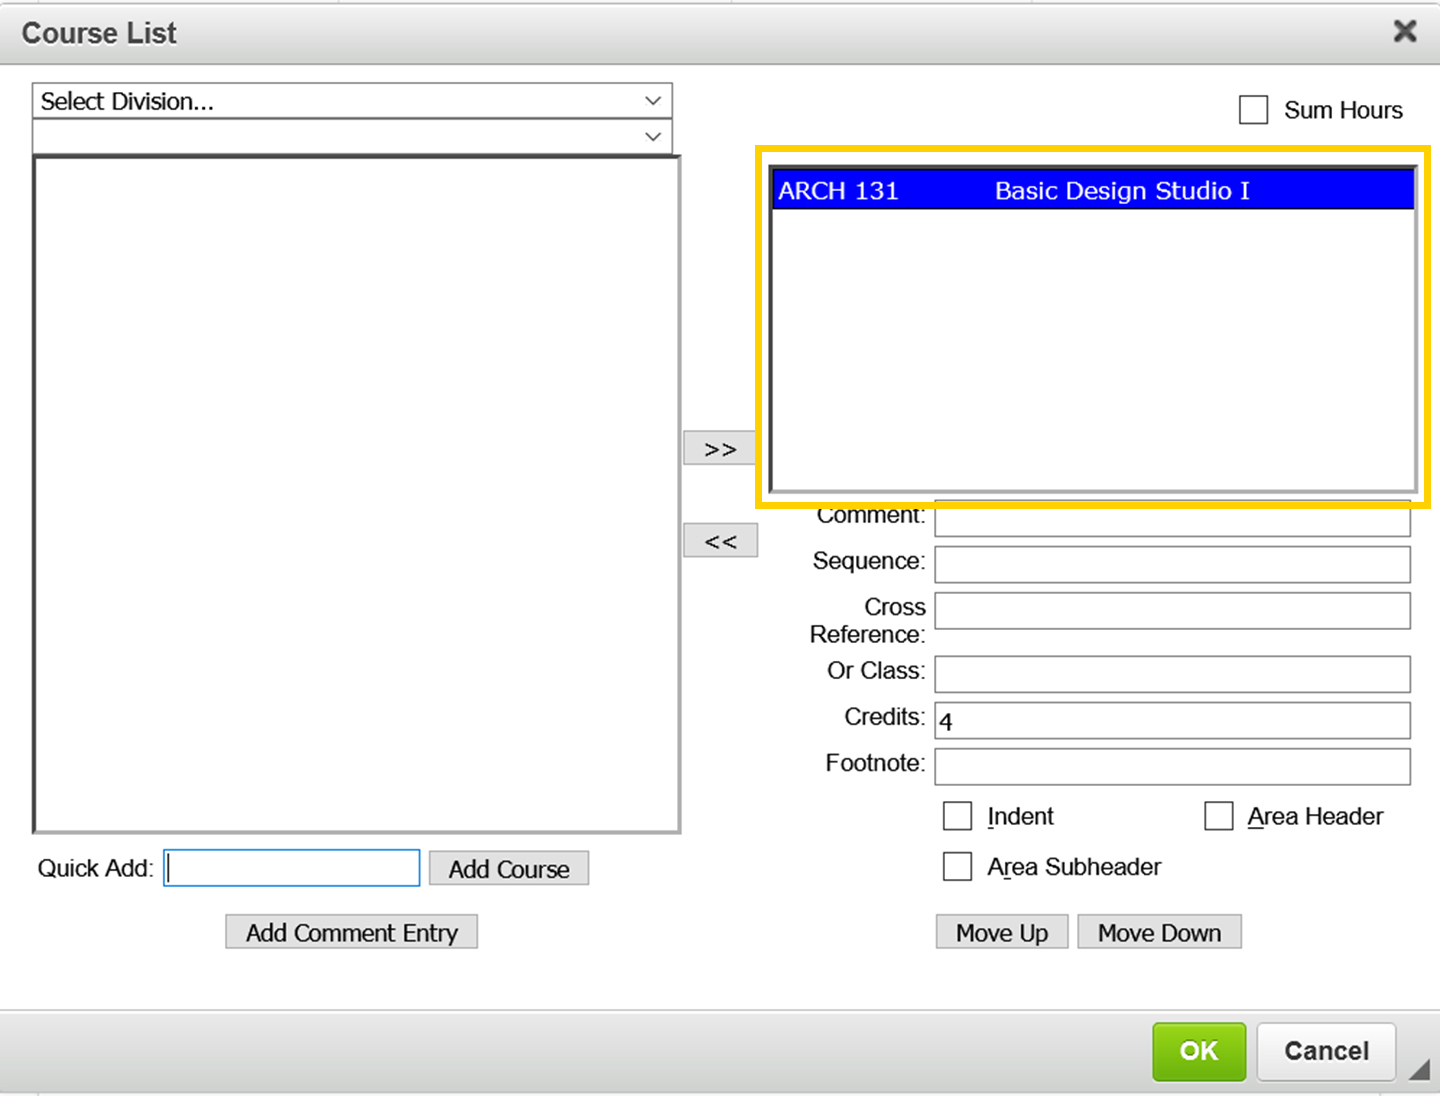
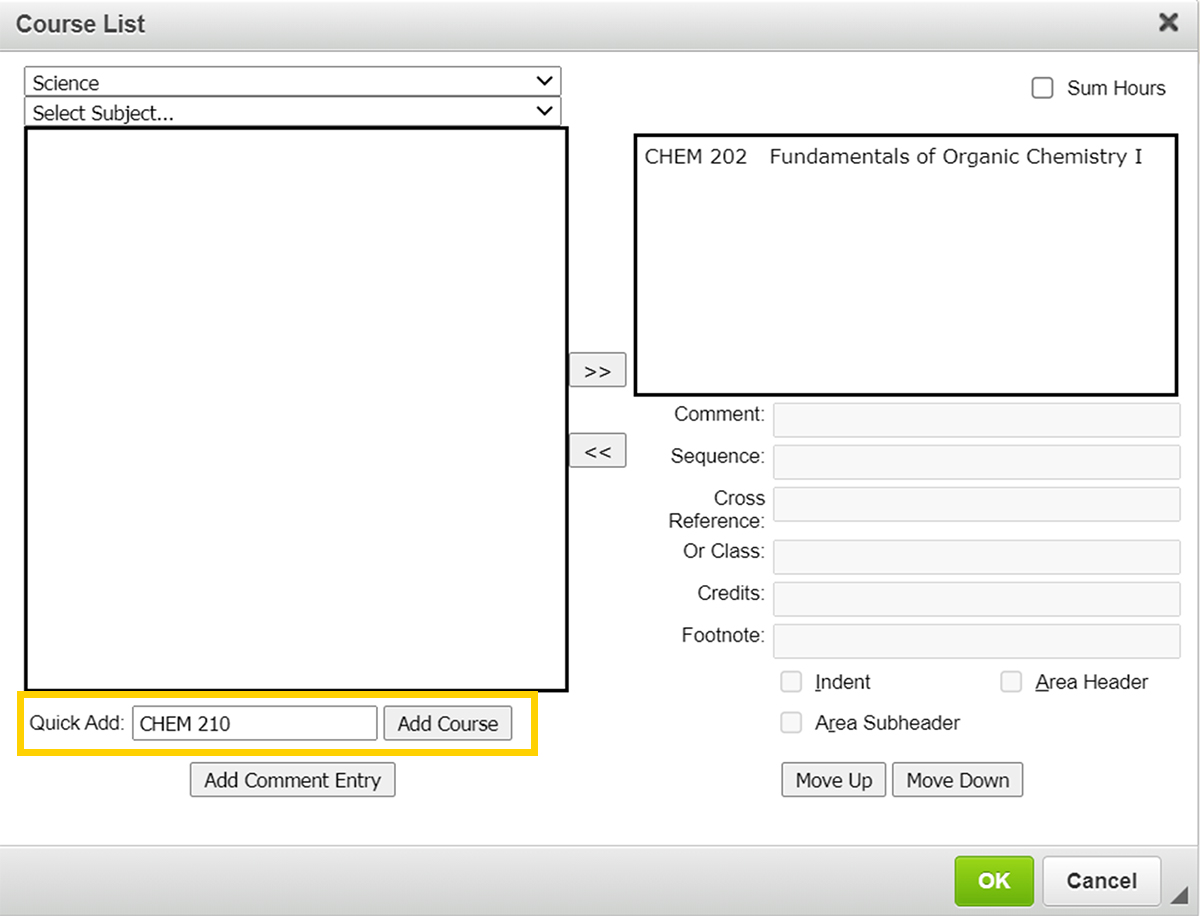
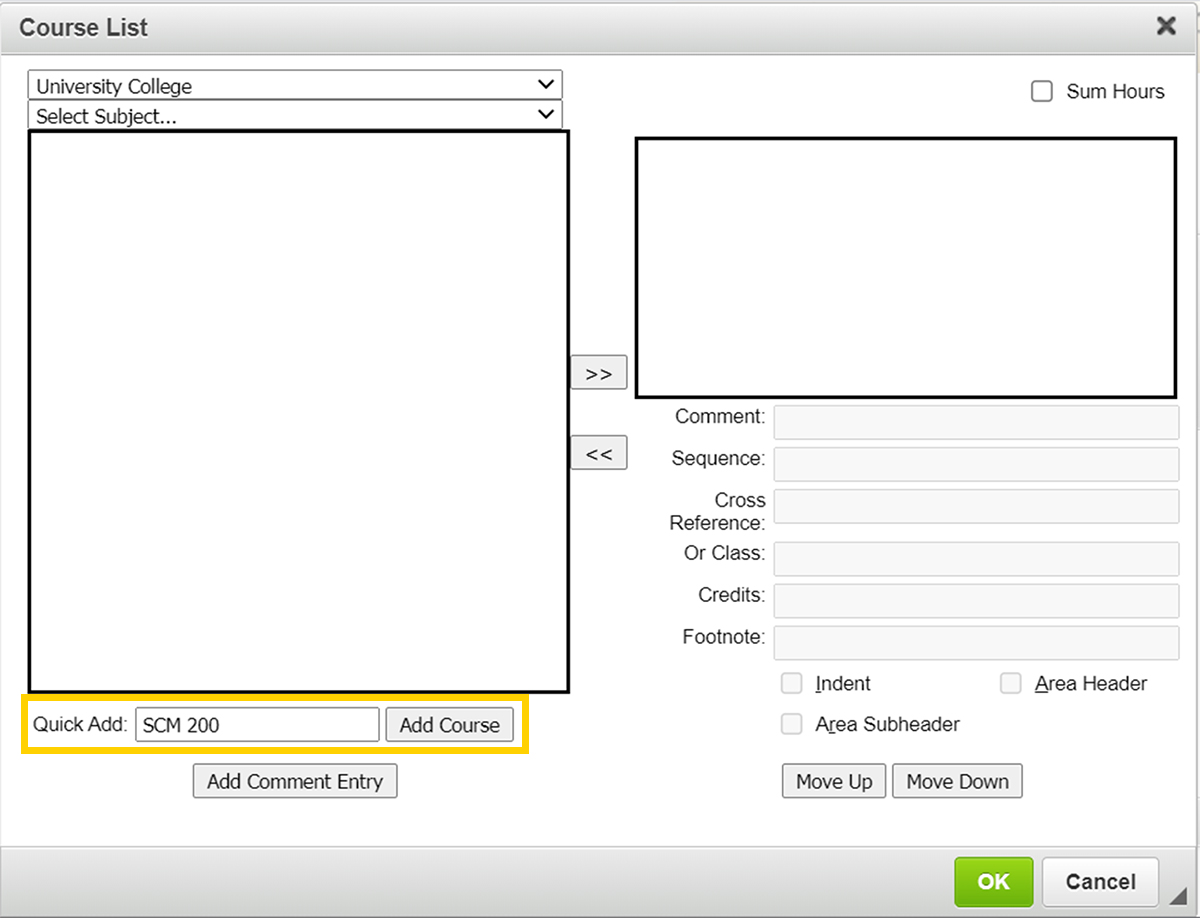
In the Quick Add field, type the desired course (abbreviation + number).
The course abbreviation should be entered in all capital letters. The system may return a Course Not Found error if the abbreviation is entered in lowercase letters.
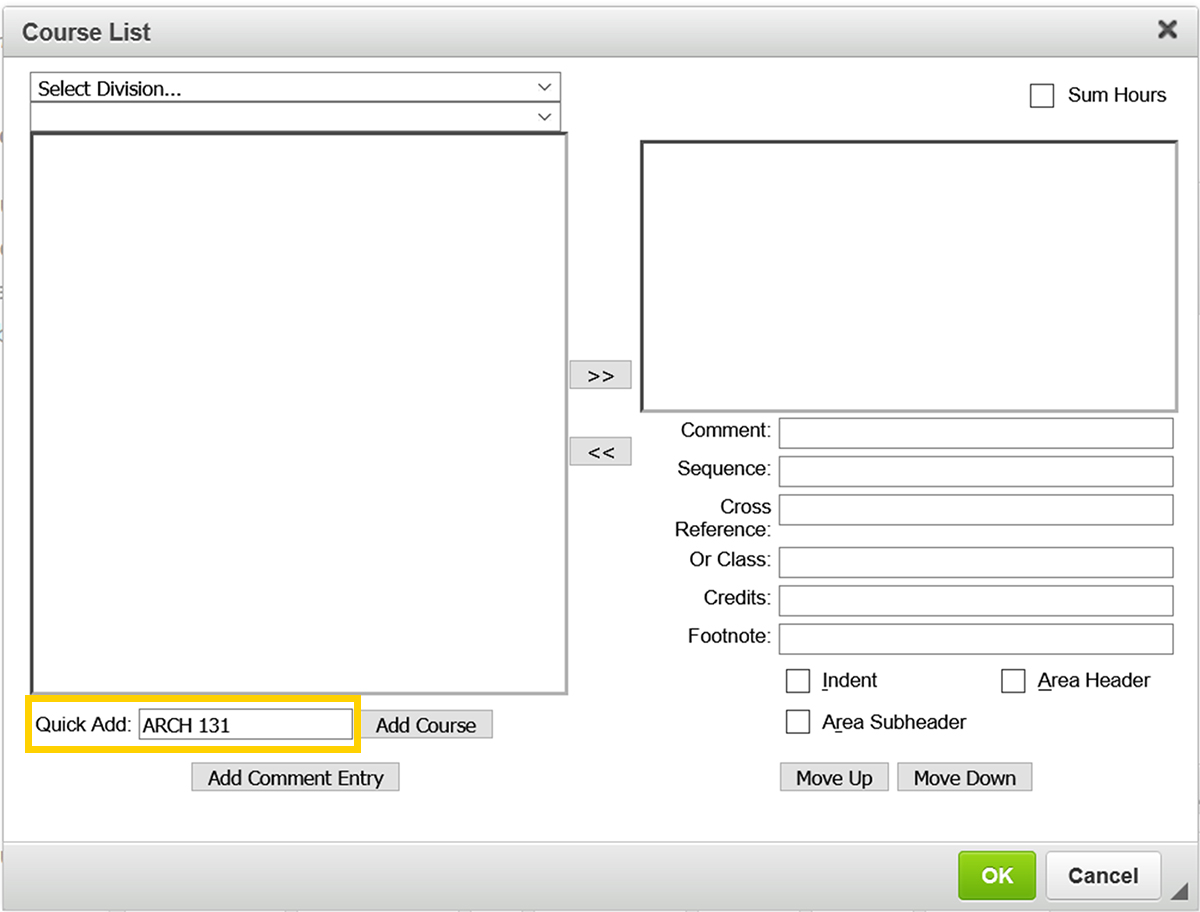
Once the course is entered, click the Add Course Button or press your enter key.
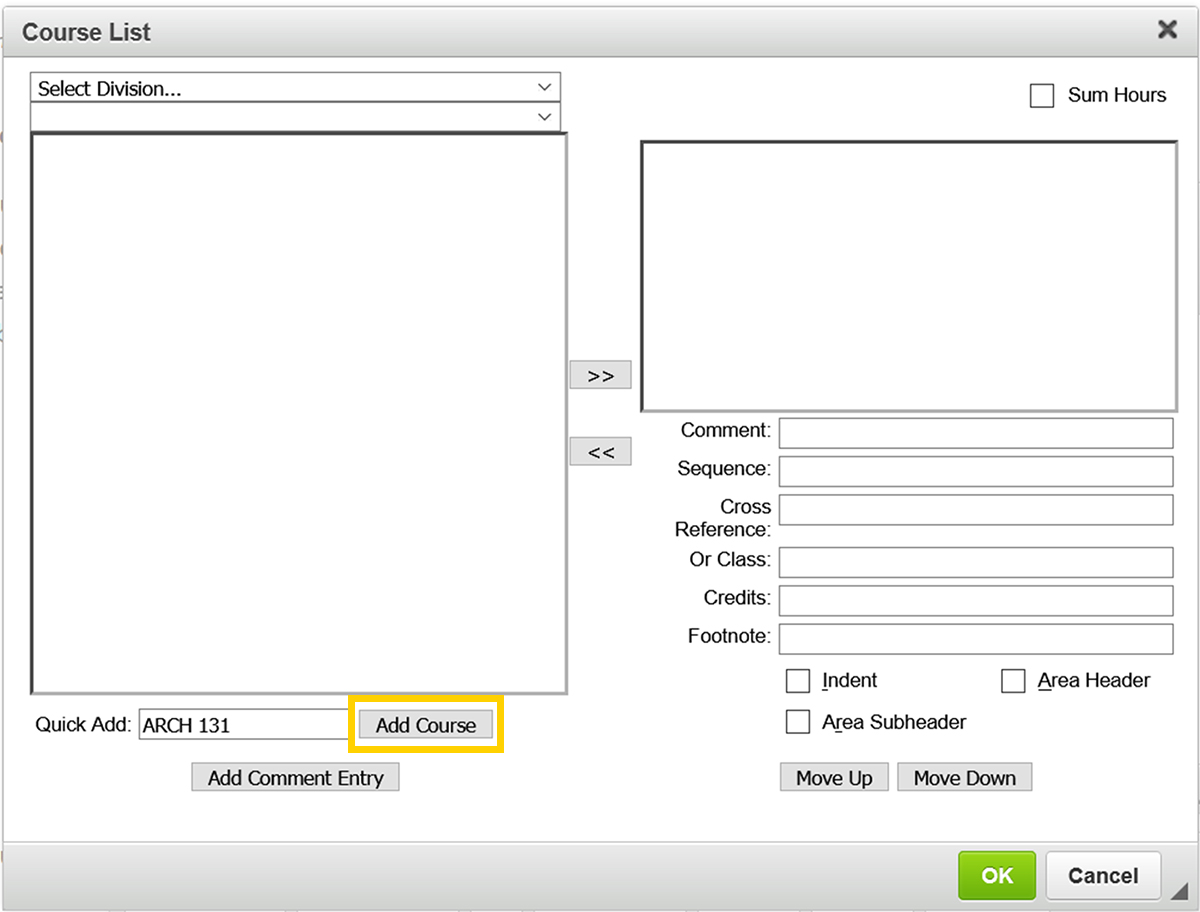
The entered course has been added to your Course List.
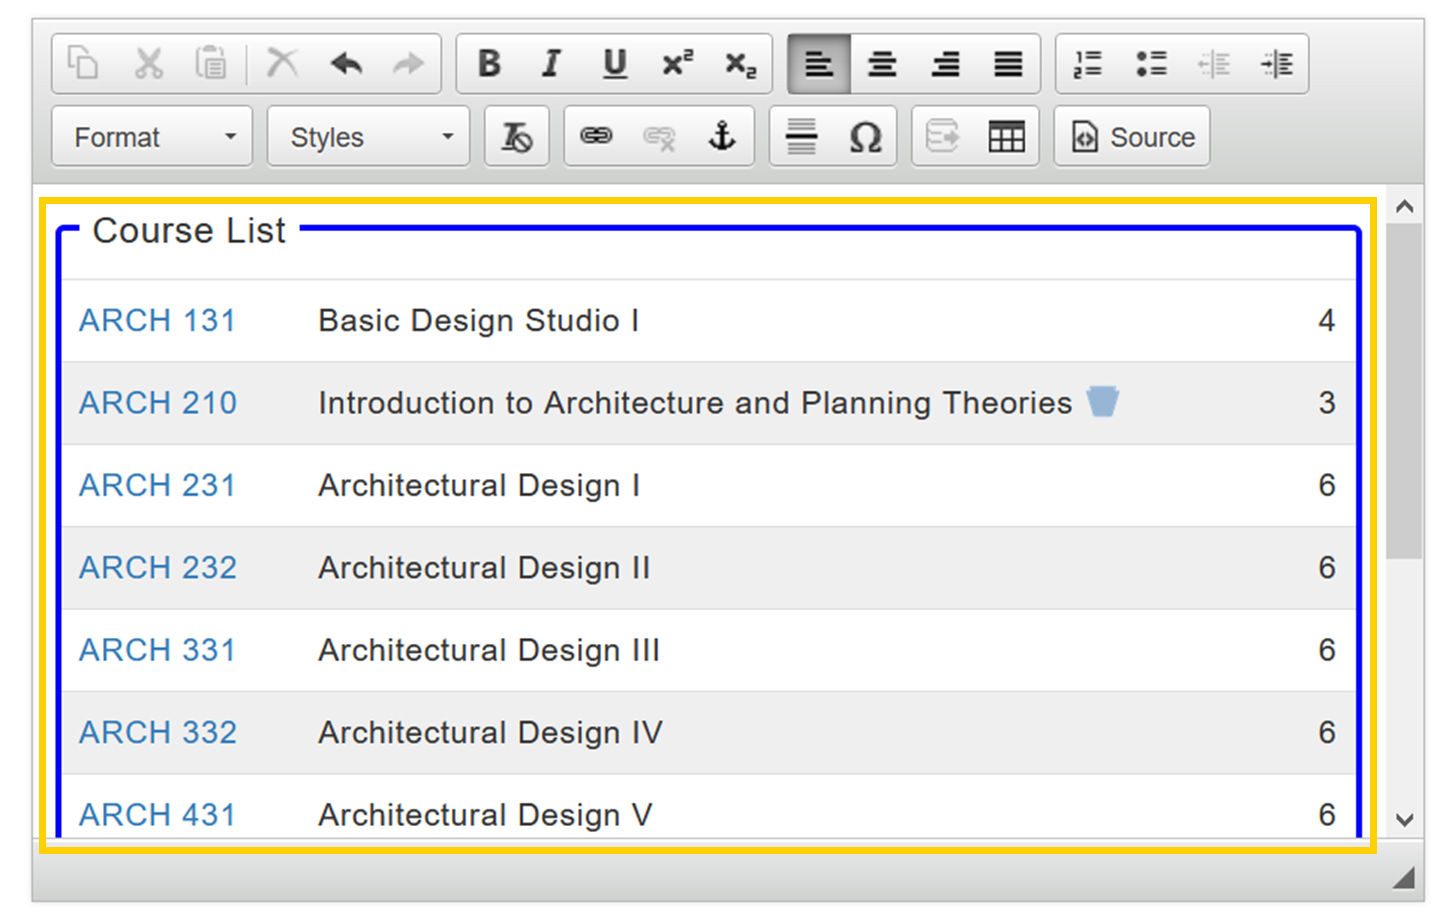
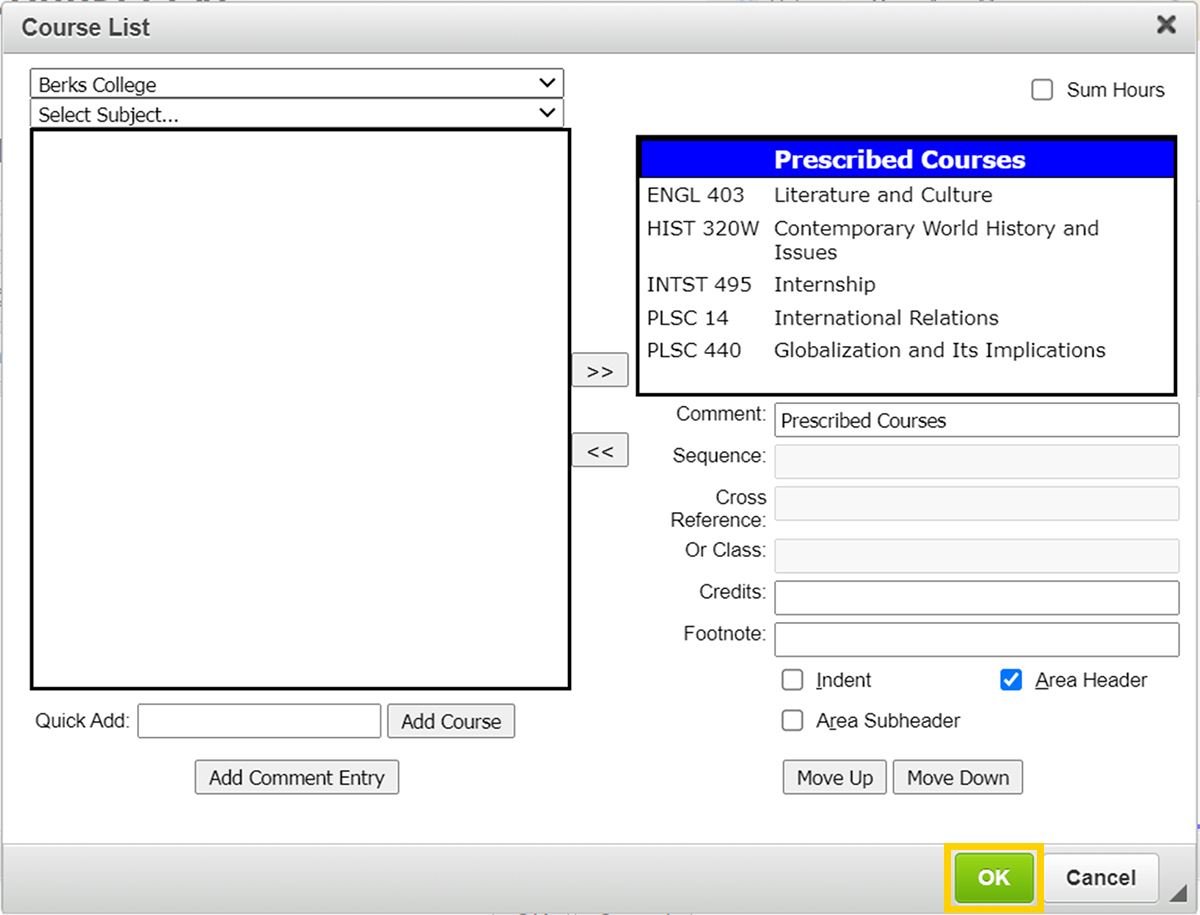
Once all courses are added, click the green OK Button in the Course List Editor to save your changes back to the proposal.
The newly added courses now appear on your proposal.
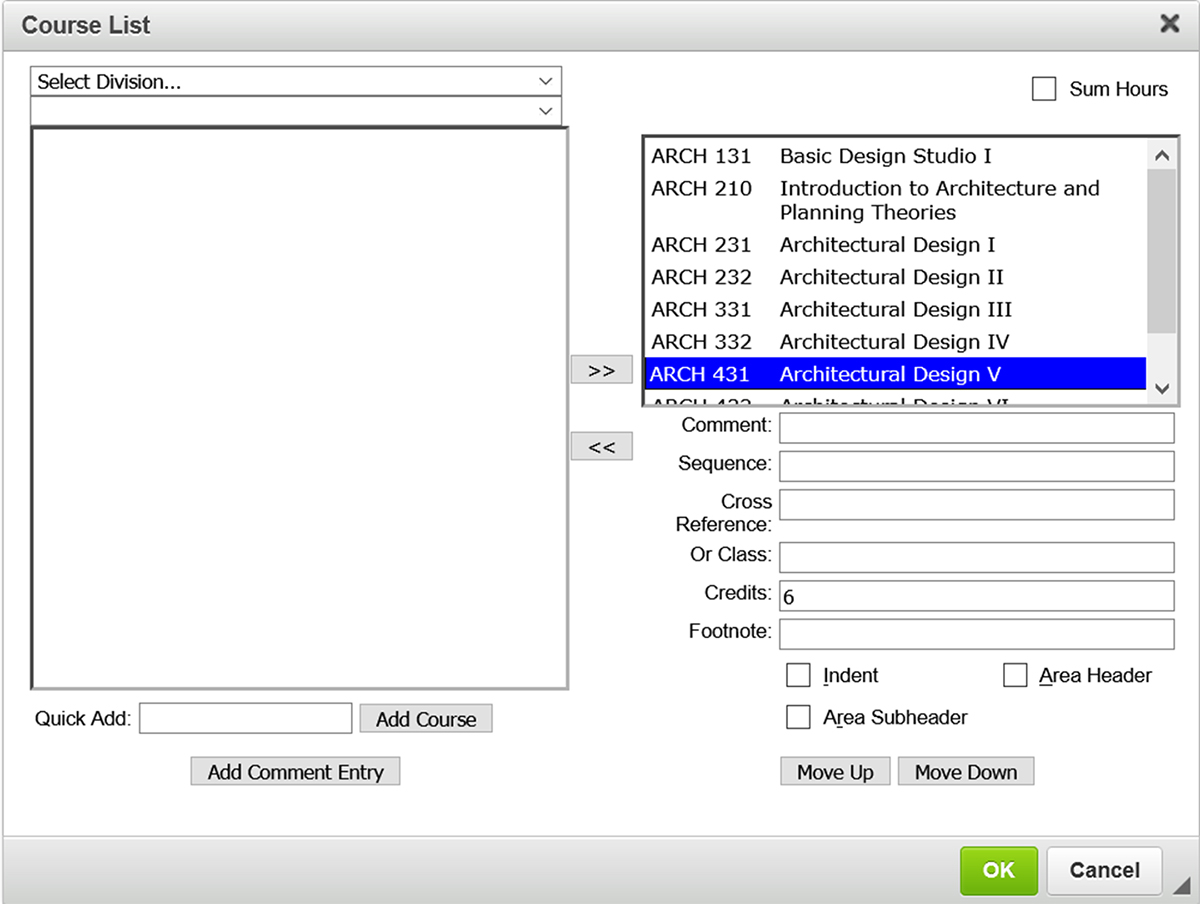
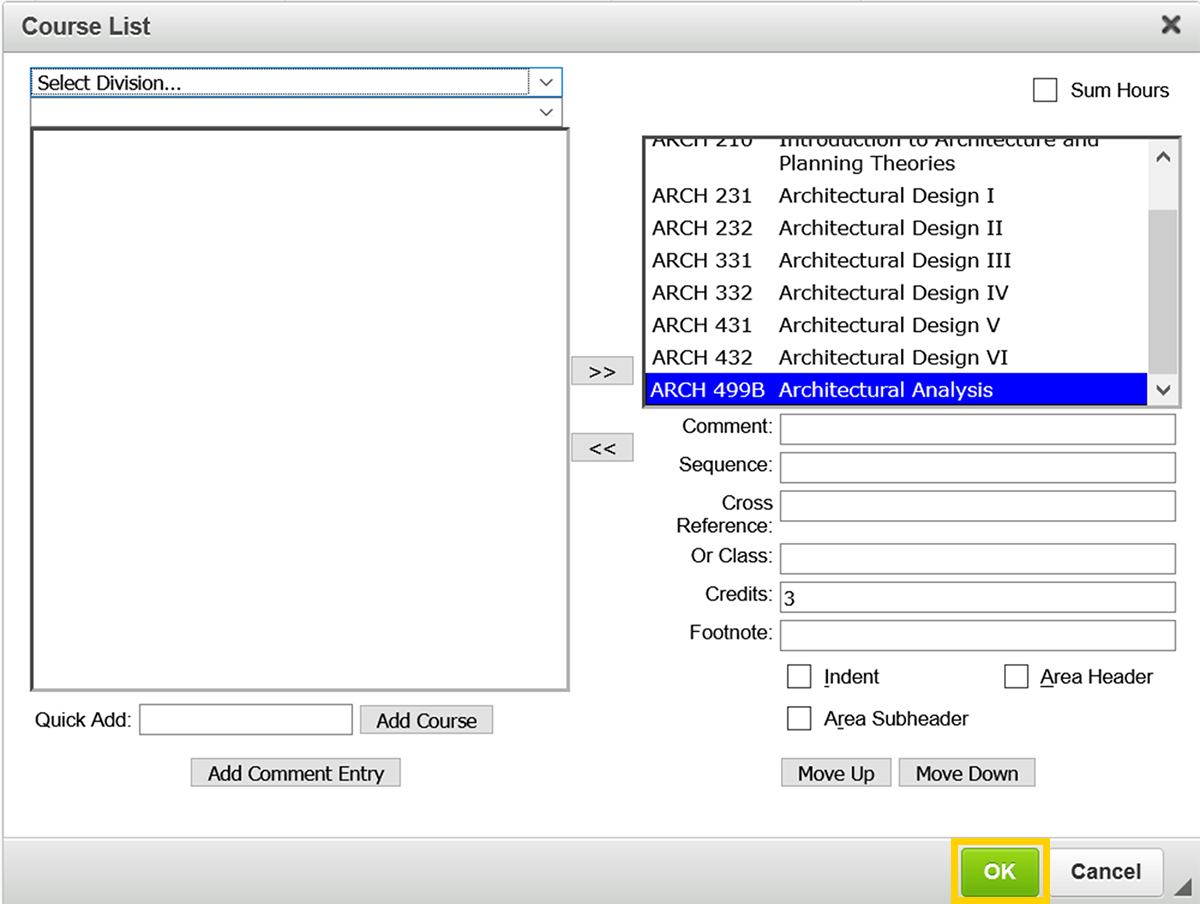
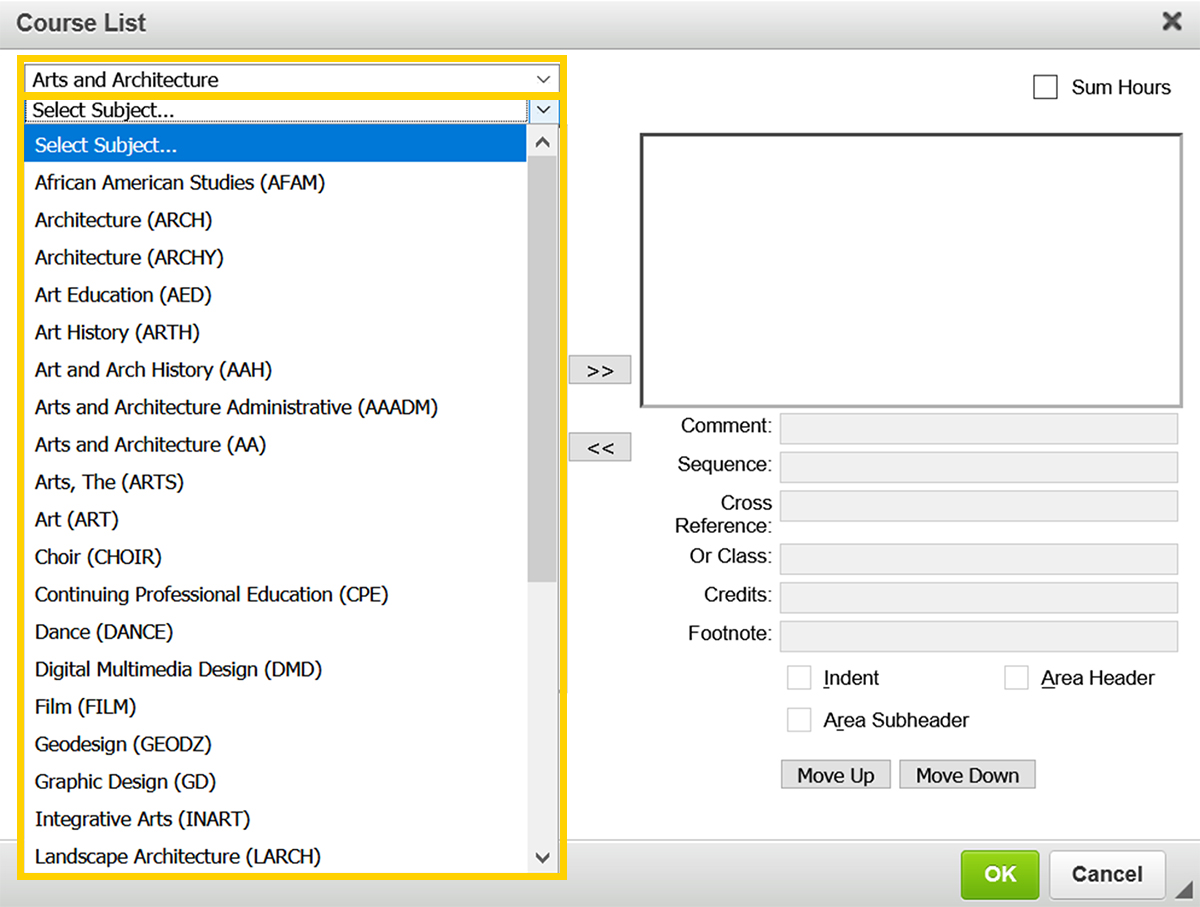
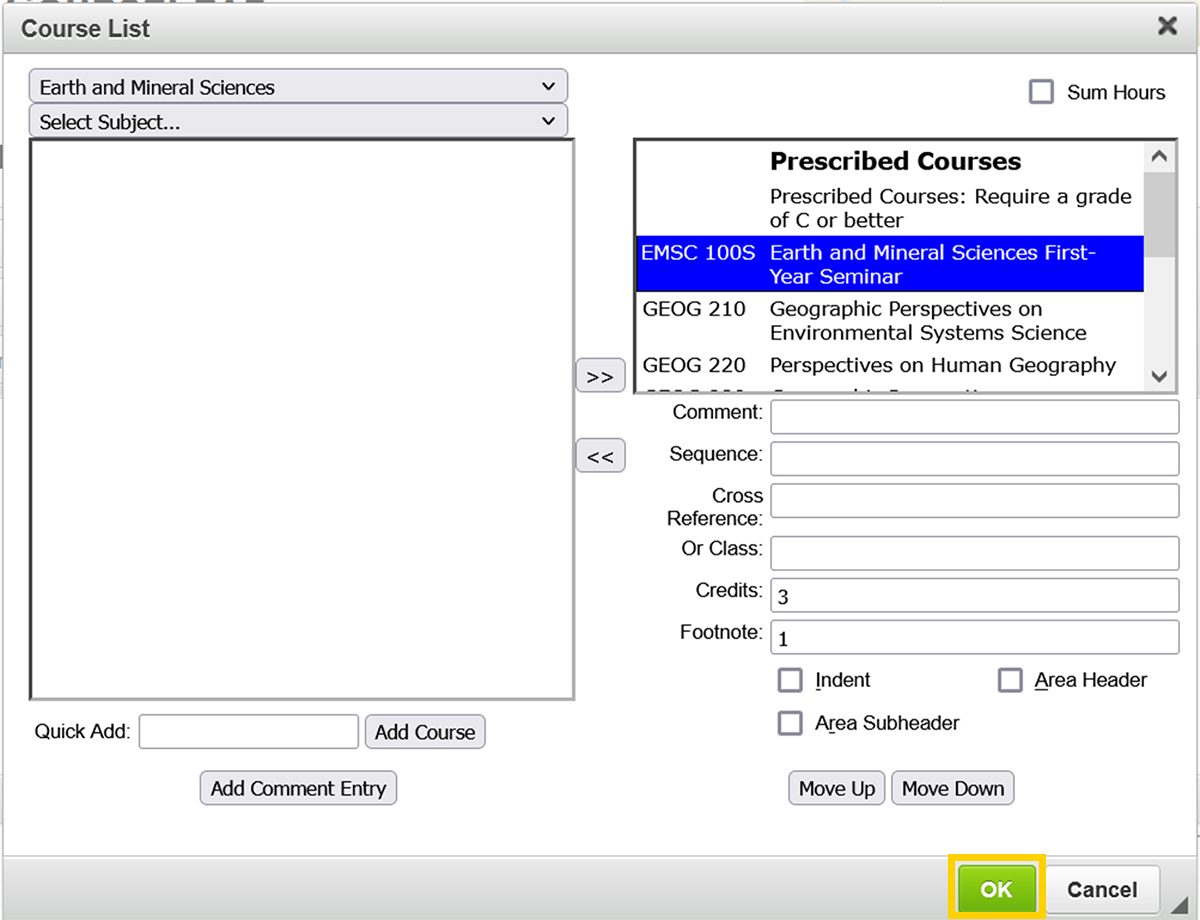
Select College and Subject from the dropdown menus in the upper left-hand corner of the Course List Editor. The College selection will populate the Subject dropdown menu with all course subjects offered by that college.
The Course Inventory will be populated with all courses within the chosen course subject.
Click on the desired course from the Course Inventory that appears. The course inventory only includes courses that are currently active.
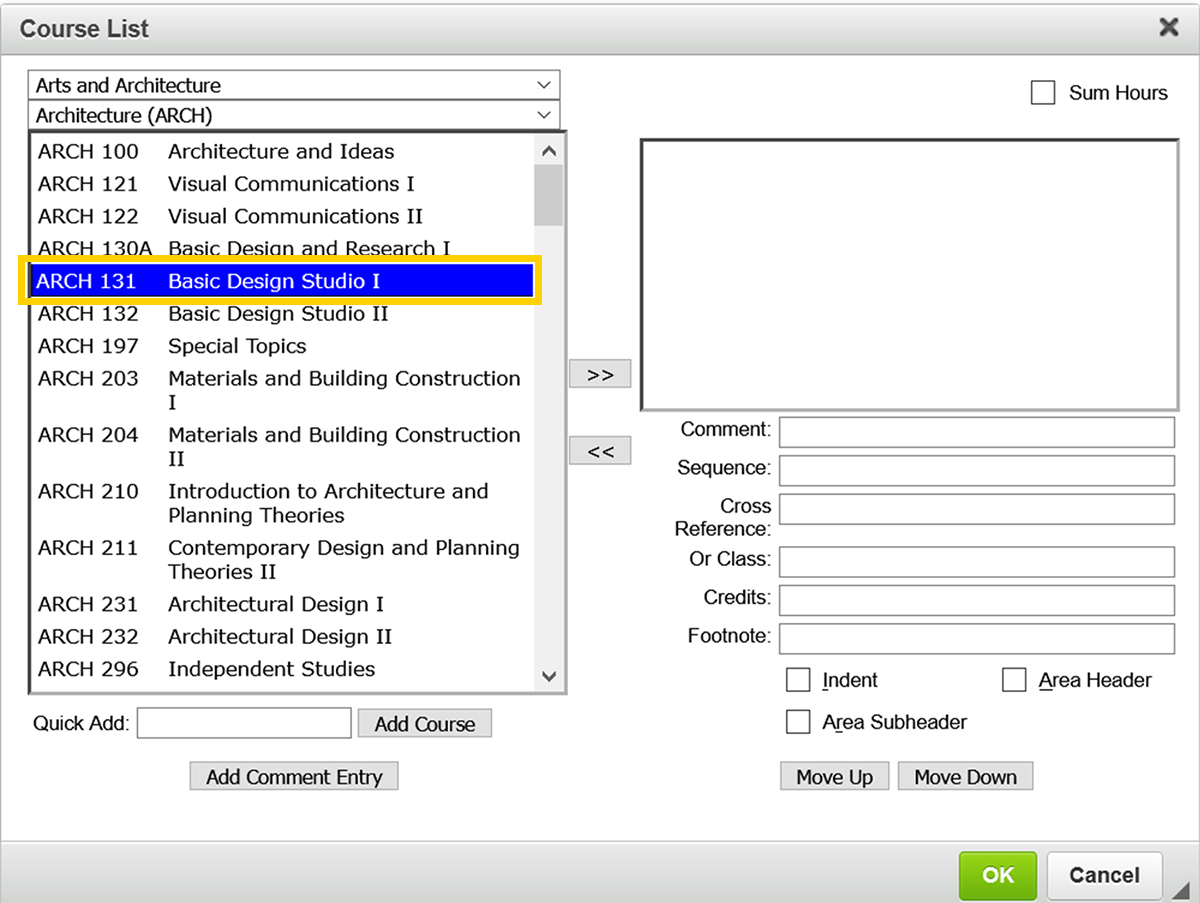
Click the Arrow Right Button to add the selected course to your Course List.
Once all courses are added, click the green OK Button in the Course List Editor to save your changes back to the proposal.
The newly added courses now appear on your proposal.
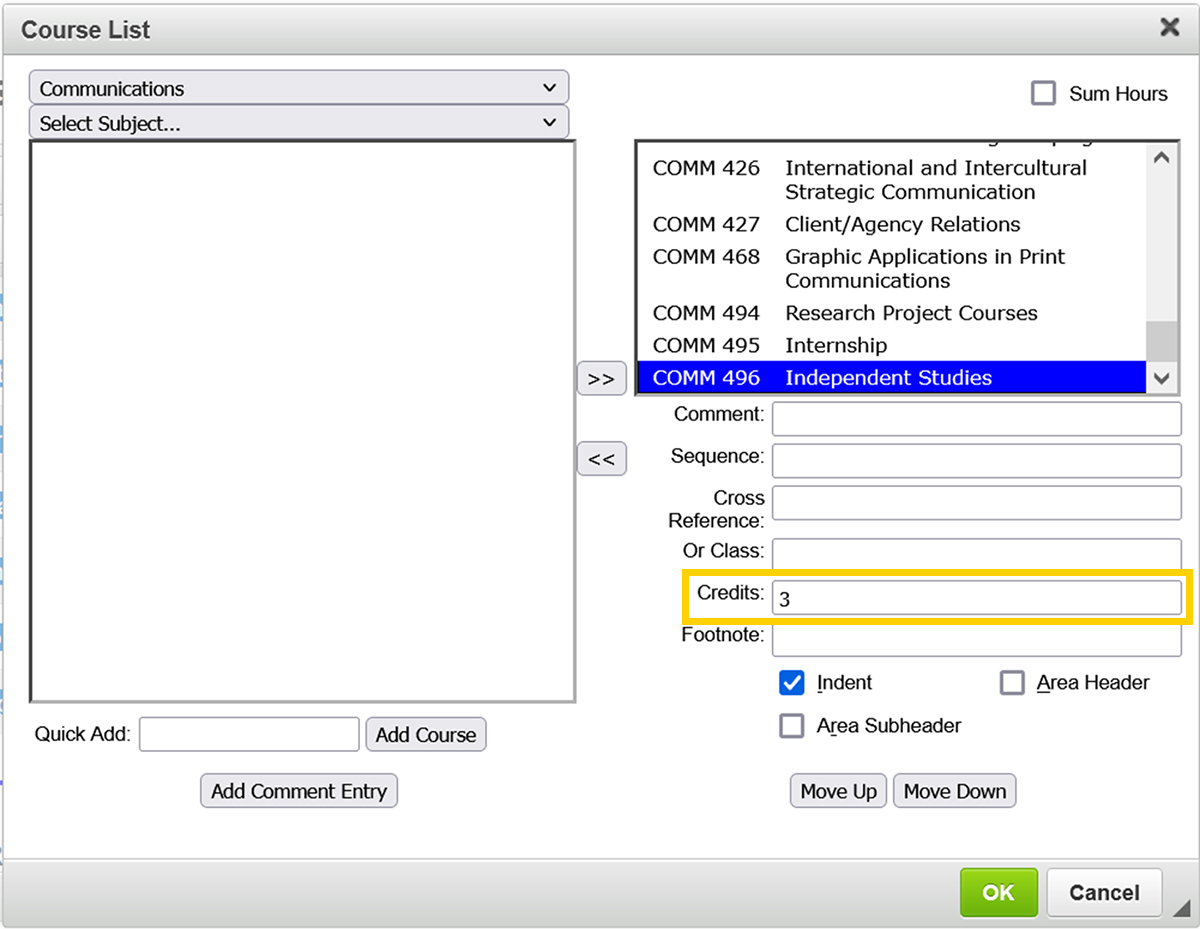
When adding a course to a course list, the Course List Editor will automatically import the currently approved credit value for the course. For courses with a variable credit range, it is important to make sure that the credit value displayed in the Credits field is the correct number of credits that should count for this course in the program's curriculum. The credit value displayed in the Credits field is the value that will be coded on the degree audit for the program.
If the variable credit range for a course in your course list is not correct for your program's curriculum, modify the credits value in the Credits field to the correct value. For example, if the course is approved with 1-18 credits but you only wish it to count for 3 credits in your program's curriculum, the credit value imported in the Credits field should be modified from "1-18" to "3".
Note: The credit value entered should be within the approved credit range for the course. The credit value entered can be either a fixed value ("3") or a credit range ("1-3").

In the Course List Editor, click on the course you want to remove from the Course List.
Click the Arrow Left Button to remove the selected course from your Course List.
Click the green OK Button in the Course List Editor to save your changes back to the proposal.
The course no longer appears in the course list on your proposal.
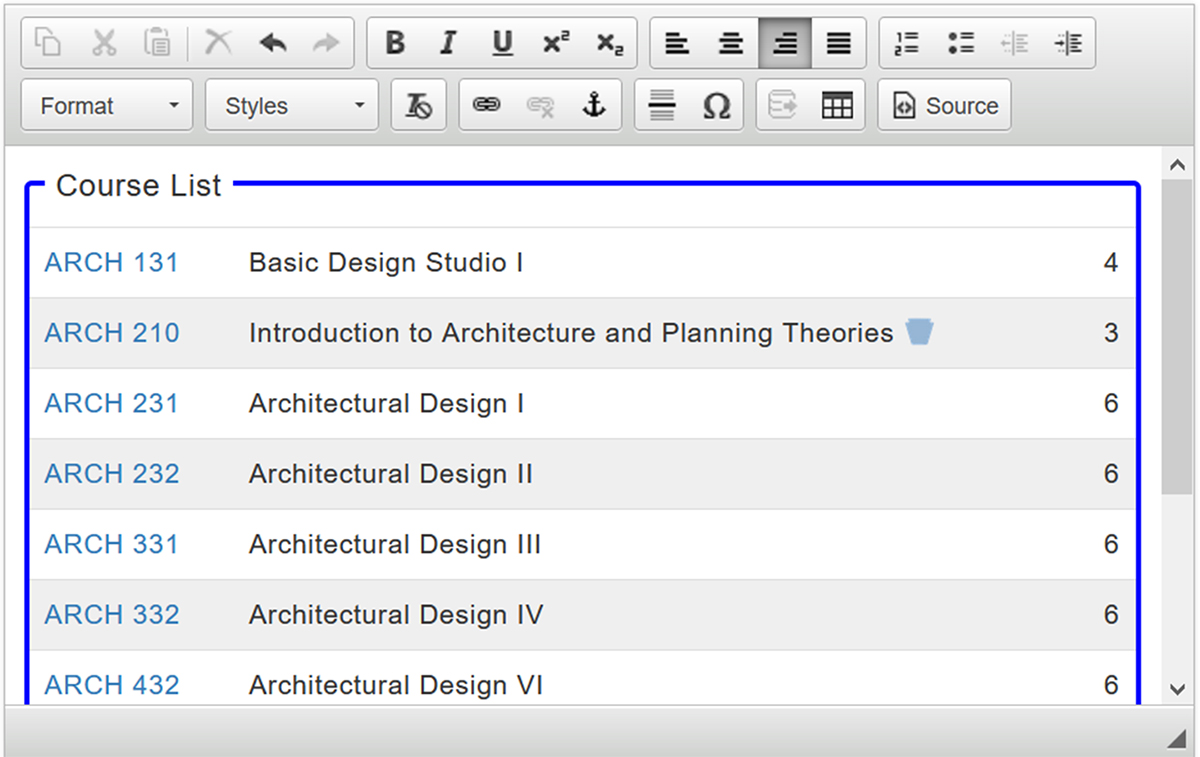
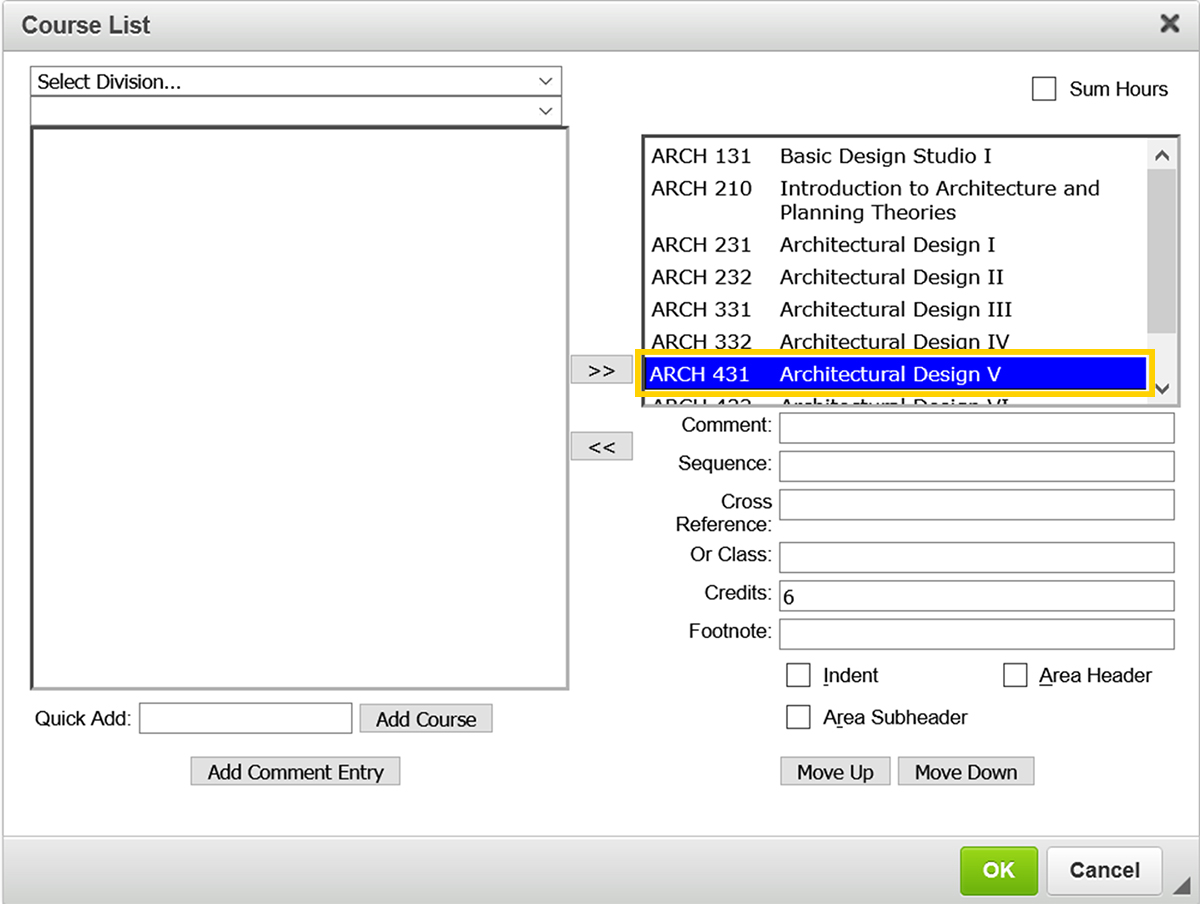
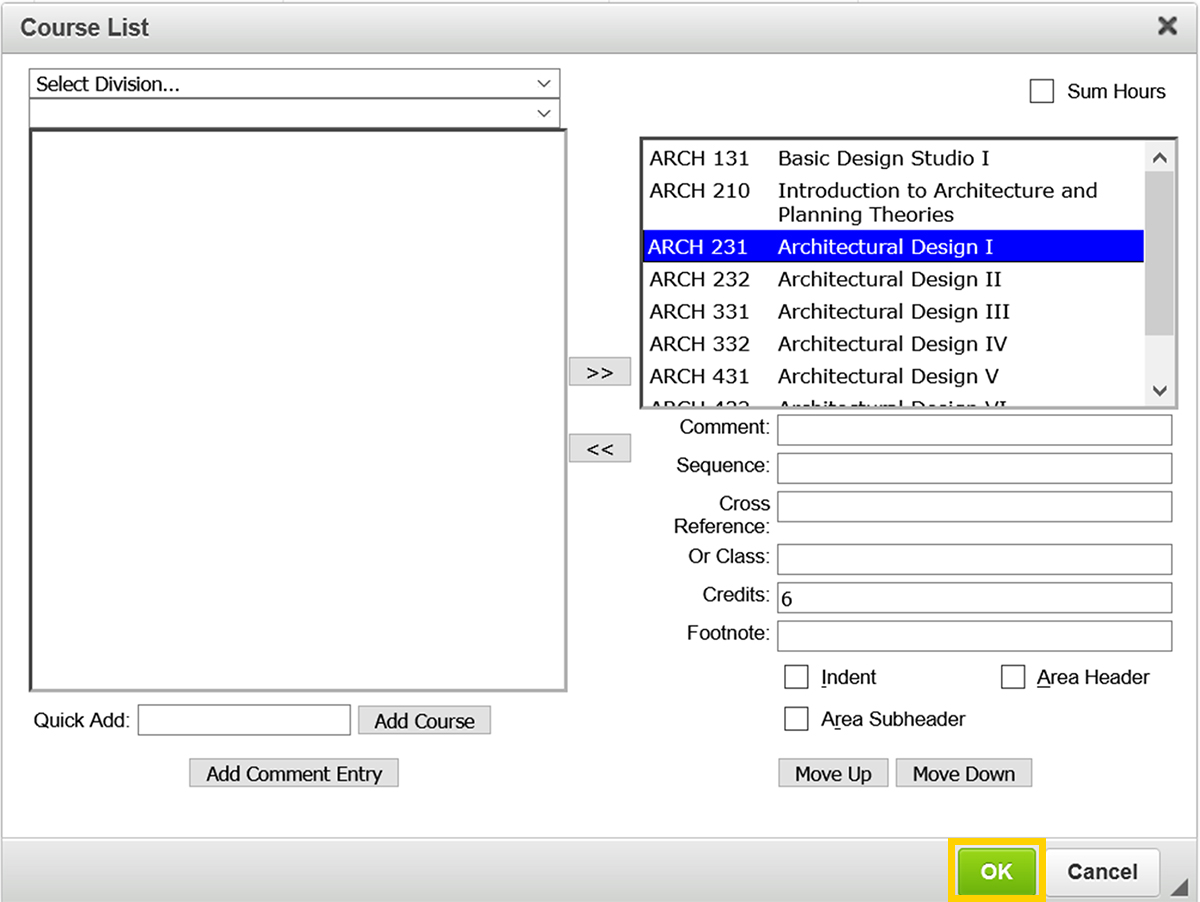
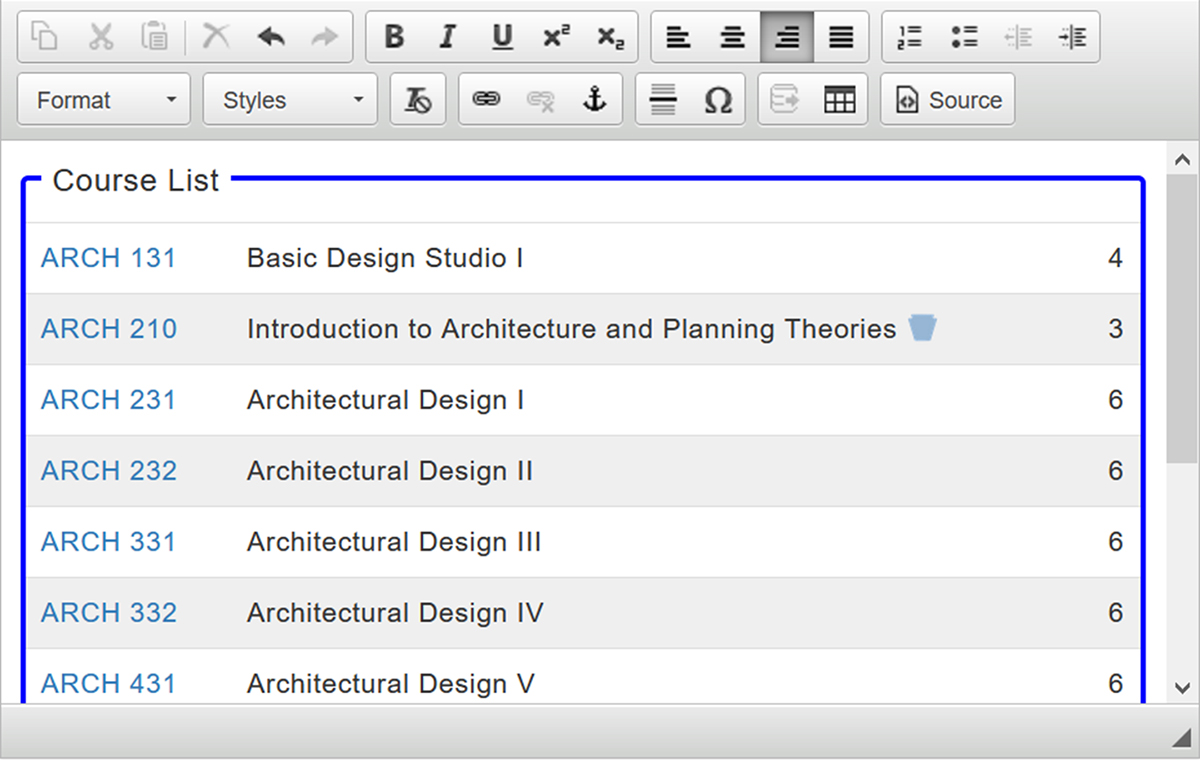
In the Course List Editor, click on the course you want to reorder in the Course List.

Click the Move Up Button or Move Down Button to change the order of the course in the Course List.
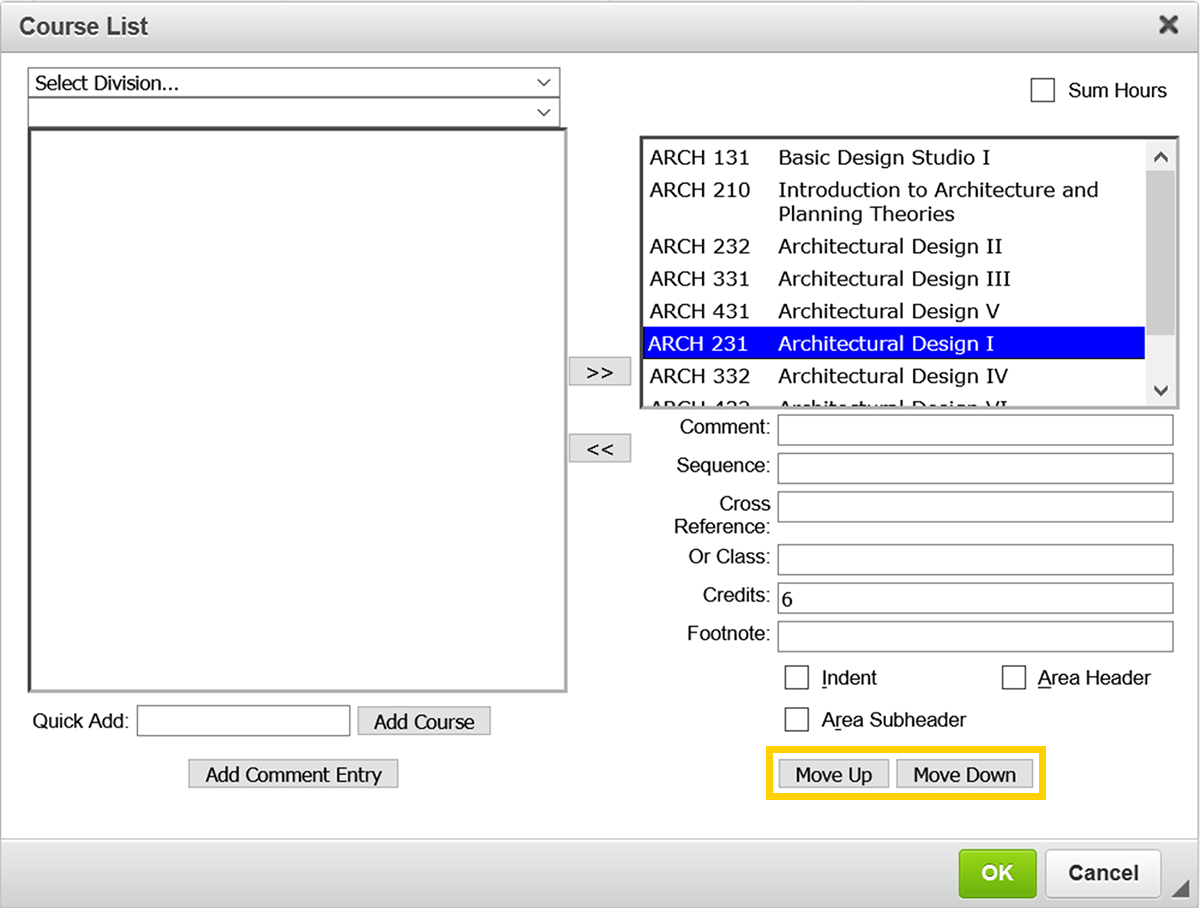
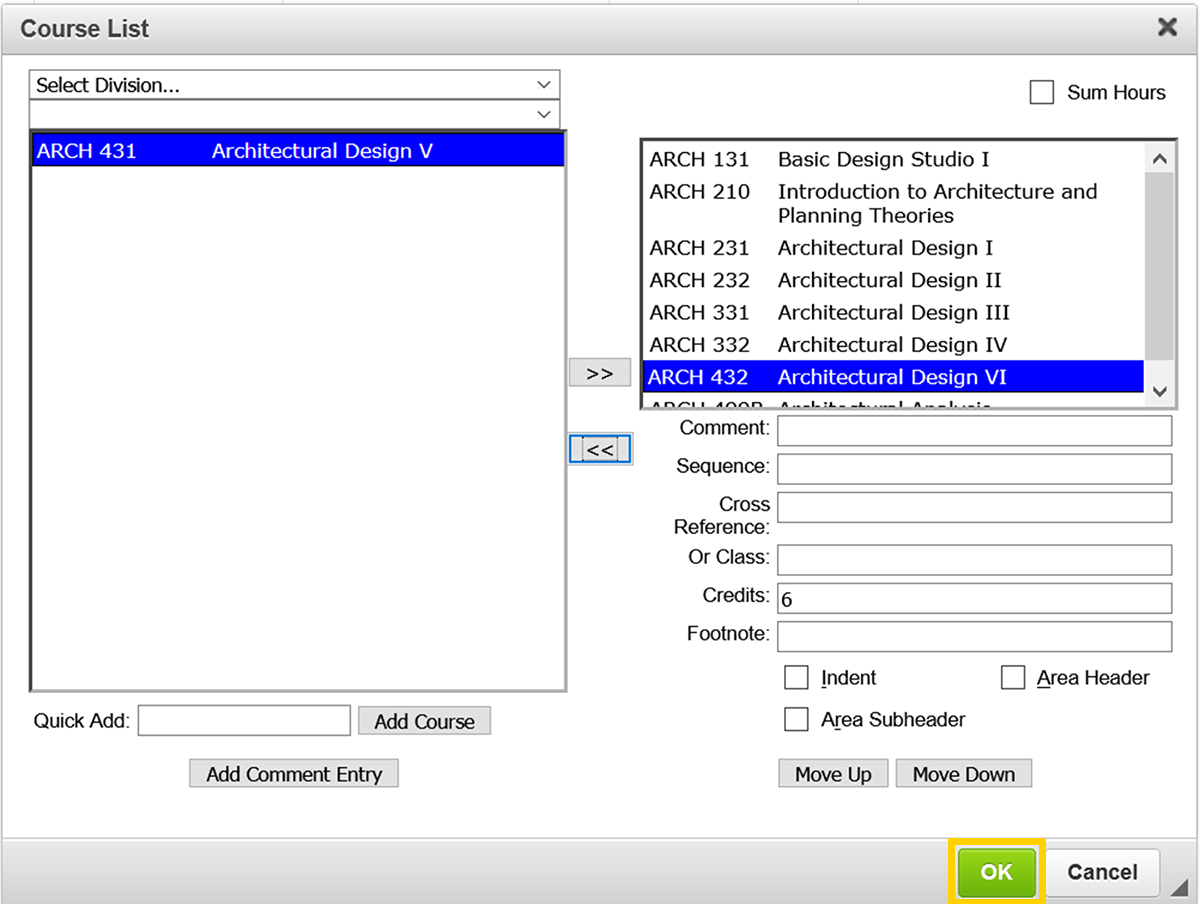
Click the green OK Button in the Course List Editor to save your changes back to the proposal.
The course list is now reordered on your proposal.
For undergraduate curriculum, the header feature is used only for the following headings:
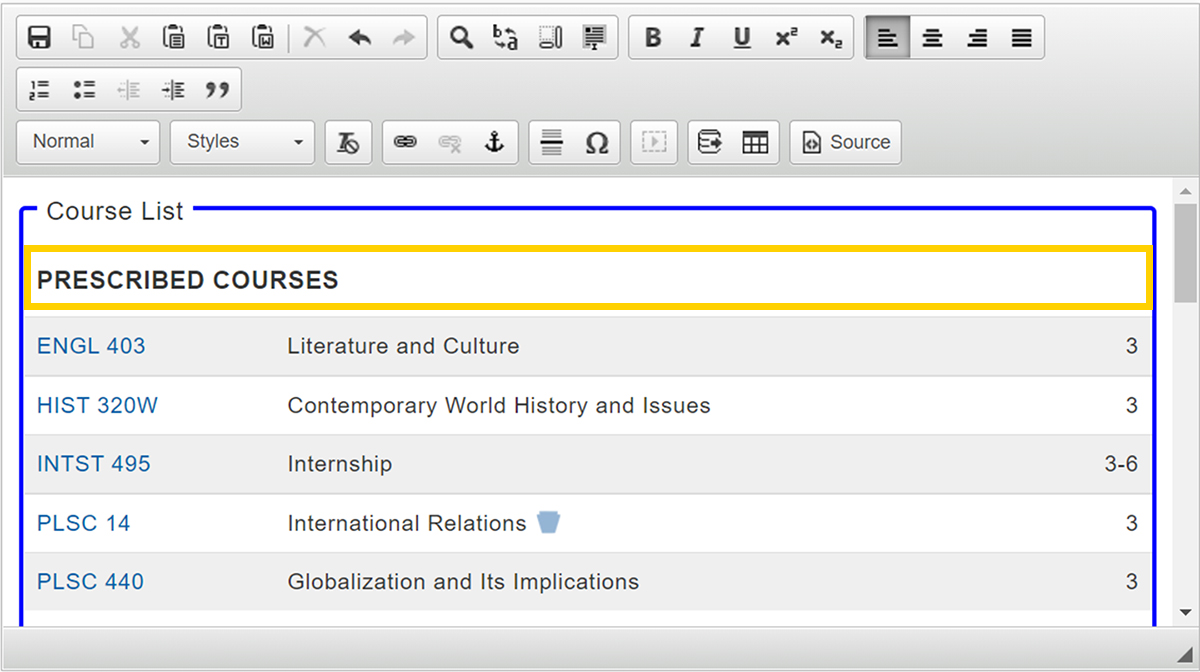
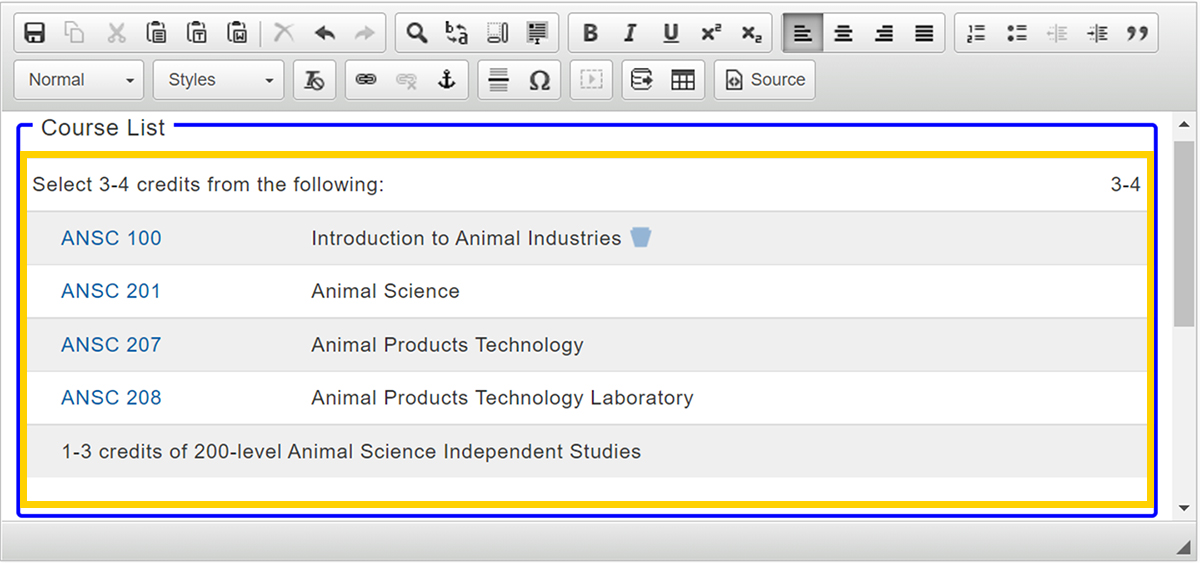
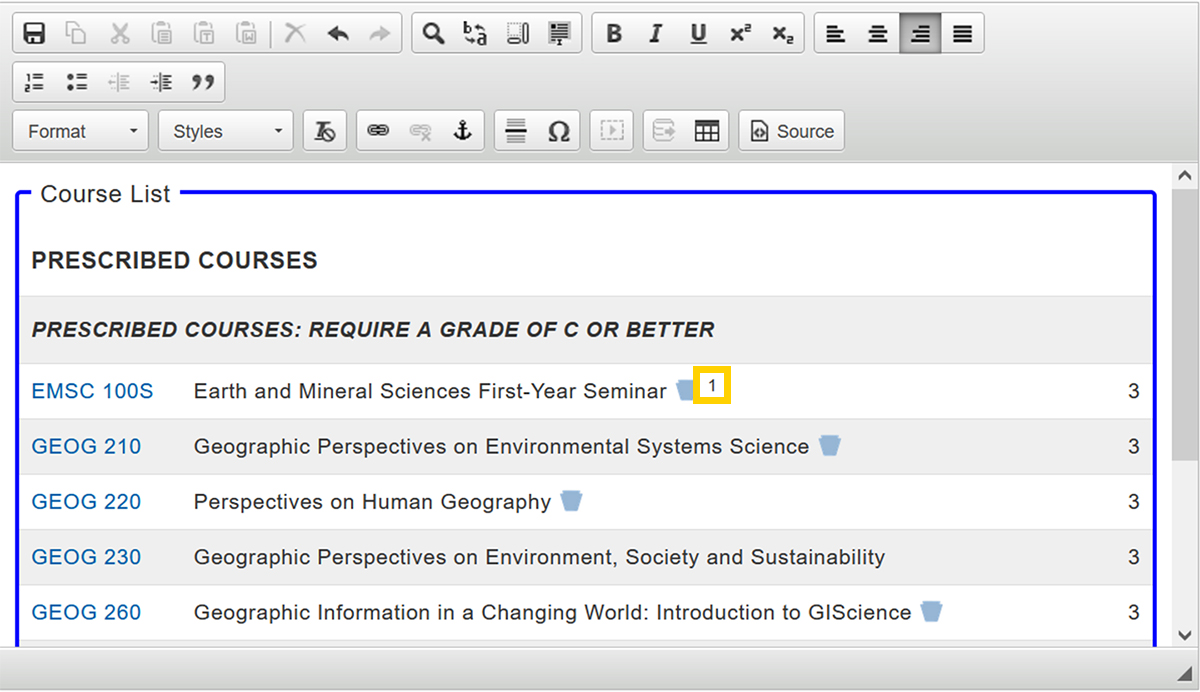
In the course list, headers appear as uppercase bolded text.
Complete the following steps to add a header to your course list:
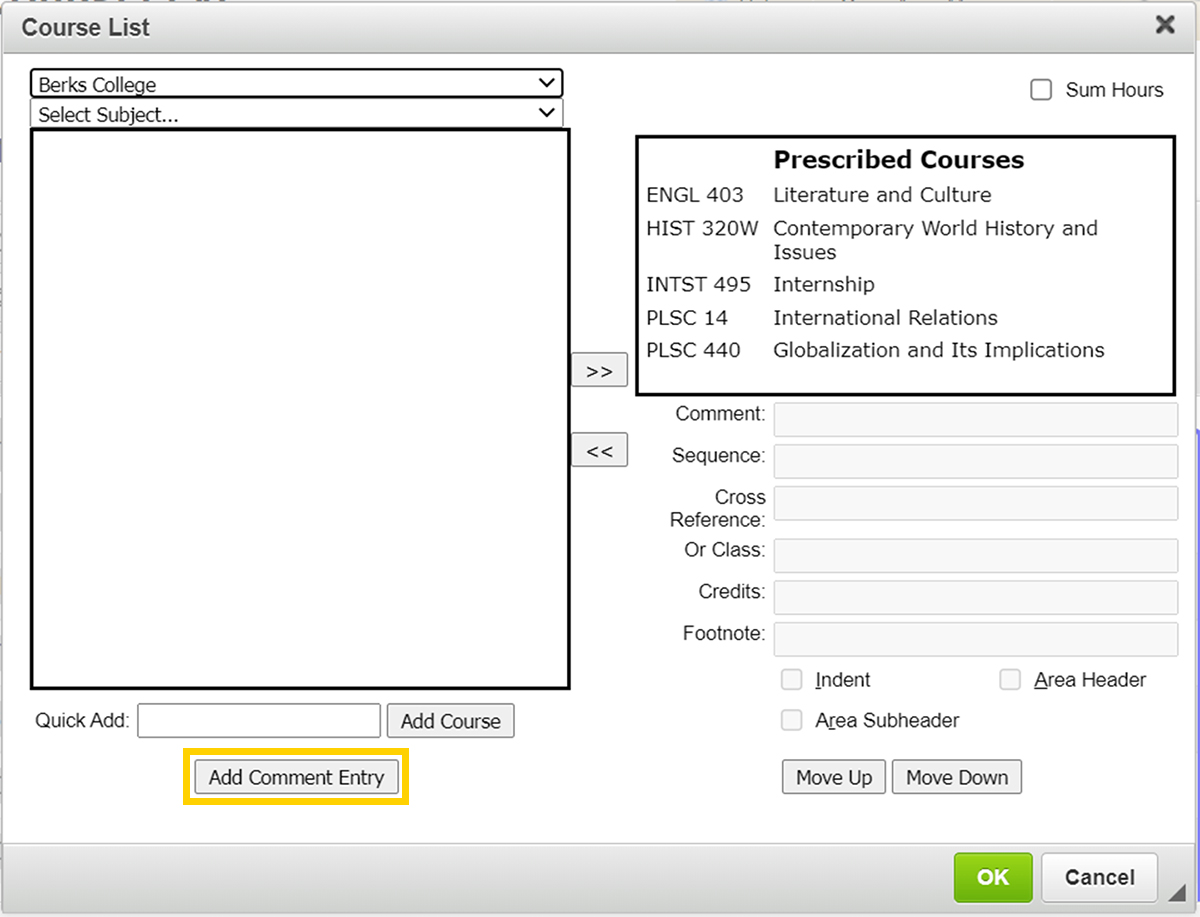
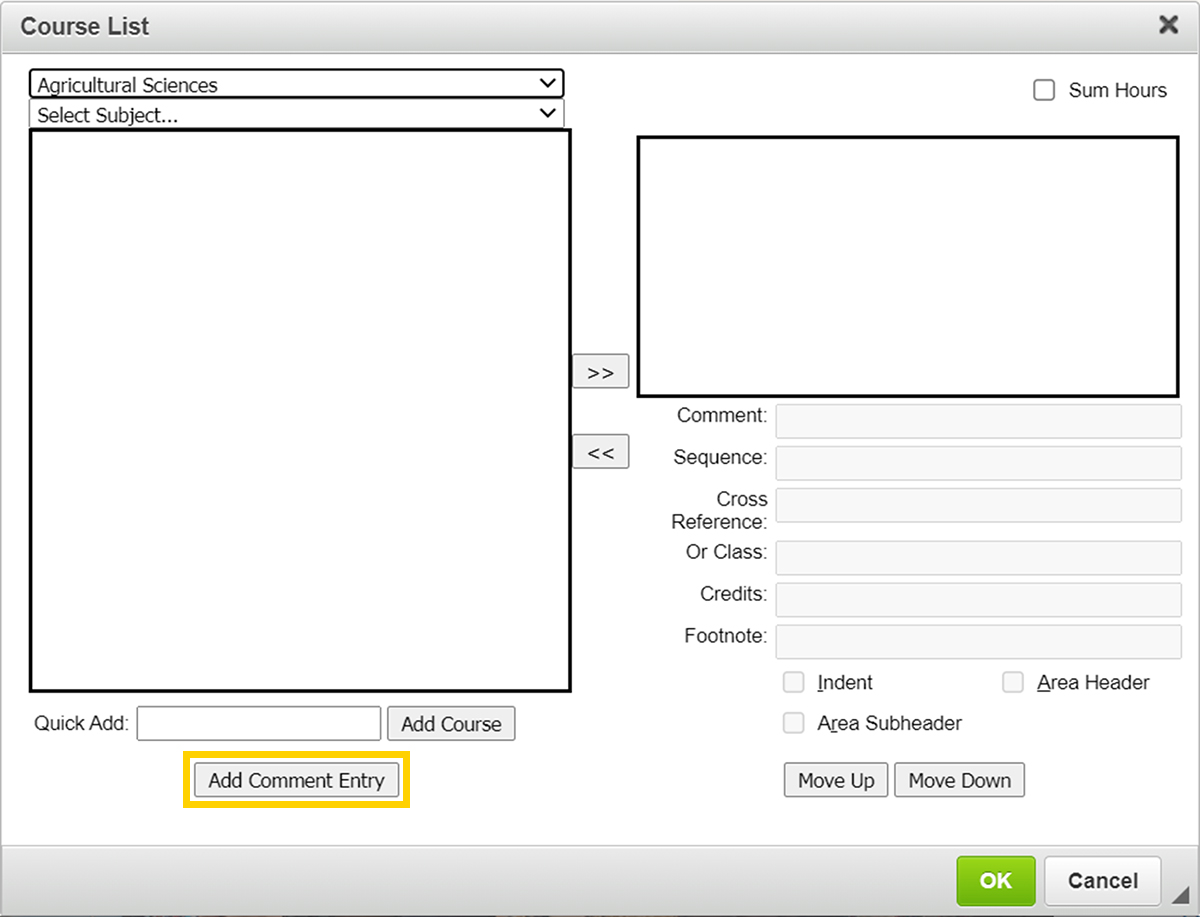
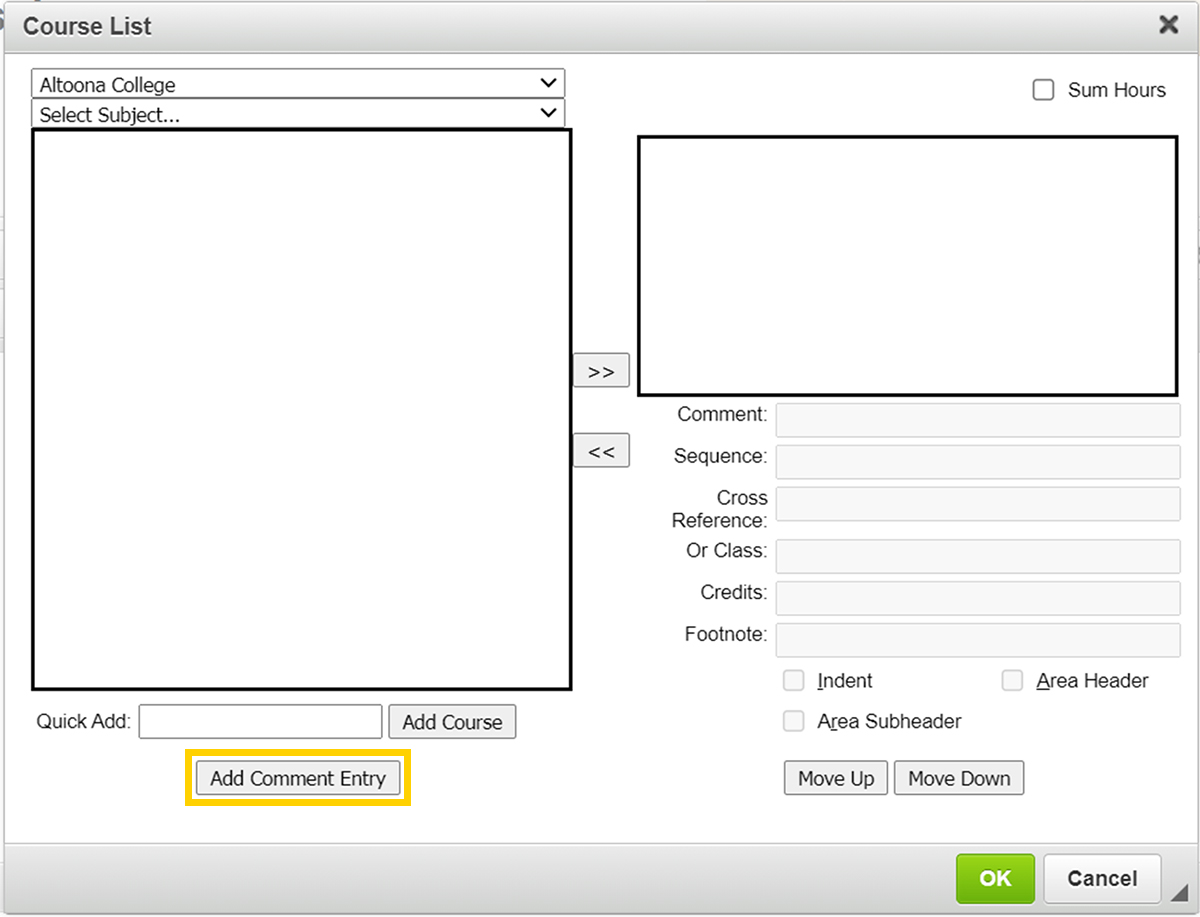
In the Course List Editor, click the Add Comment Entry Button.
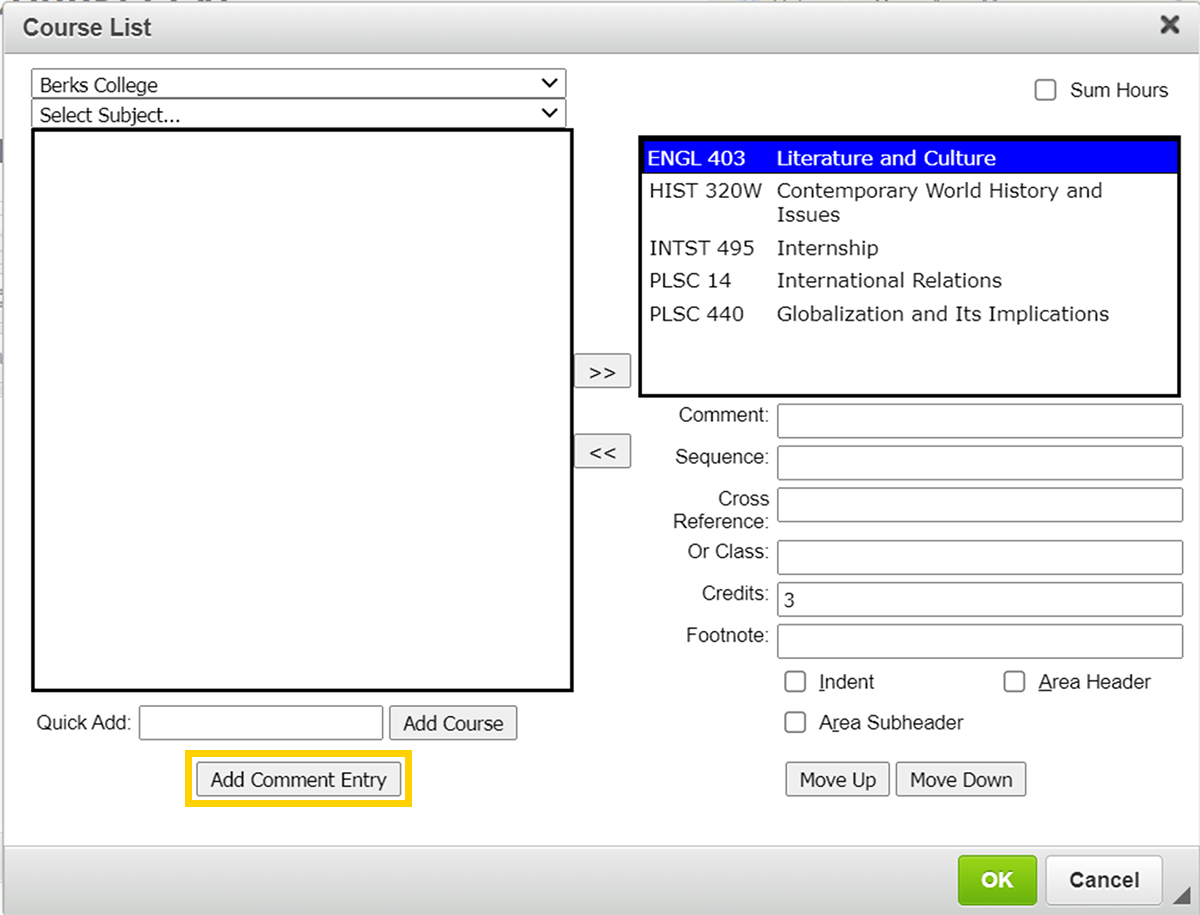
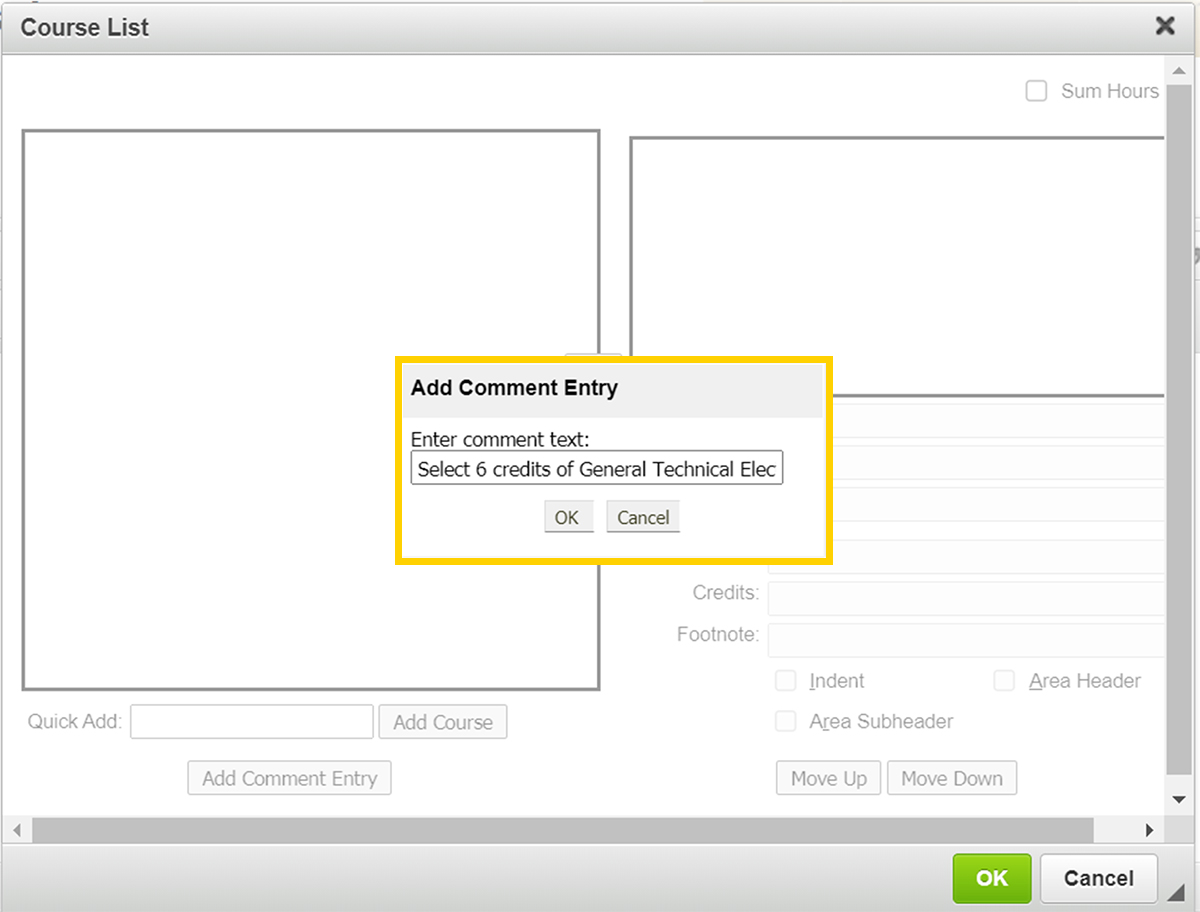
The Add Comment Entry pop-up window will open. Enter the text of the heading to be placed in the Course List and then click the OK Button.
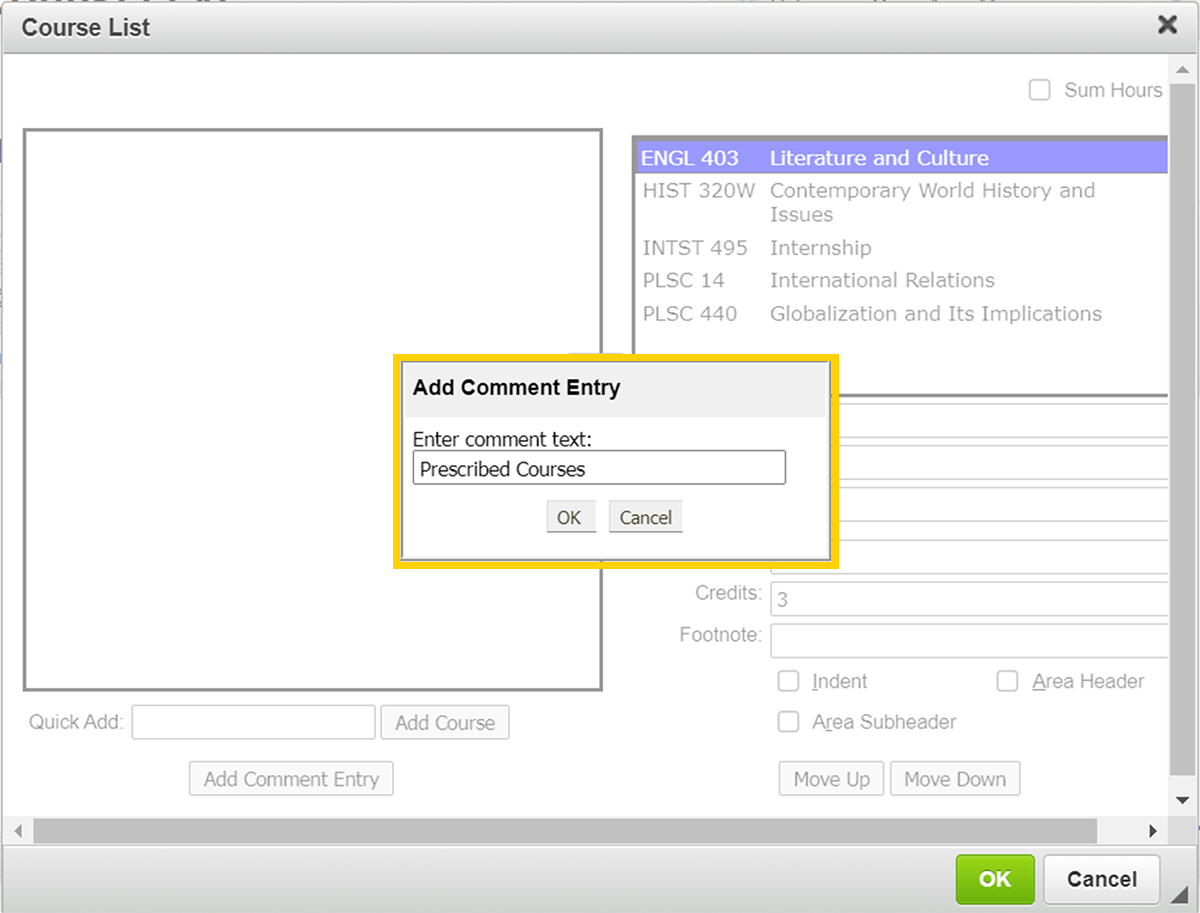
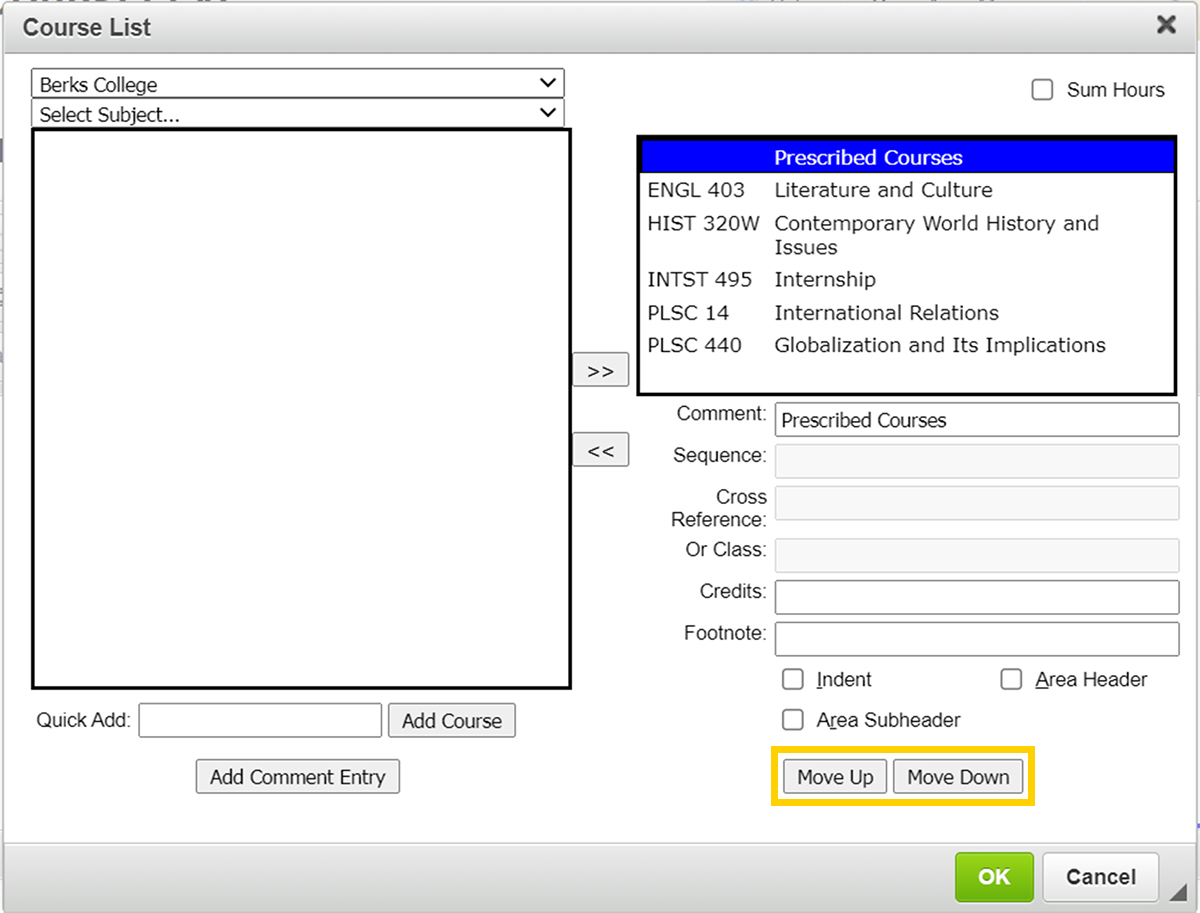
The Comment Entry now appears in your Course List.

If there are no courses or comment entries in your Course List, the new Comment Entry will appear at the top of your right-side Course List. If there are courses or comment entries in your right-side Course List, the new Comment Entry will appear on the line below the line that is currently selected in the list. If no line is currently selected, the new Comment Entry will appear at the bottom of the list.
To move the new Comment Entry up or down in the list, select the Comment Entry and click the Move Up Button or Move Down Button to change the order of the comment in the Course List.
To transform the Comment Entry into a header, check the Area Header checkbox while the comment is selected.
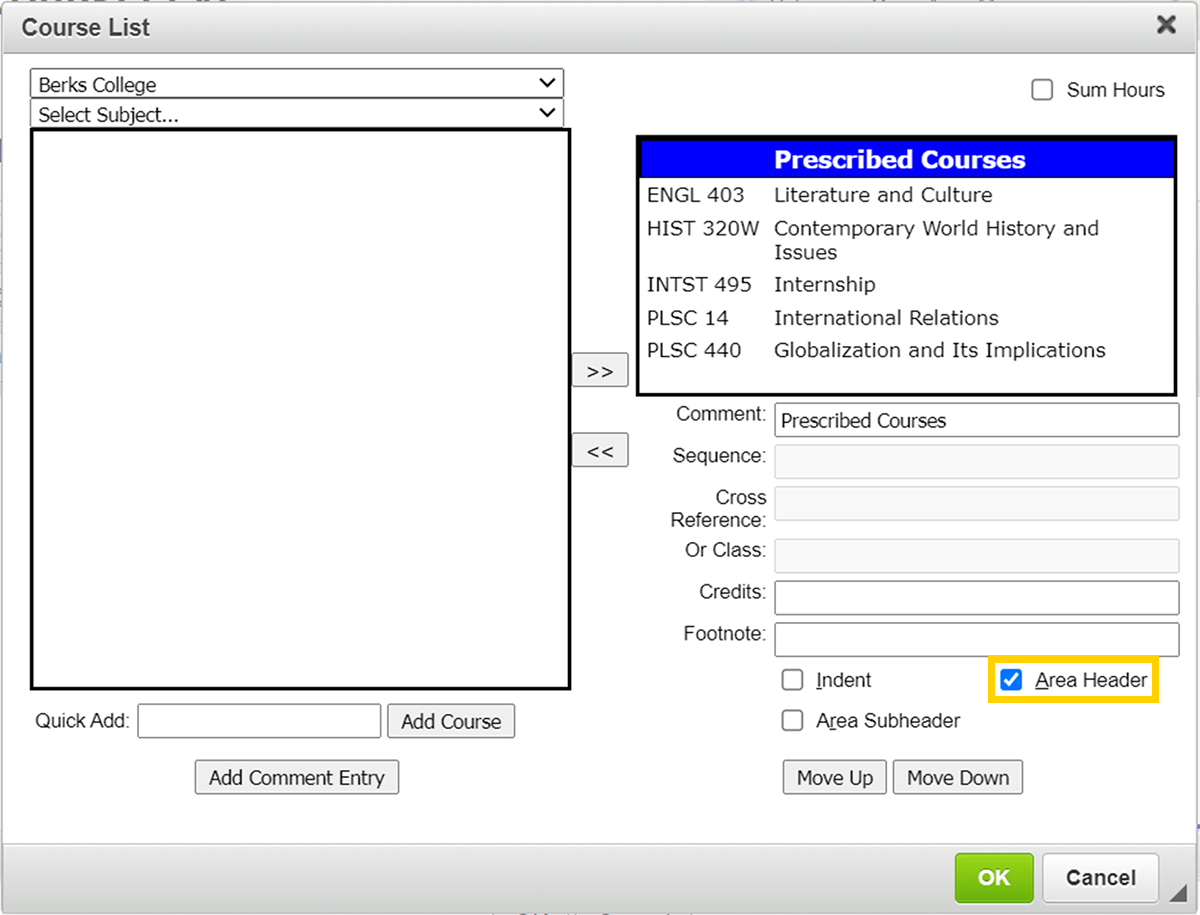
Click the green OK Button in the Course List Editor to save your changes back to the proposal.
The header now appears in the course list on your proposal.
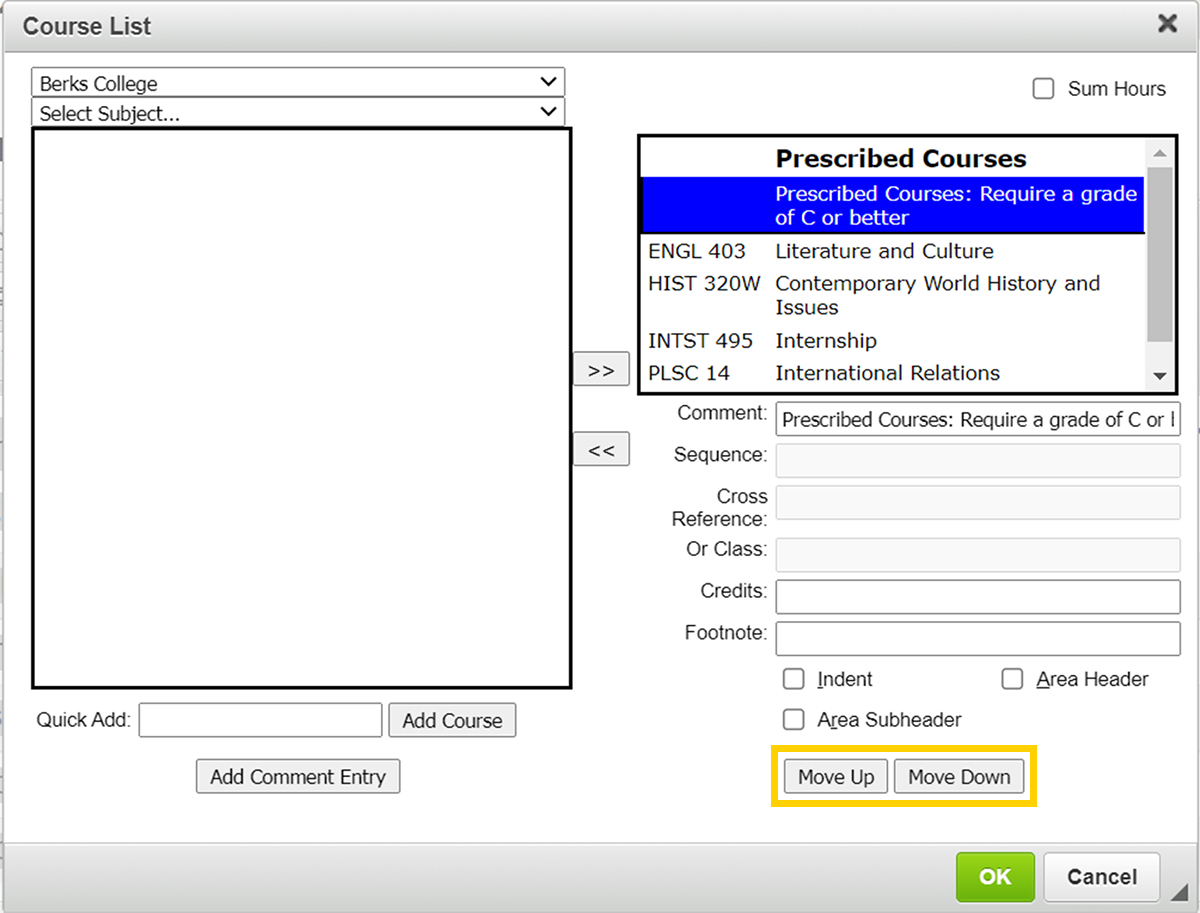
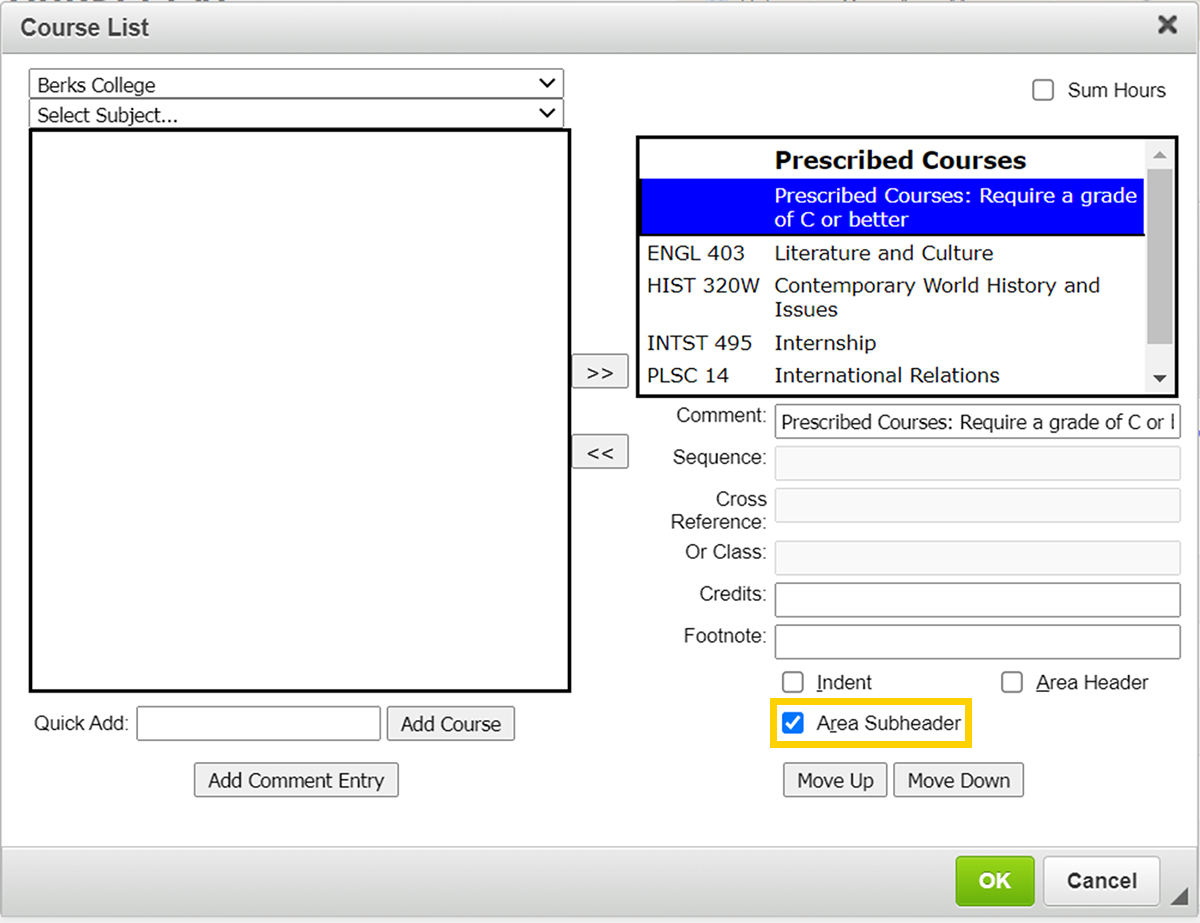
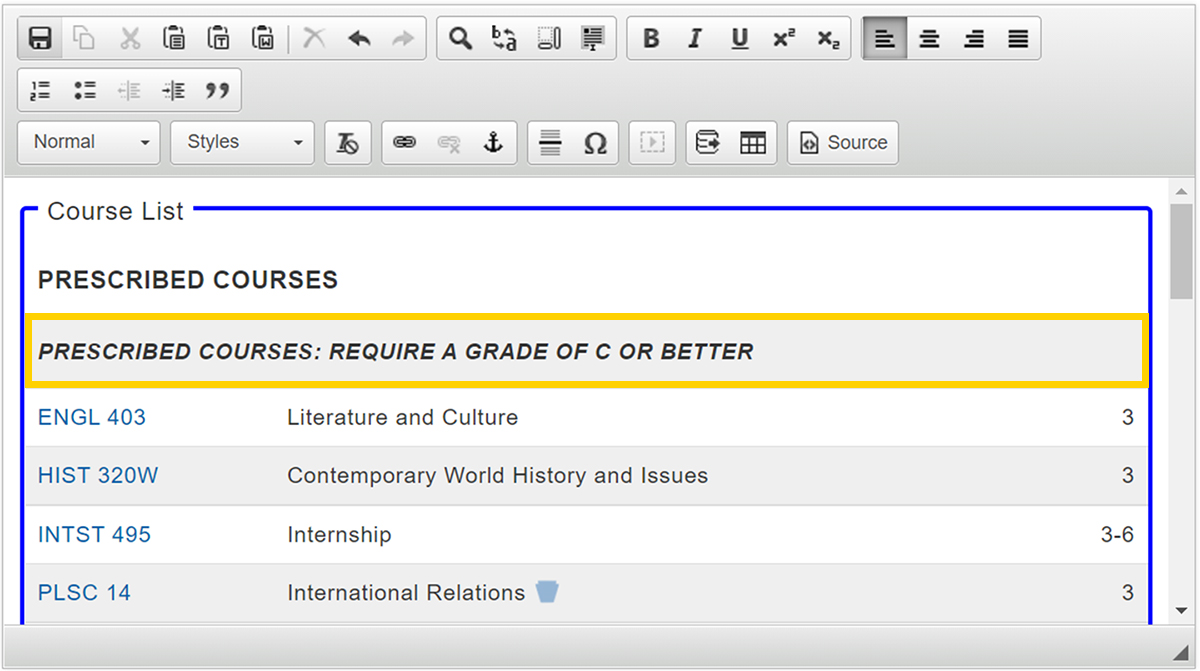
For undergraduate curriculum, the subheader feature is used only for the following subheadings to denote courses that require a grade of C or better:
Subheadings also are used to denote groups, categories, or tracks of course selections in more complex select statements.
In the course list, subheaders appear as uppercase text that is both bolded and italicized.
Complete the following steps to add a subheader to your course list:
In the Course List Editor, click the Add Comment Entry Button.
The Add Comment Entry pop-up window will open. Enter the text of the subheader to be placed in the Course List and then click the OK Button.

The Comment Entry now appears in your Course List.

If there are no courses or comment entries in your Course List, the new Comment Entry will appear at the top of your right-side Course List. If there are courses or comment entries in your right-side Course List, the new Comment Entry will appear on the line below the line that is currently selected in the list. If no line is currently selected, the new Comment Entry will appear at the bottom of the list.
To move the new Comment Entry up or down in the list, select the Comment Entry and click the Move Up Button or Move Down Button to change the order of the comment in the Course List.
To transform the Comment Entry into a subheader, check the Area Subheader checkbox while the comment is selected.
Please note, there will be no visual transformation of the text while in the Course List Editor tool. The text transformation will display in the proposal once changes are saved by clicking the green OK Button.
Click the green OK Button in the Course List Editor to save your changes back to the proposal.
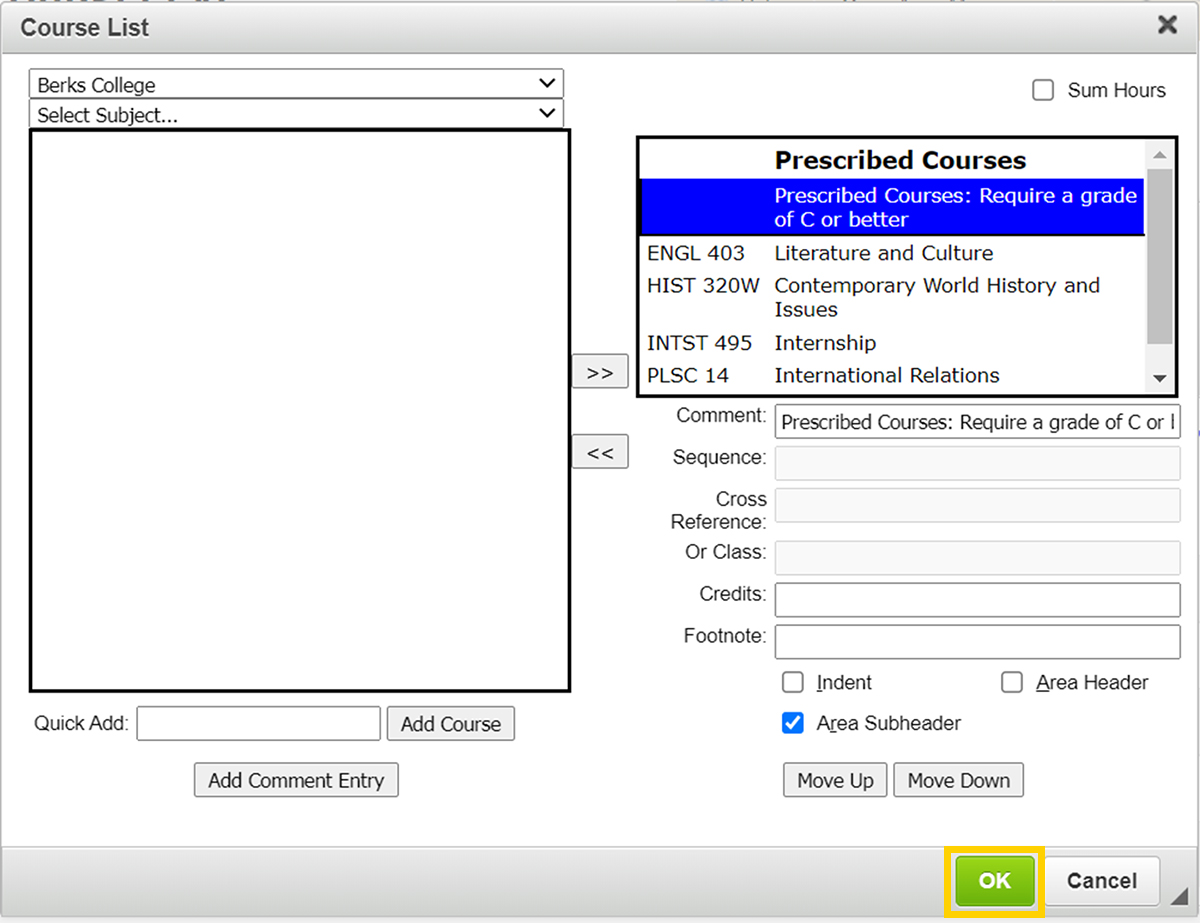
The subheader now appears in the course list on your proposal.
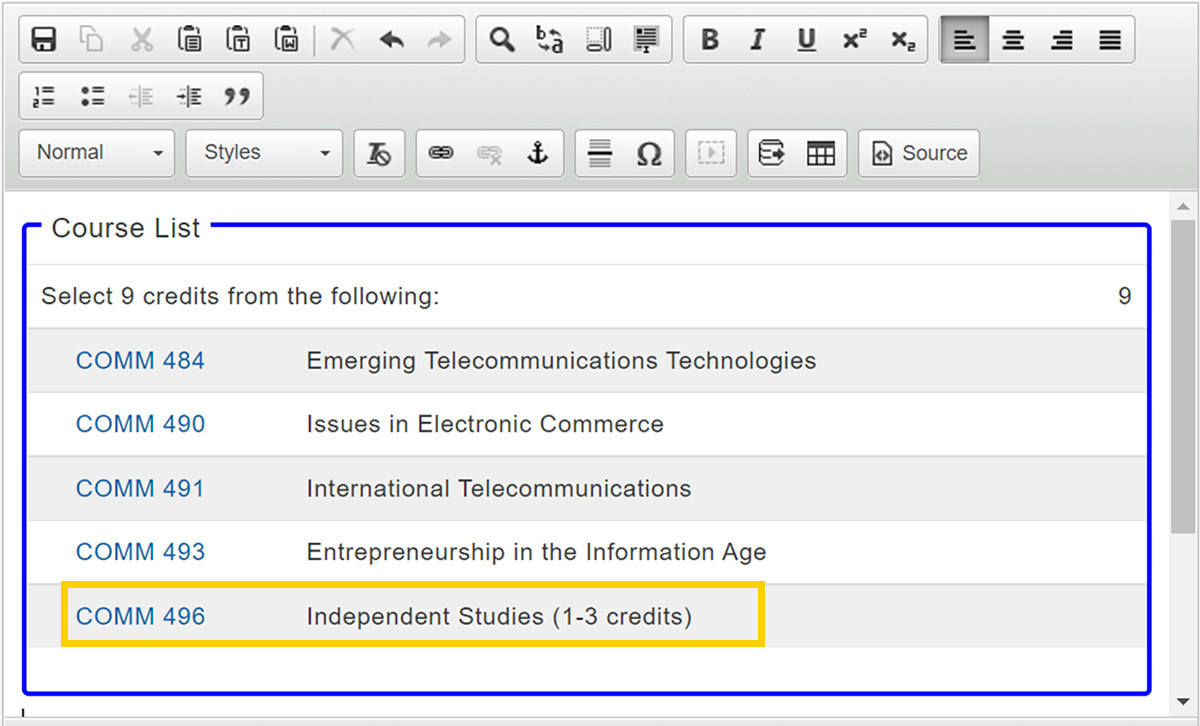
In the Course List, click on the course in which you want to add a comment.
In the Comment field, type the comment you would like to display in the Course List for the selected course.
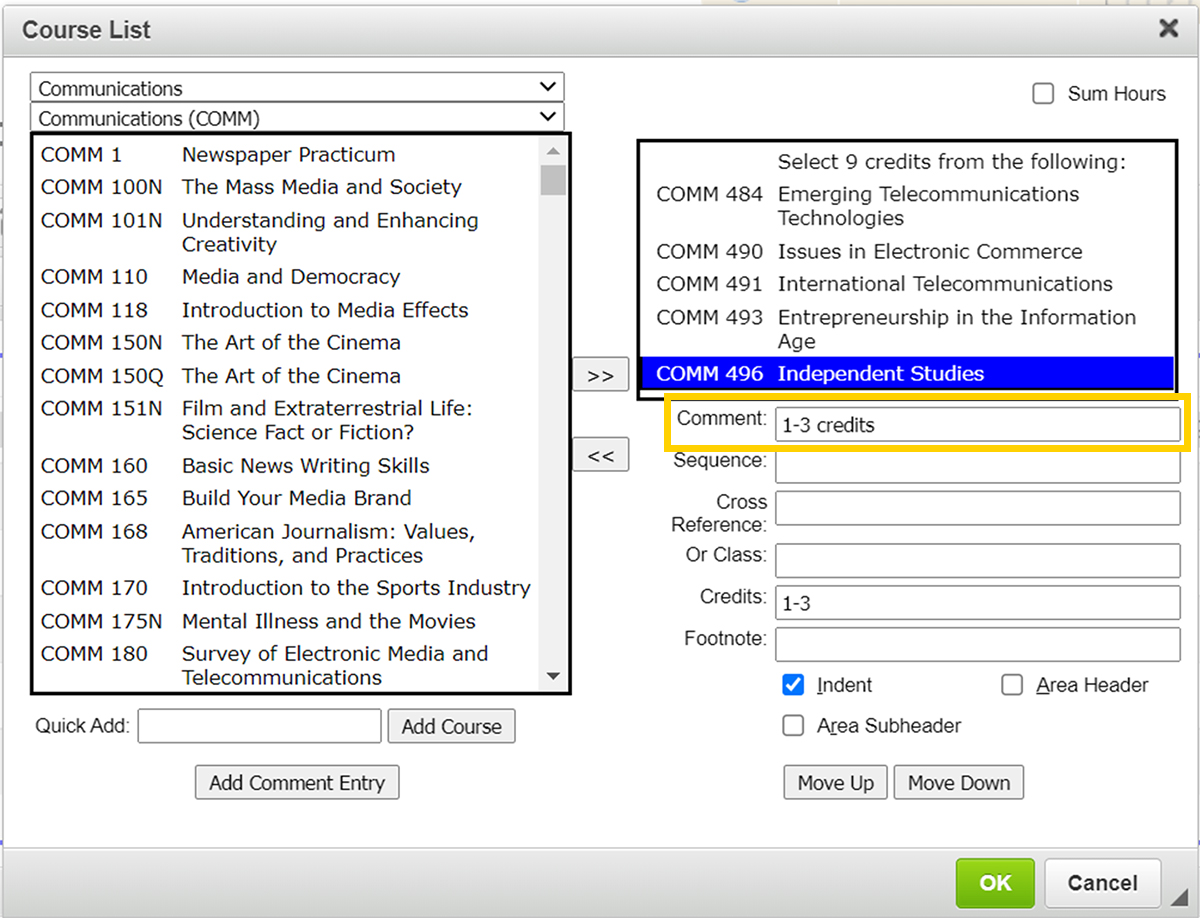
Click the green OK Button in the Course List Editor to save your changes back to the proposal.
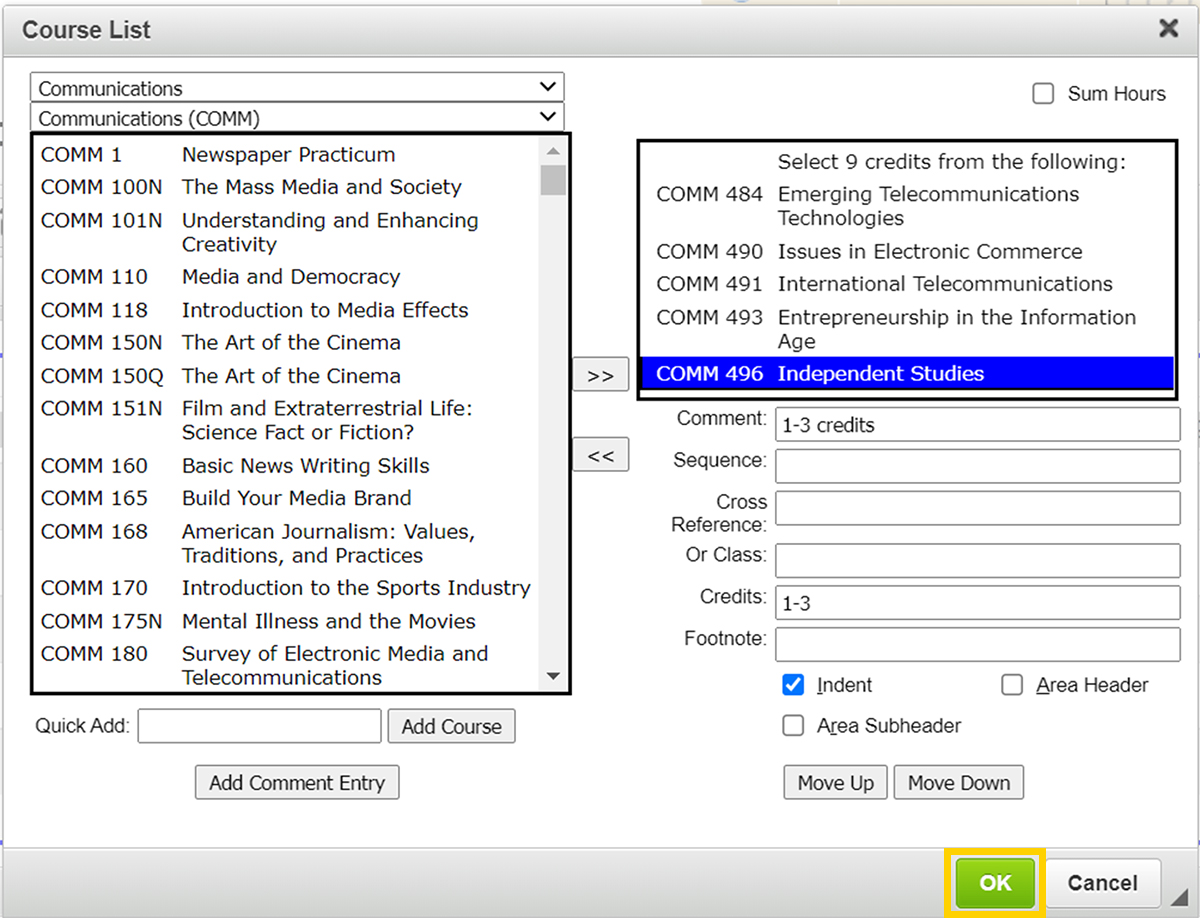
The comment now appears in parentheses after the course title.
In the Additional Courses or Supporting Courses and Related Areas course requirements, it is sometimes necessary to denote a sequence of courses as part of a selection statement. This is done by adding an "and" between the two courses.
In the Course List Editor, add the first course of the sequence using the Quick Add method (described above).
The course now appears in your Course List.
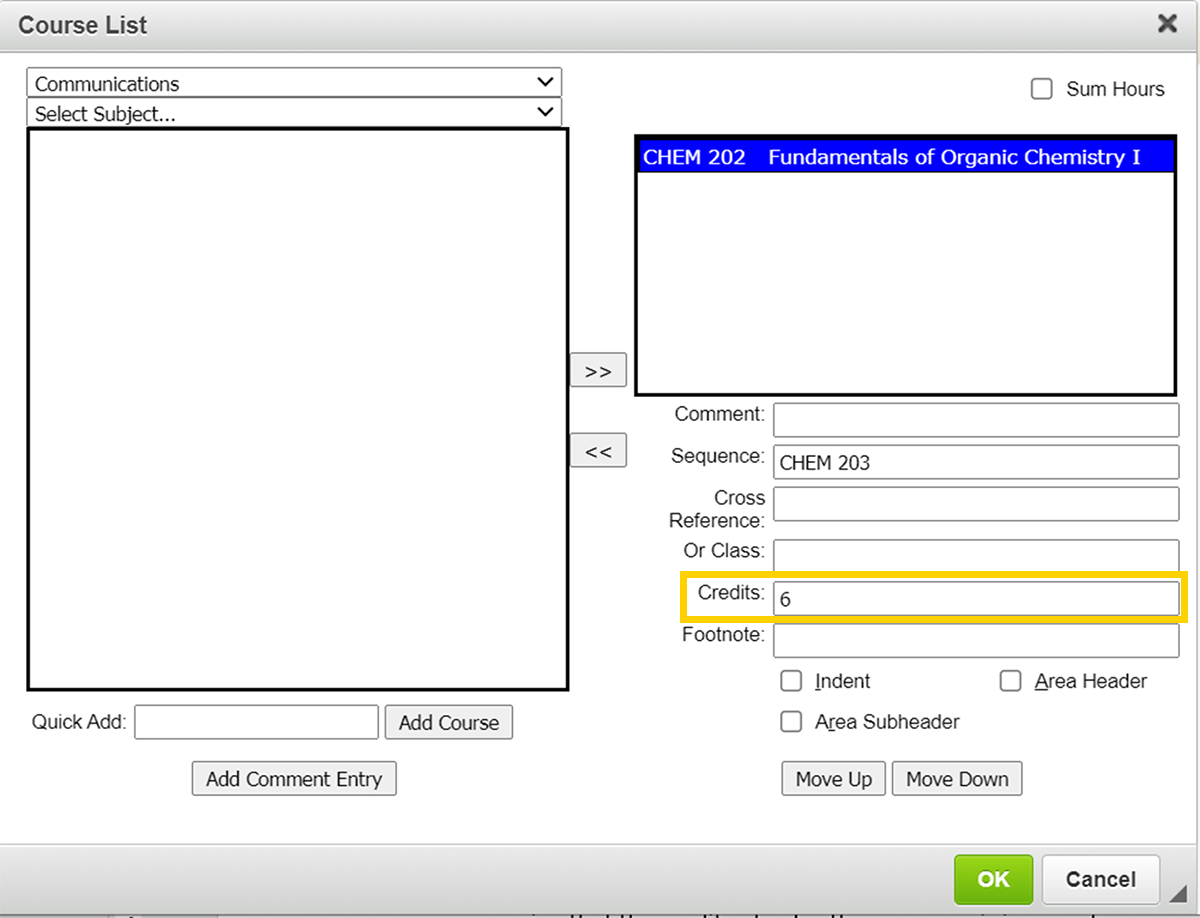
With the first course selected in your Course List, type the second course of your sequence in the Sequence field.
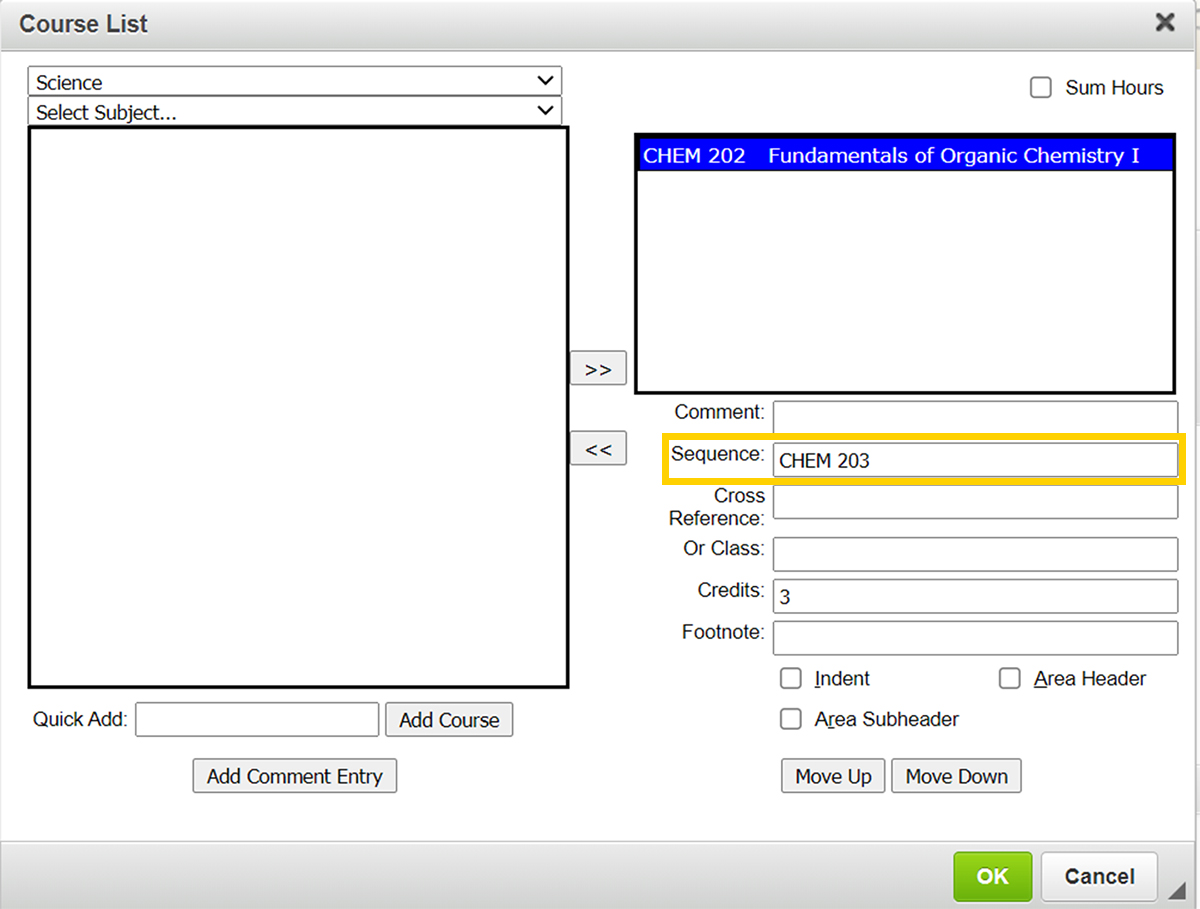
Next, modify the credits value in the Credits field to equal the total number of credits earned from both courses. (The current value is the number of credits for the first course entered via the Quick Add method.) For example, if the first course is 3 credits and the second course is 3 credits, the credit value entered in the Credits field should be modified from "3" to "6".
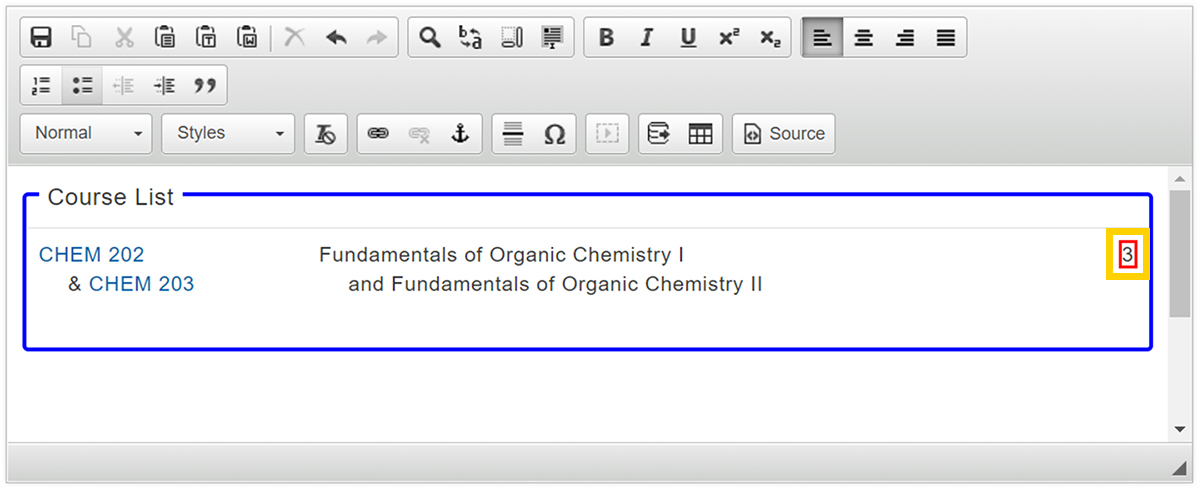
If you leave the credits value at the original number of credits for the first course only, the course list in your proposal will contain a red box warning that the credit value for the sequence is incorrect.
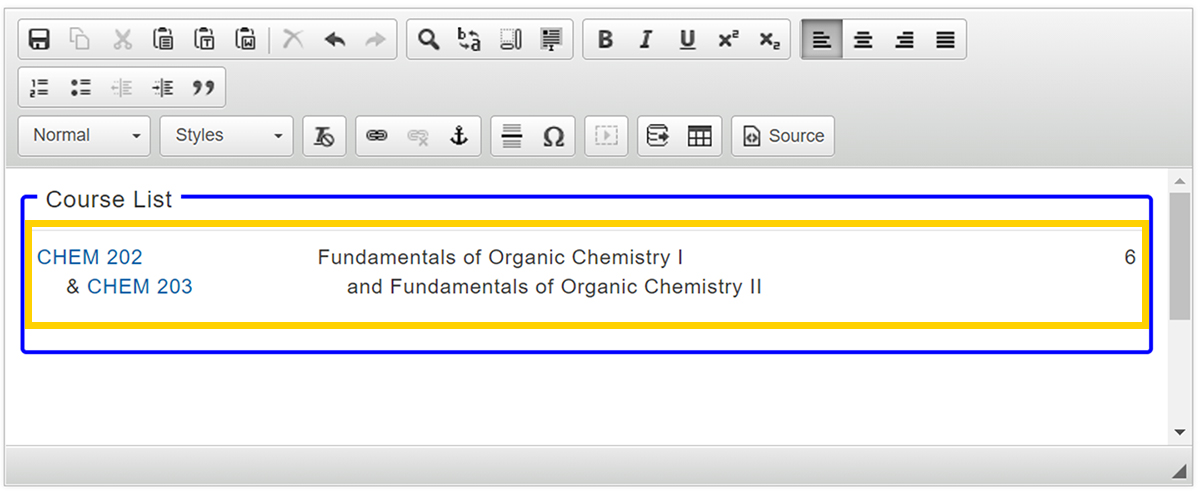
Once you have entered the correct credits value, click the green OK Button in the Course List Editor to save your changes back to the proposal.

The sequence now appears in your course list on your proposal.
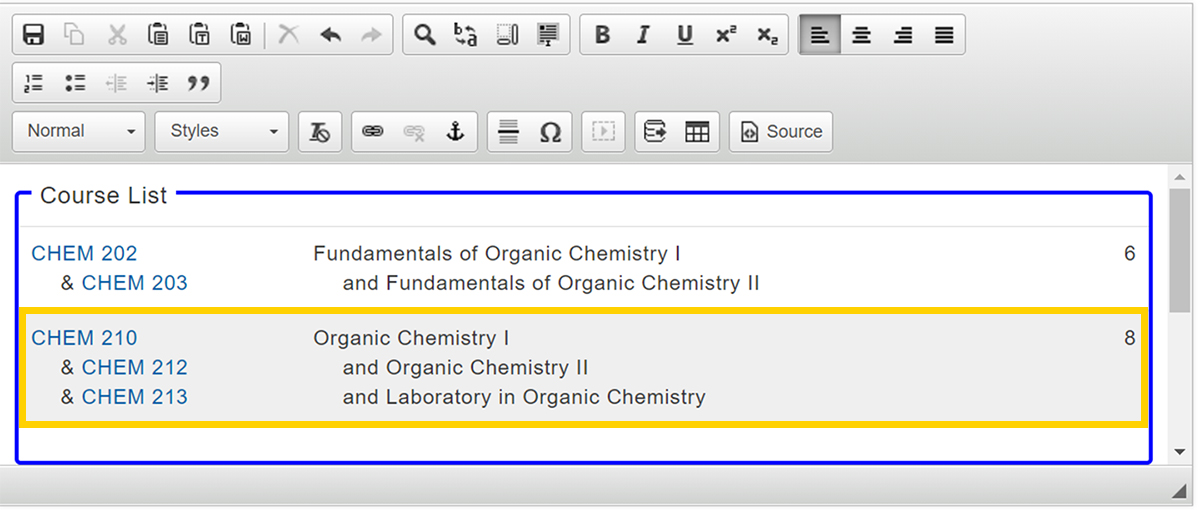
In certain circumstances it may be necessary to display a sequence that includes more than two courses.
In the Course List Editor, add the first course of the sequence using the Quick Add method (described above).
The course now appears in your Course List.
With the first course selected, type the additional courses of your sequence into the Sequence field with a comma separating each course listed.
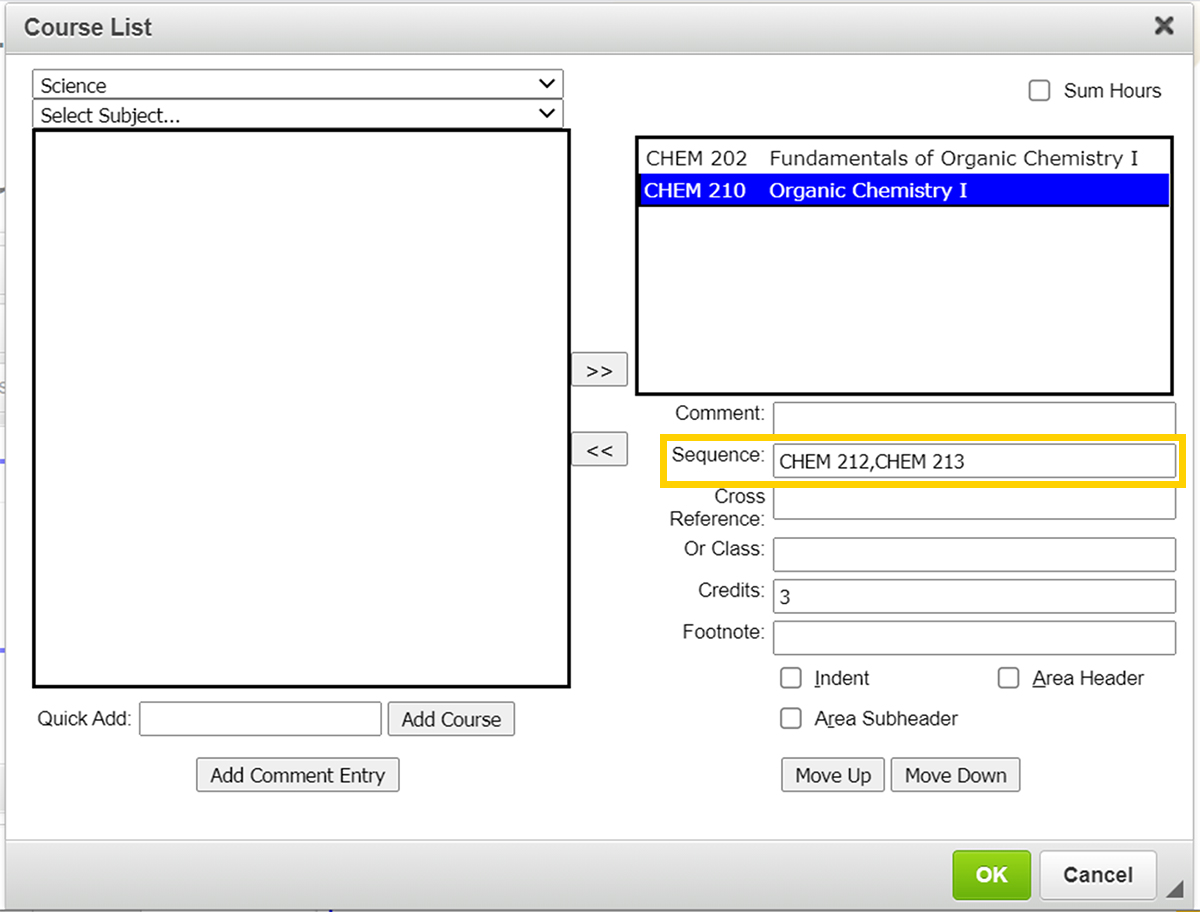
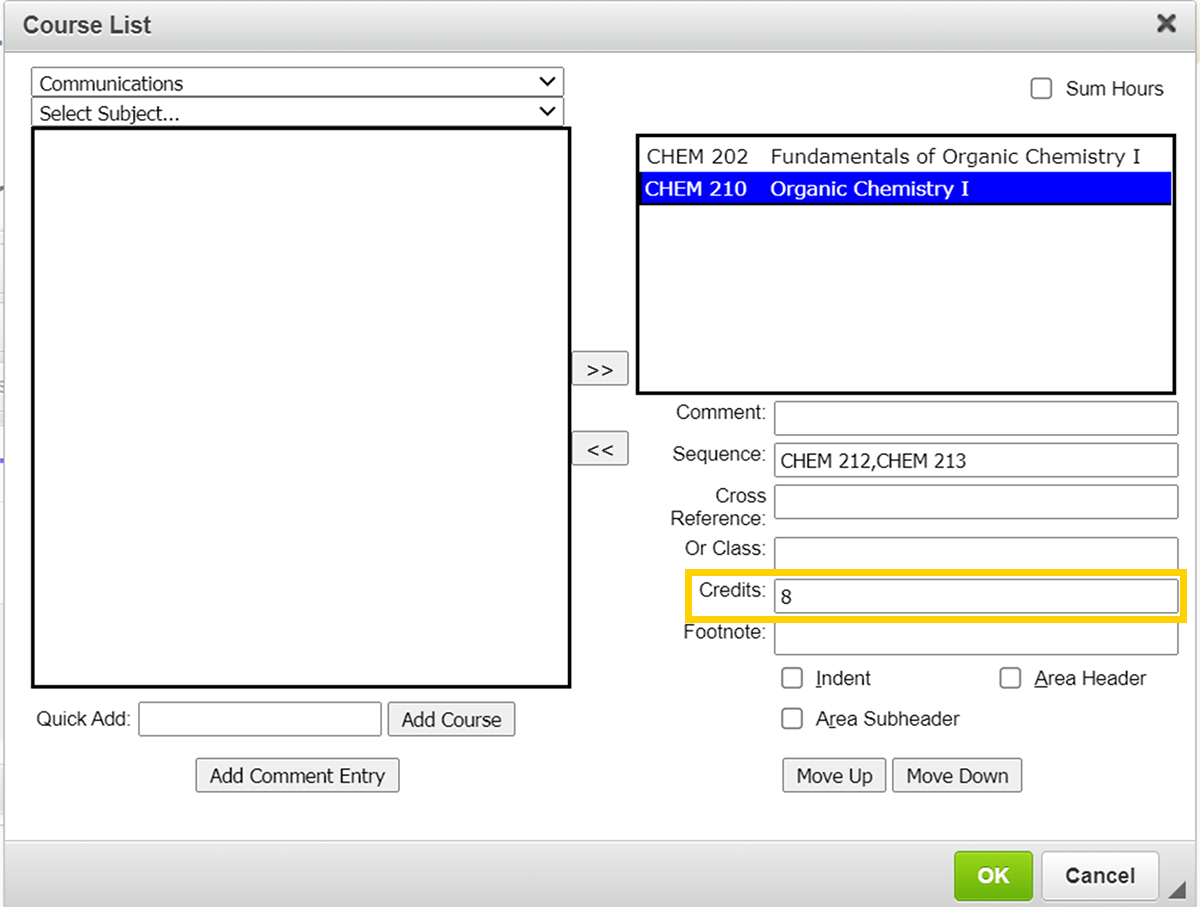
3. Next, modify the credits value in the Credits field to equal the total number of credits earned from all courses in the sequence. (The current value is the number of credits for the first course entered via the Quick Add method.) For example, if there are three courses and the first course is 3 credits, second course is 3 credits, and third course is 2 credits, the credit value entered in the Credits field should be modified from "3" to "8".
Once you have entered the correct credits value, click the green OK Button in the Course List Editor to save your changes back to the proposal.
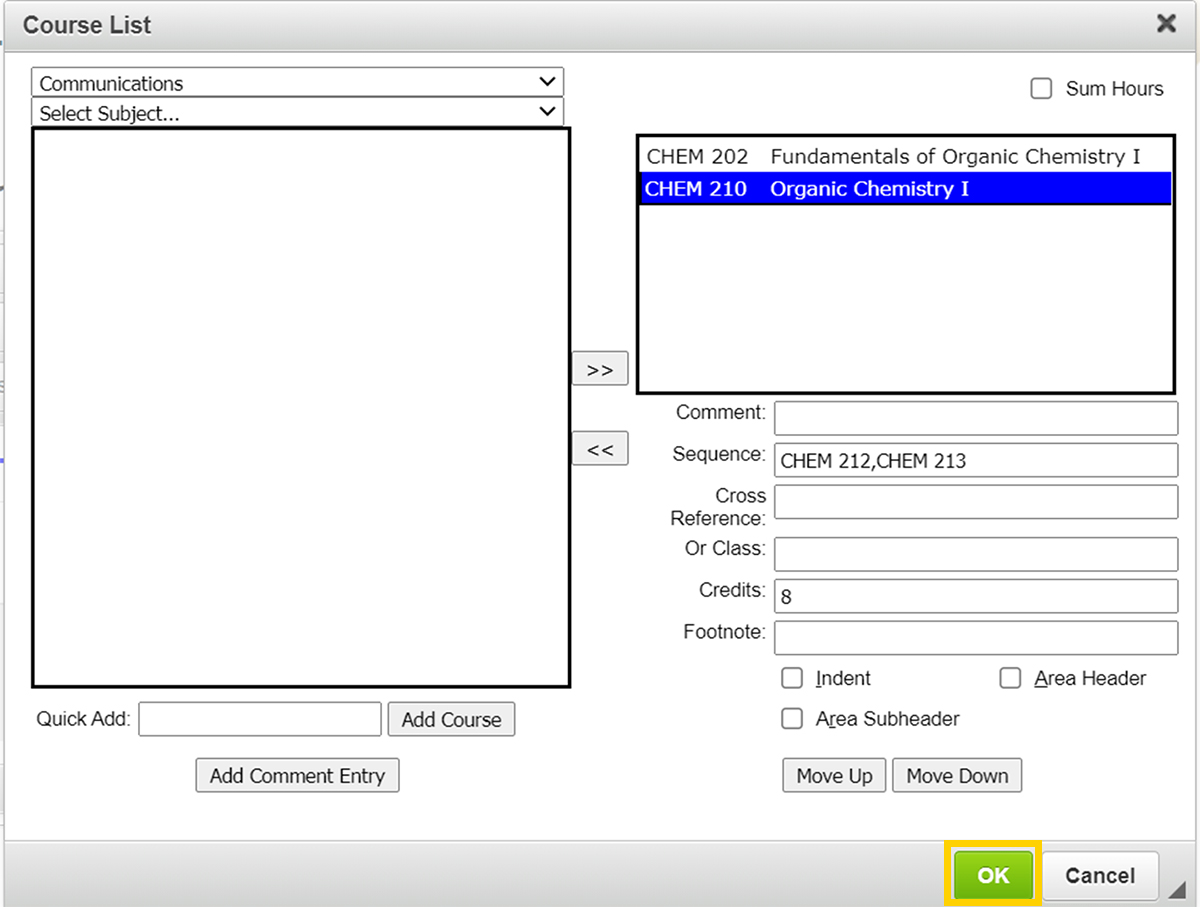
The sequence now appears in your course list on your proposal.
In the Course List Editor, add the first course using the Quick Add method (described above).
The course now appears in your Course List.
With the first course selected in your Course List, type the cross-listed course into the Cross Reference field.
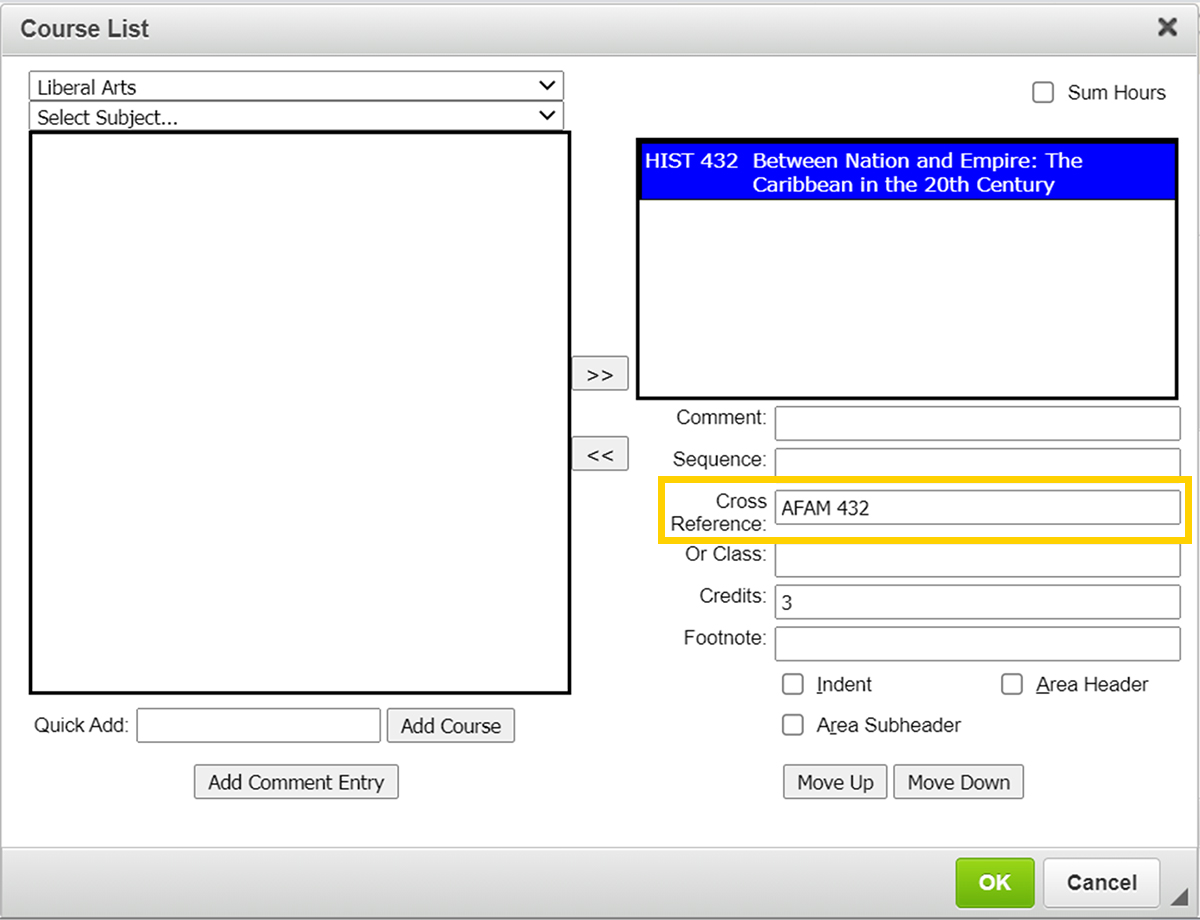
If there is more than one cross-listed course to add to the Cross Reference field, use a comma to separate each course listed in the field.
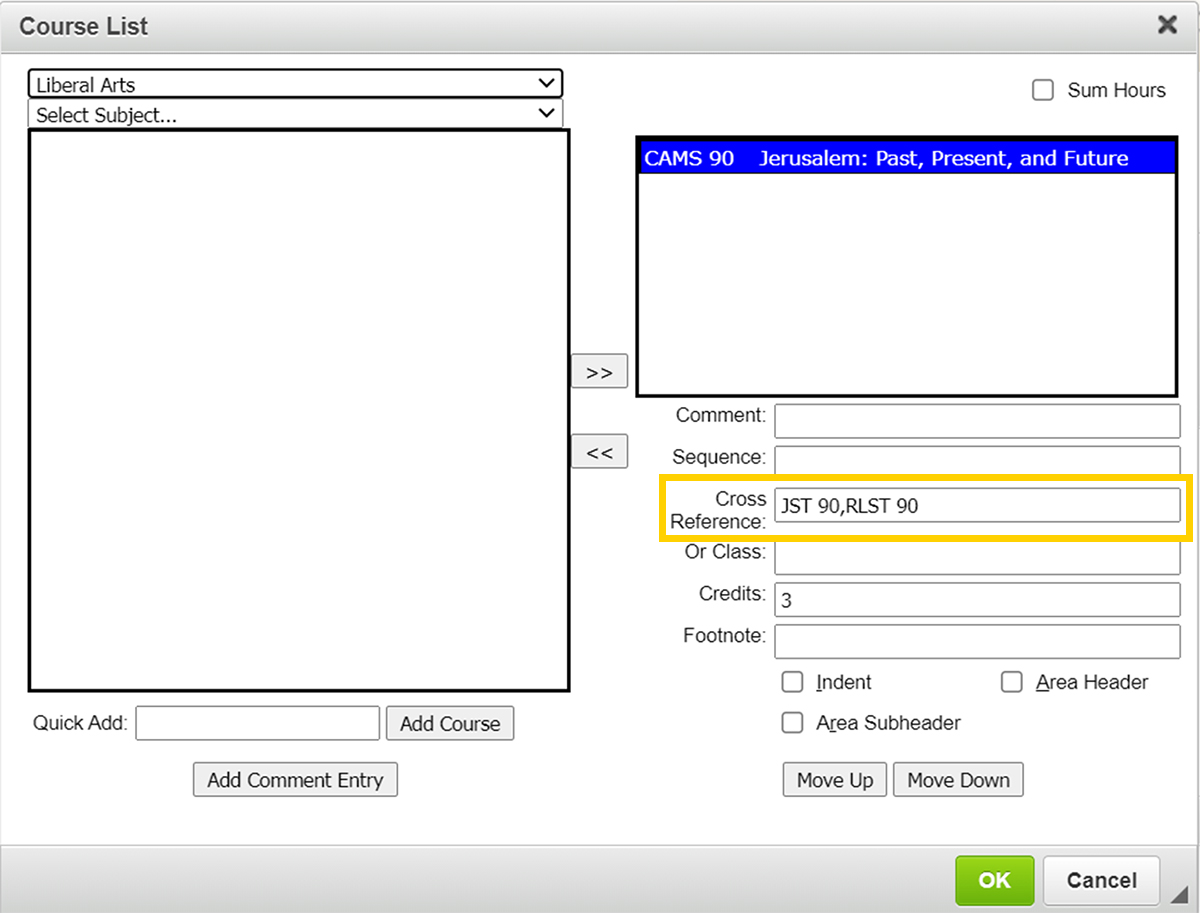
Once you have entered the cross-listed course(s), click the green OK Button in the Course List Editor to save your changes back to the proposal.
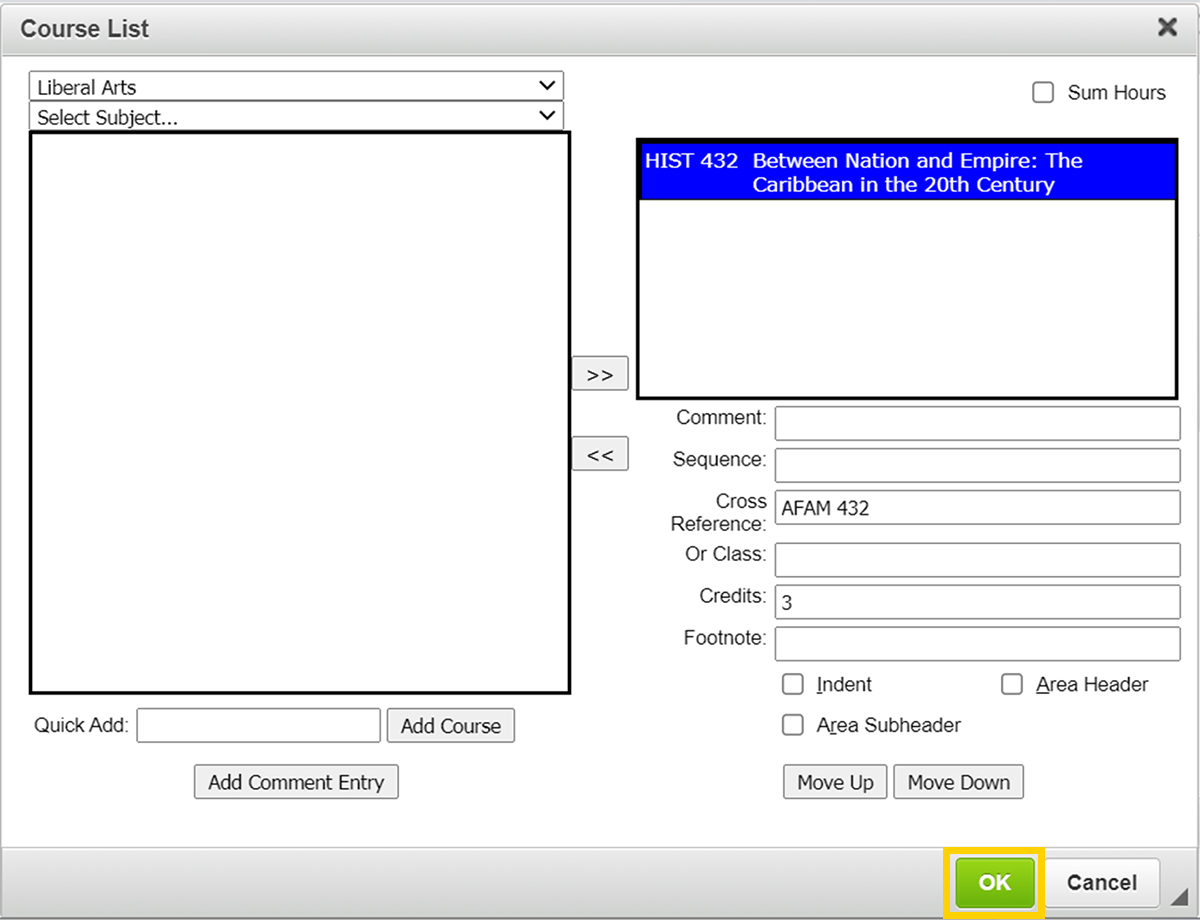
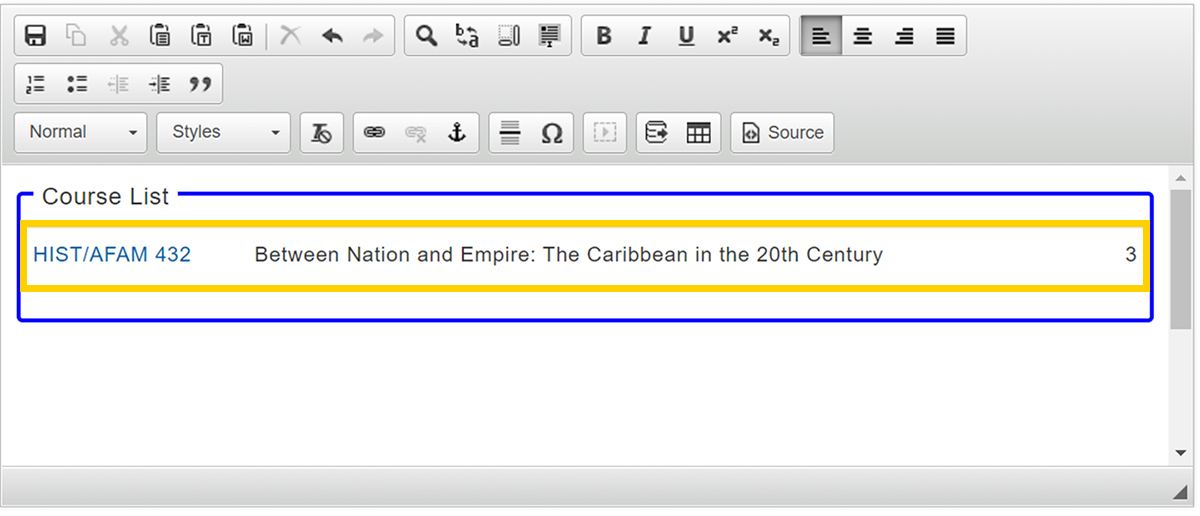
The cross-listing is now properly denoted in your course list on your proposal.
The Additional Courses and Supporting Courses and Related Areas course requirements typically include various selections of courses that students may choose from.
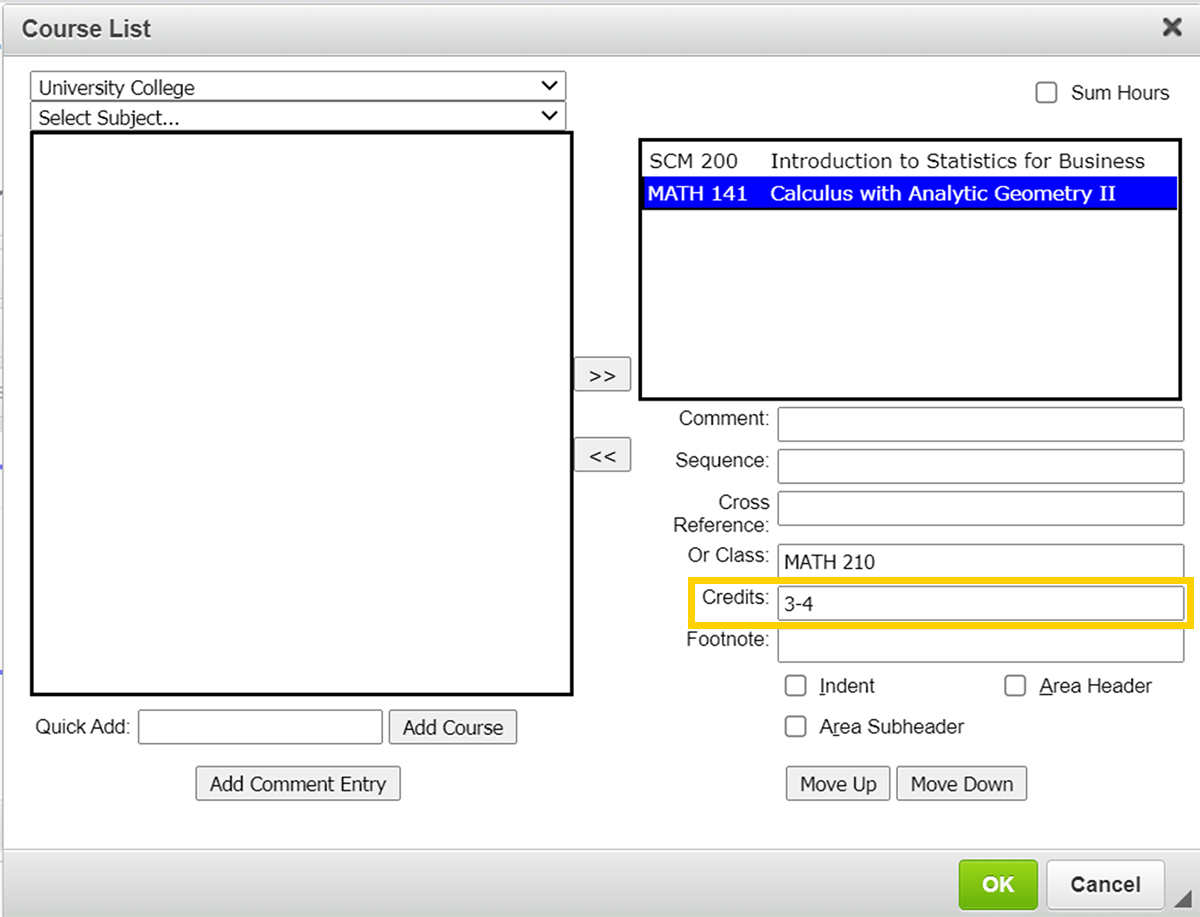
If the course requirements instruct the student to select between two courses, this can be denoted in the course list by using the Or Class field in the Course List Editor.
In the Course List Editor, add the first course using the Quick Add method (described above).
The course now appears in your Course List.
With the first course selected in your Course List, type the second course the student can choose from into the Or Class field.

Next, view the credit value listed in the Credits field. The current value is the number of credits for the first course entered via the Quick Add method. If students can earn the same number of credits from either course the credit value entered does not need to be modified.
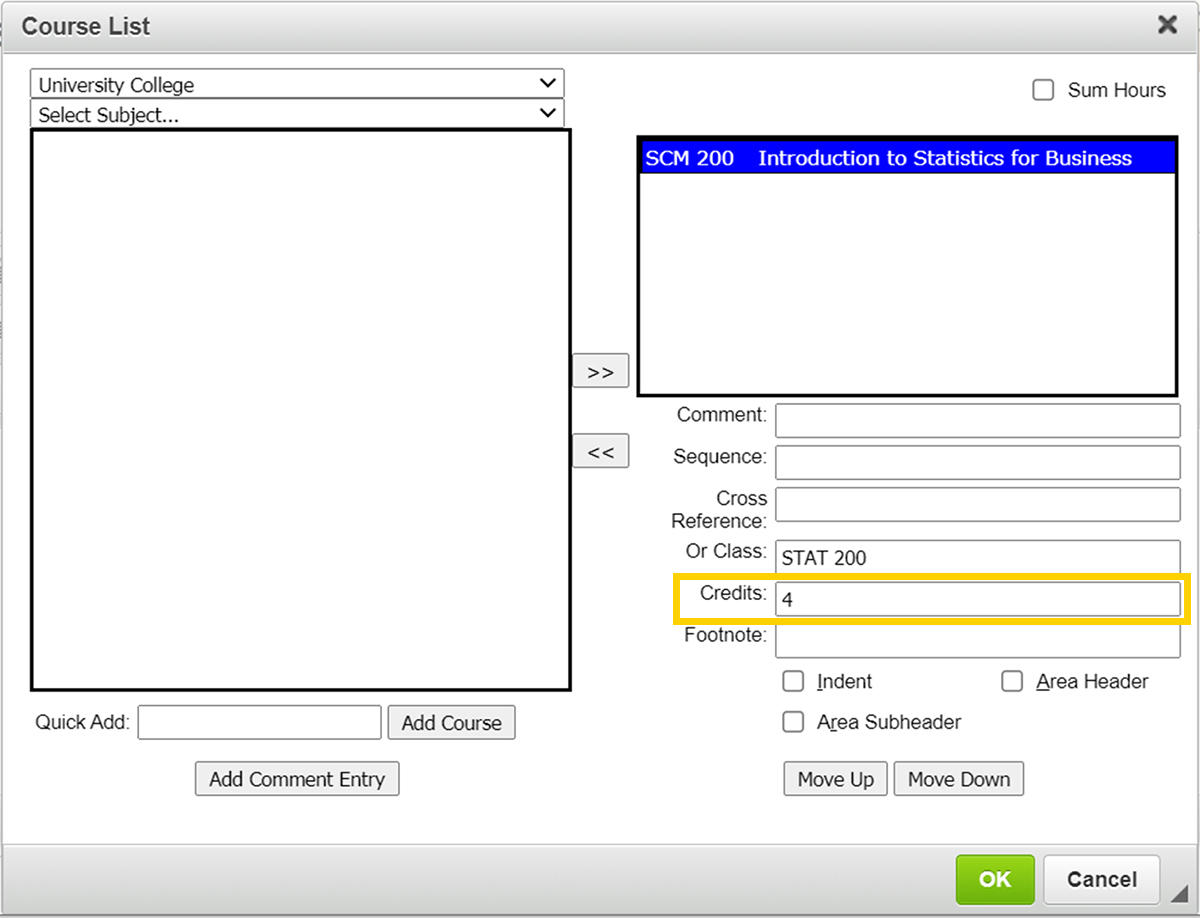
However, if each course has a different credit value, the value in the Credits field should be modified to reflect the range of credits that can be earned from this course selection.
For example, if students can select between MATH 141 and MATH 210, they will earn either 4 credits if they take MATH 141 or 3 credits if they take MATH 210. The credit range that should be entered for this selection is "3-4".
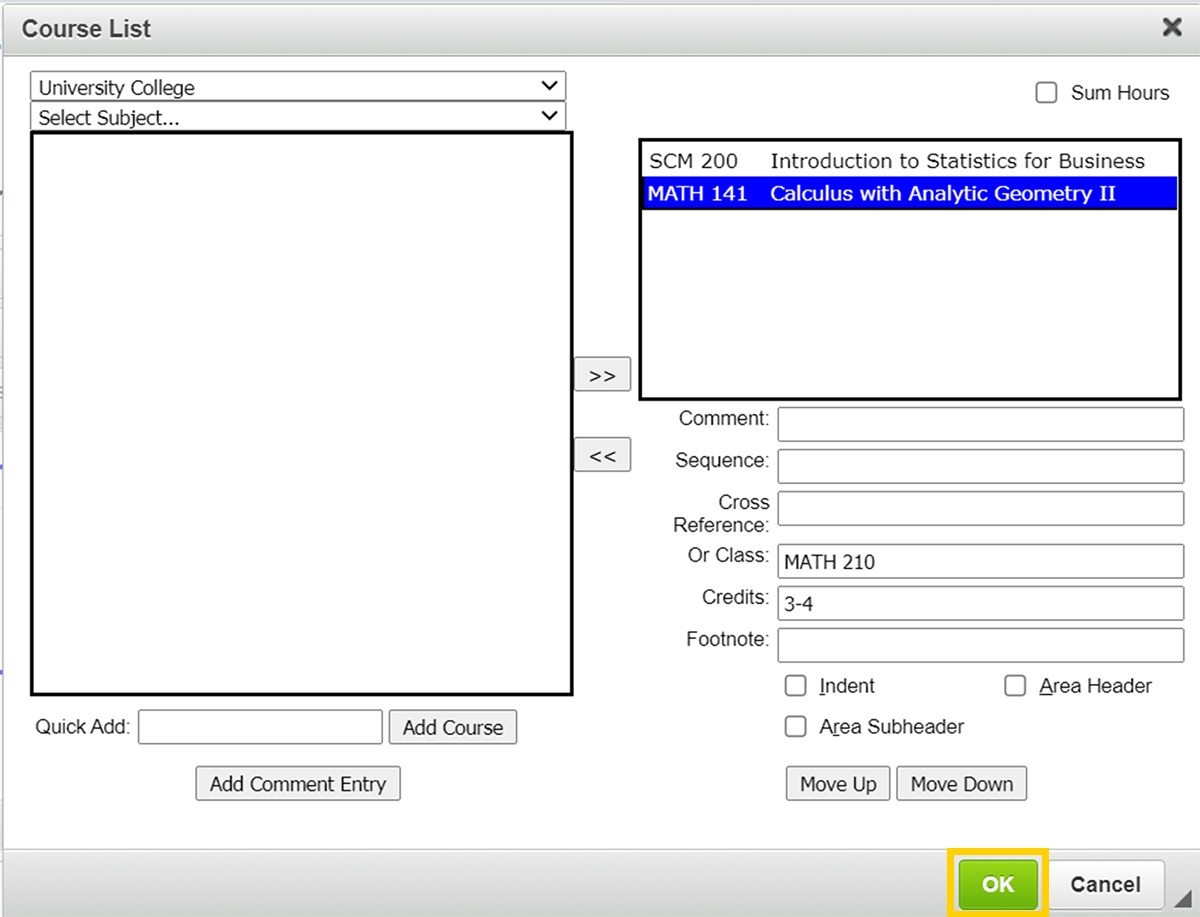
Once you have made appropriate adjustments to the credits value, click the green OK Button in the Course List Editor to save your changes back to the proposal.
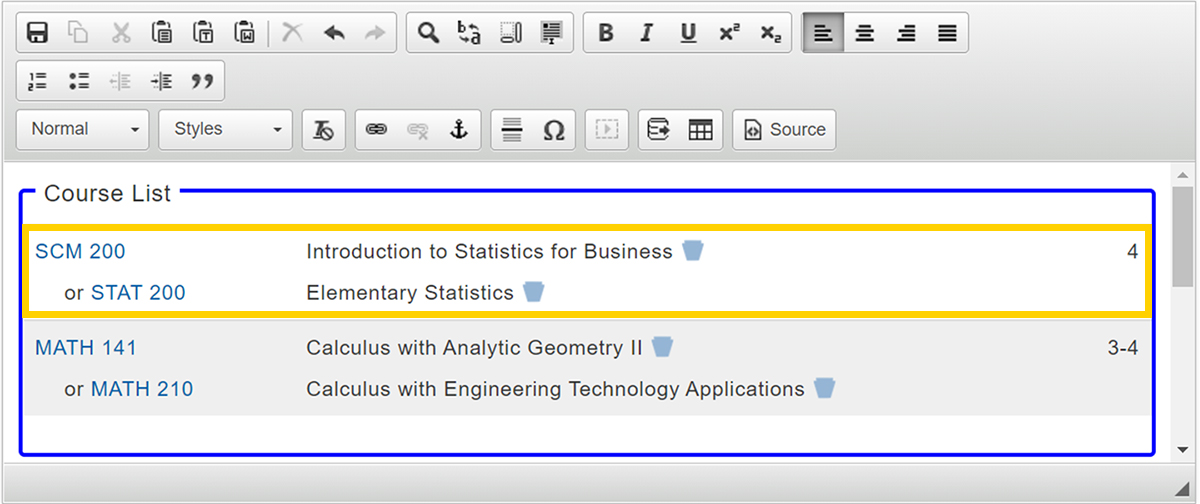
The two-course select statement now appears in your course list on your proposal with "or" between the two courses students must choose from.
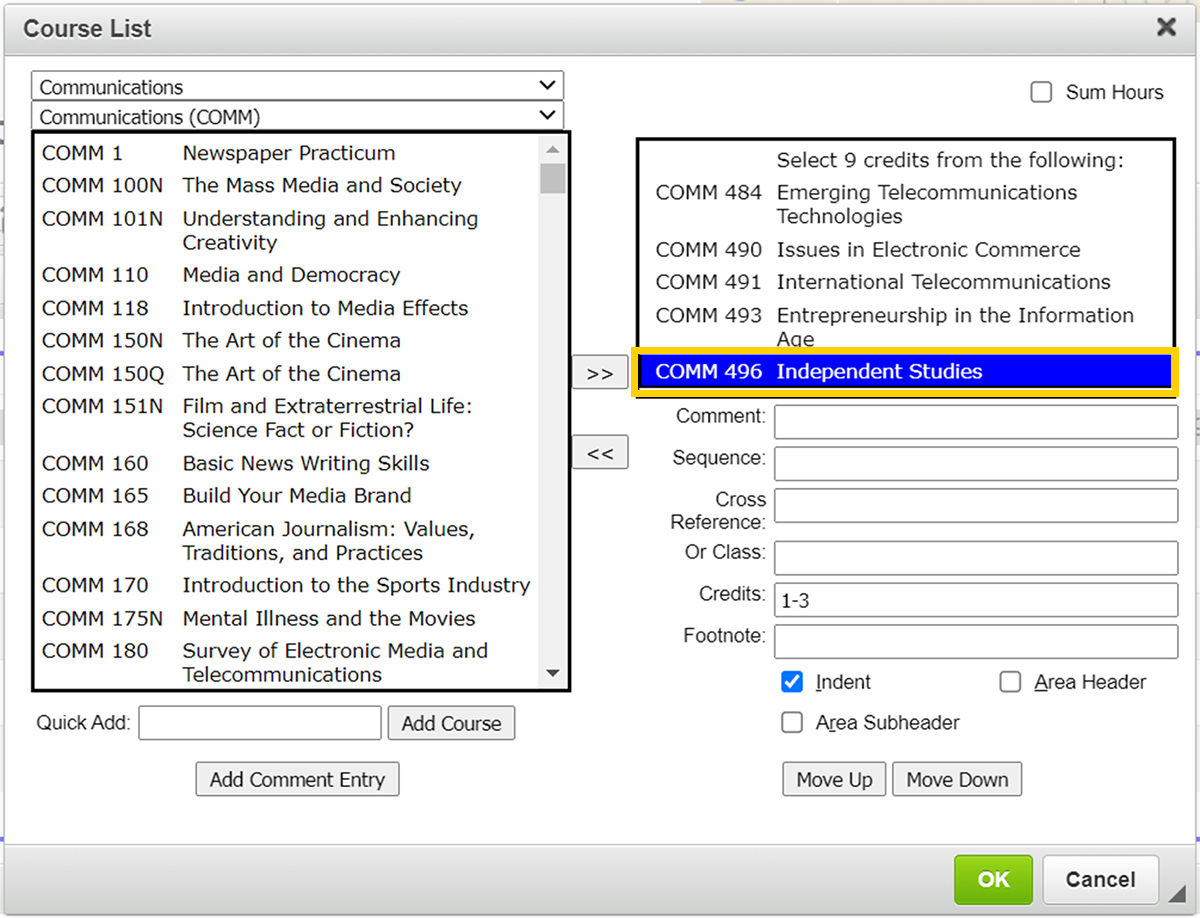
If the course requirements instruct the student to select from a list of more than two courses, this can be denoted in the course list by adding a select statement in the Add Comment Entry field followed by an indented list of courses.
In the Course List Editor, click the Add Comment Entry Button.
The Add Comment Entry pop-up window will open. Enter the select statement instructions, which should include the number of courses or total credits students must select from the list of courses included in this selection. After entering the text, click the OK Button.
The Comment Entry now appears in your Course List.
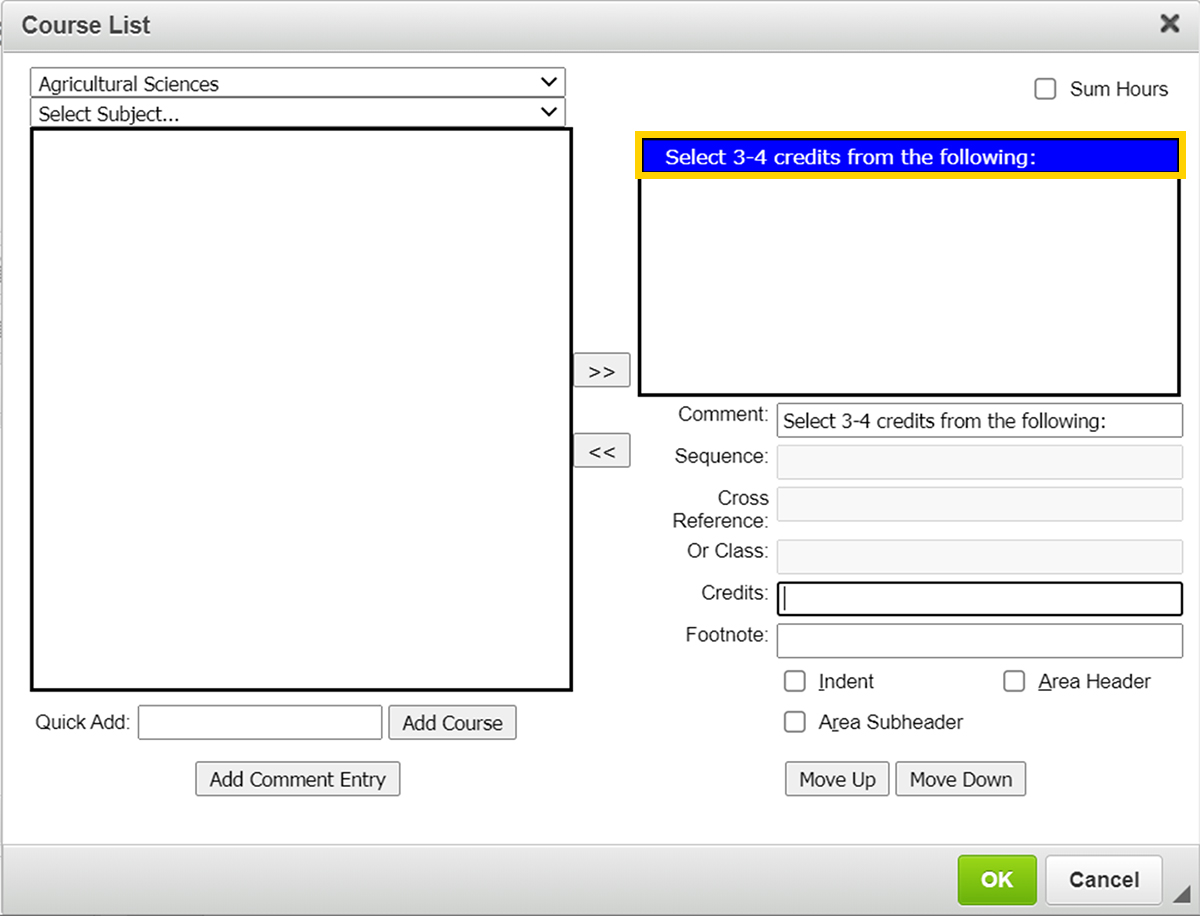
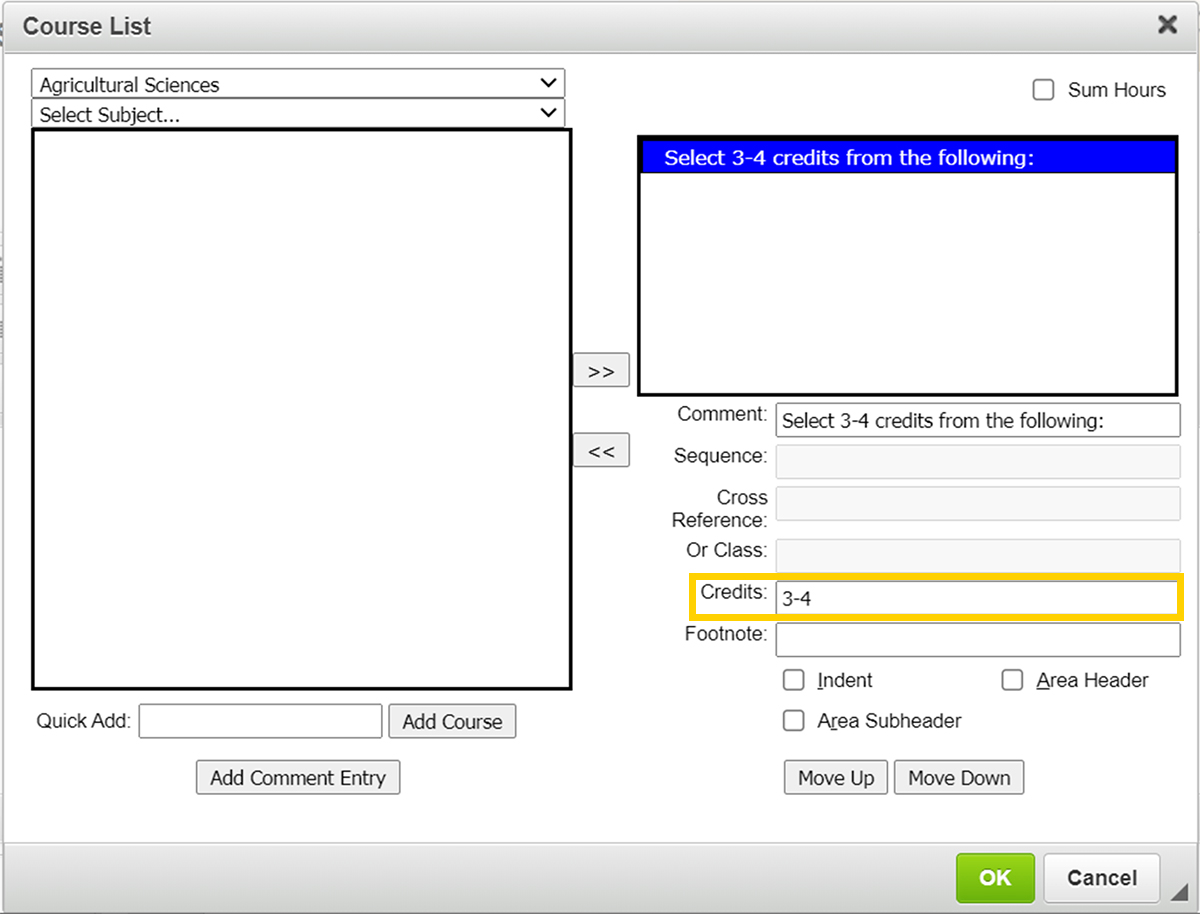
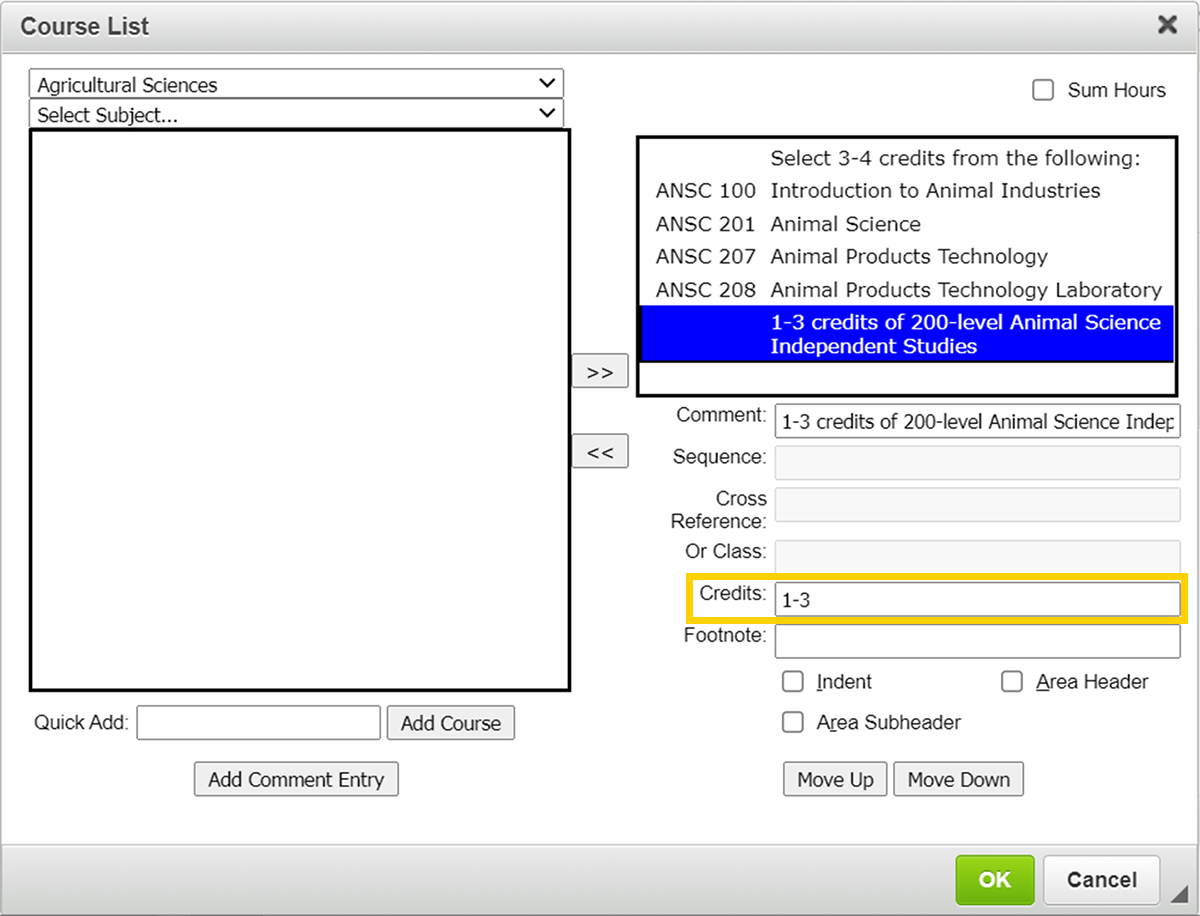
With the select statement comment selected, enter the total number of credits for this selection requirement in the Credits field.
Next, add each course that is part of this selection statement using the Quick Add method (described above).
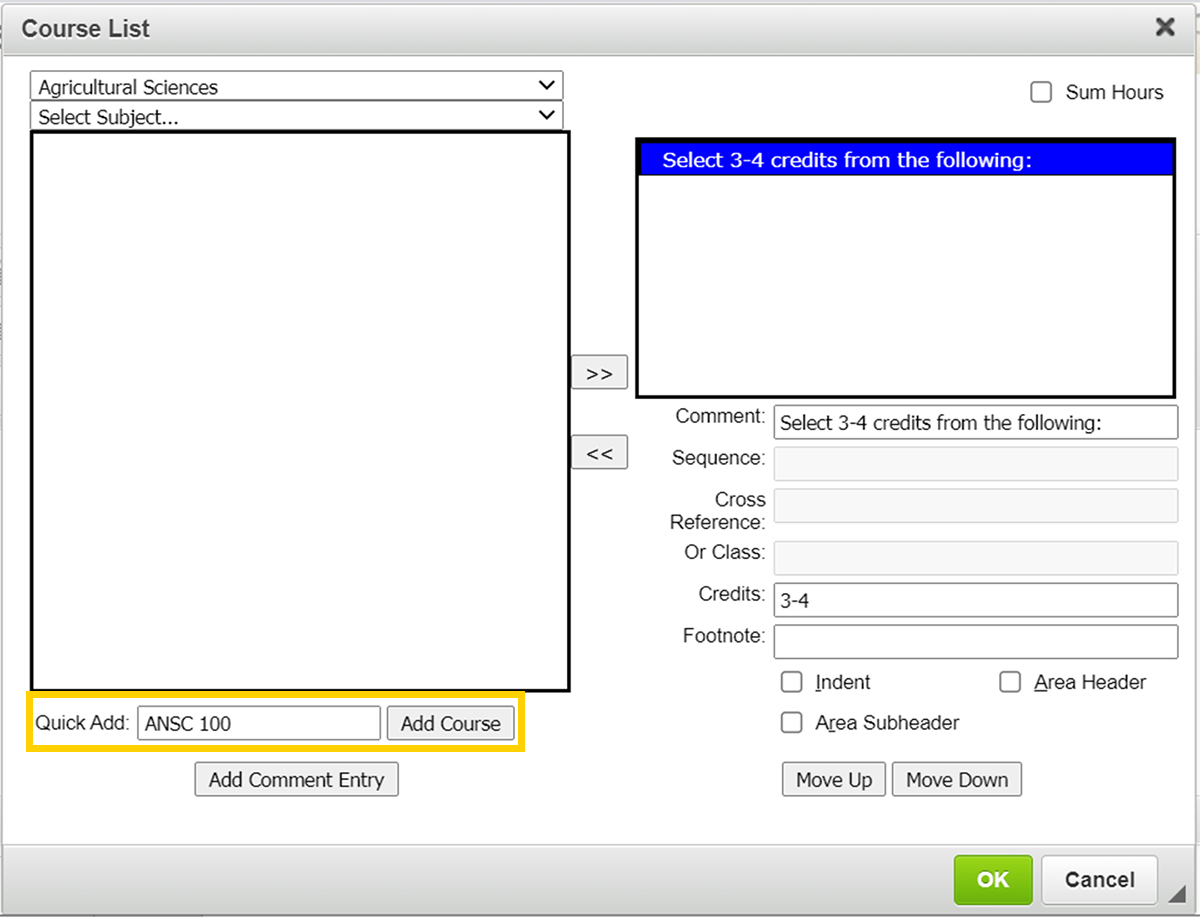
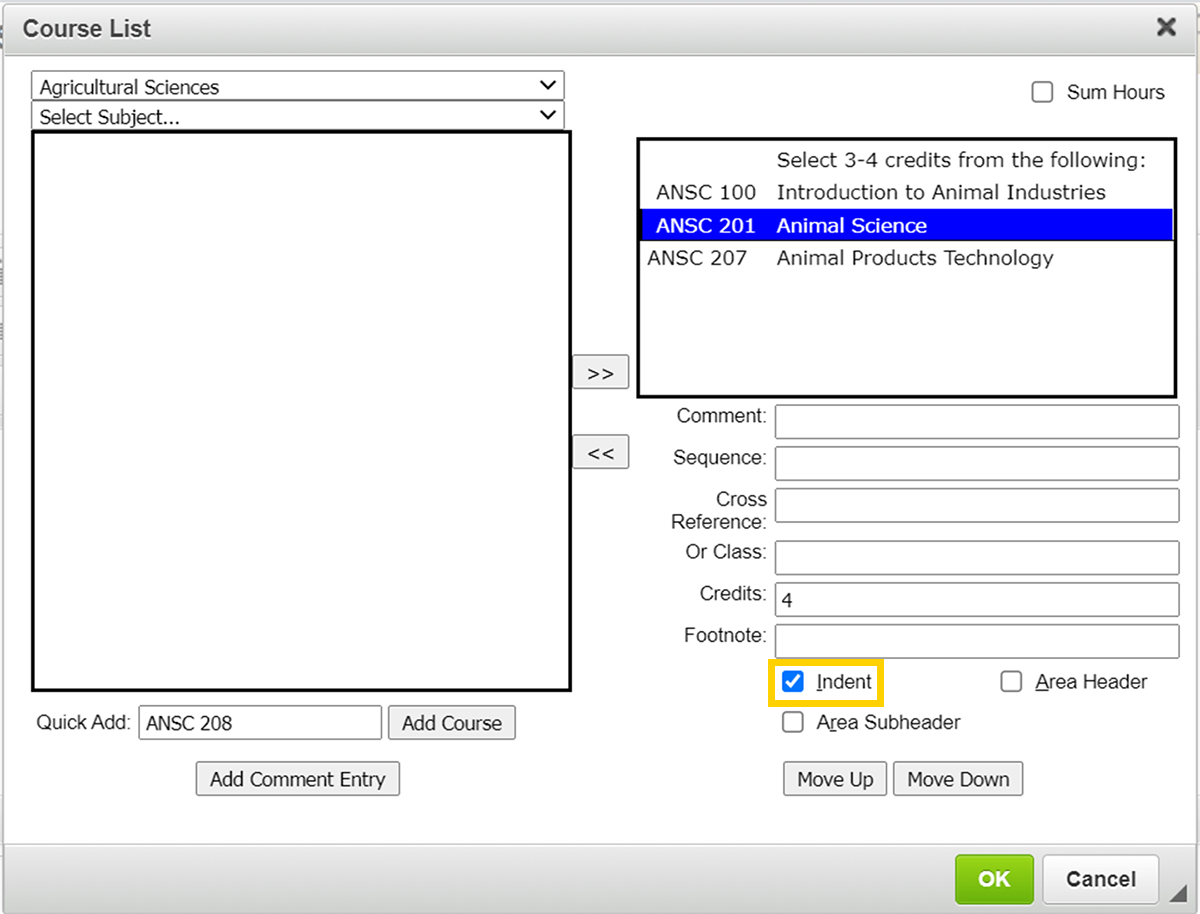
Each course that is part of the selection statement will need to be indented. Indenting makes it easier to read the course selection list by clearly identifying all courses that belong to that requirement and suppressing the display of individual course credit values.
To indent a course, select the course in your Course List and check the Indent checkbox.
If the selection requirement includes both specific courses and non-specific course options, the non-specific options should be entered using the Add Comment Entry Button and indented like the specific courses.
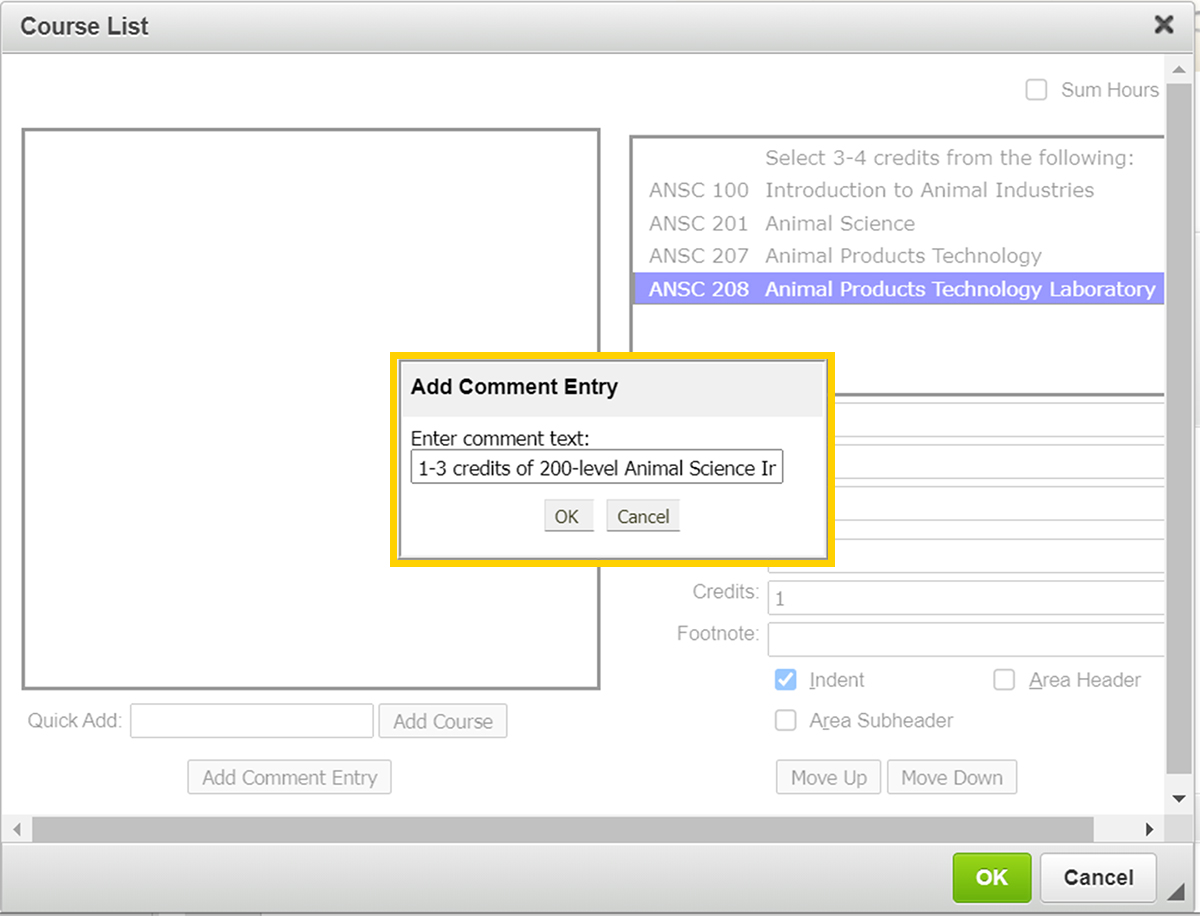
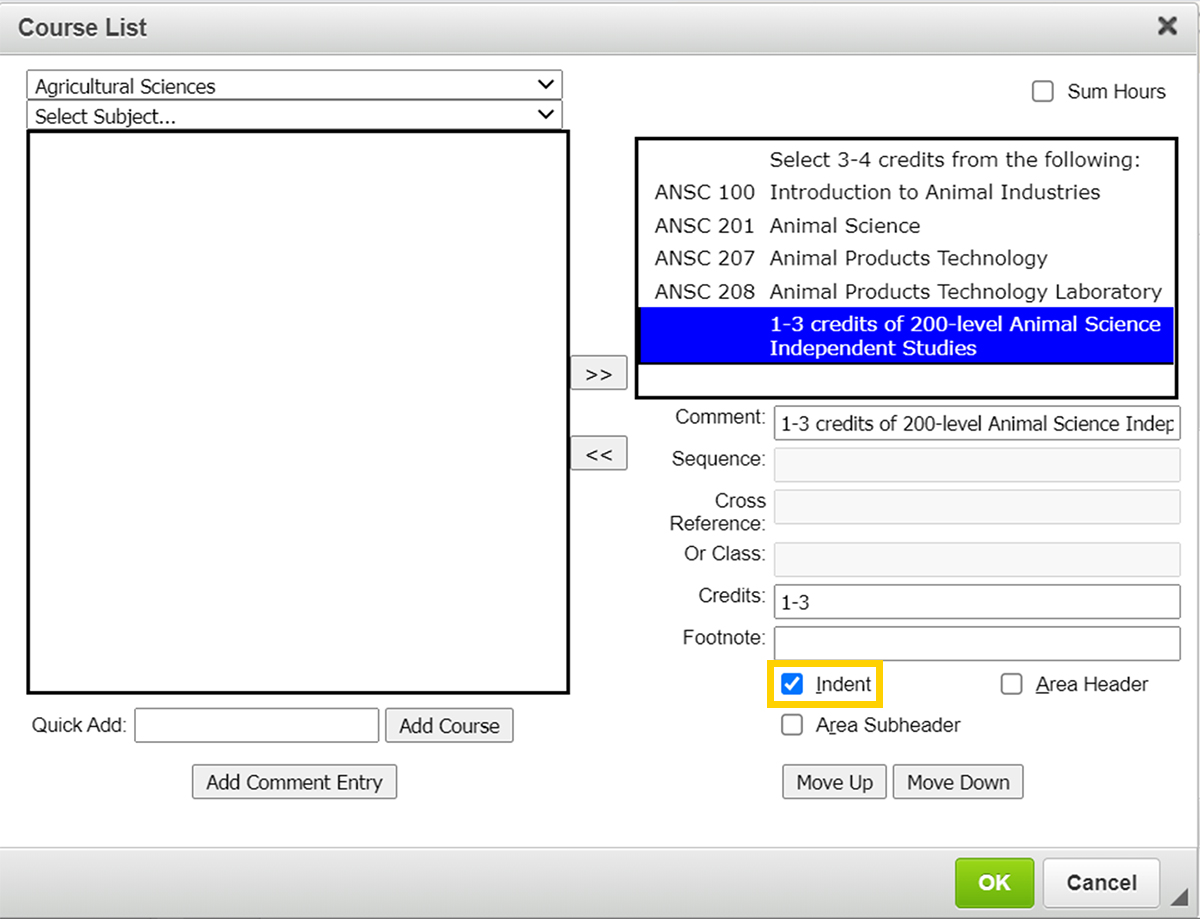
Once the non-specific course option is added to your Course List, add the appropriate credit value for the option in the Credits field.
Then check the Indent checkbox.
Once you have completed your selection statement, click the green OK Button in the Course List Editor to save your changes back to the proposal.
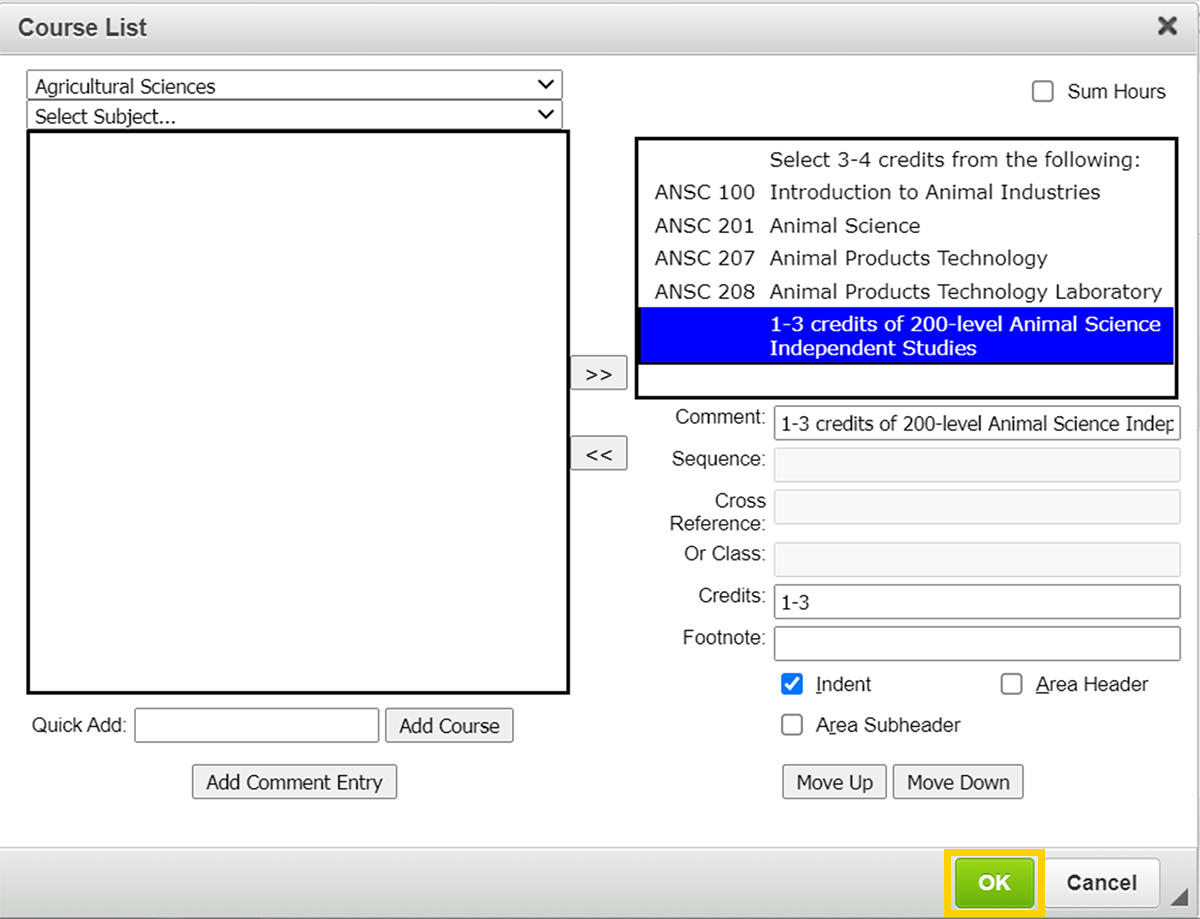
The select statement now appears in the course list on your proposal.
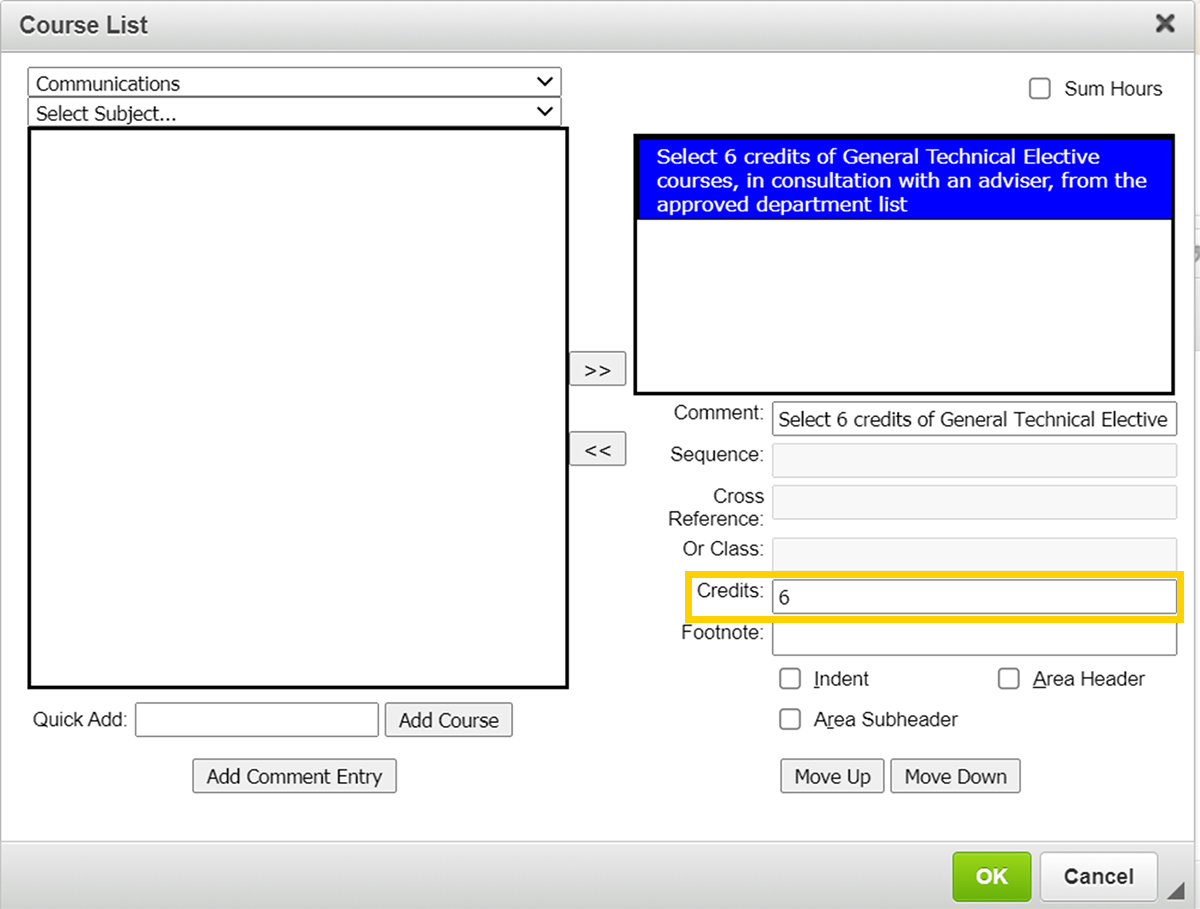
If the selection statement does not include a list of any individual courses, this can be denoted in the Course List by adding the select statement using the Add Comment Entry method.
In the Course List Editor, click the Add Comment Entry Button.
The Add Comment Entry pop-up window will open. Enter the select statement instructions, which should include the total credits students must select to fulfill this requirement. After entering the text, click the OK Button.
The Comment Entry now appears in your Course List.

With the select statement comment selected, enter the total number of credits of this selection requirement in the Credits field.
Click the green OK Button in the Course List Editor to save your changes back to the proposal.
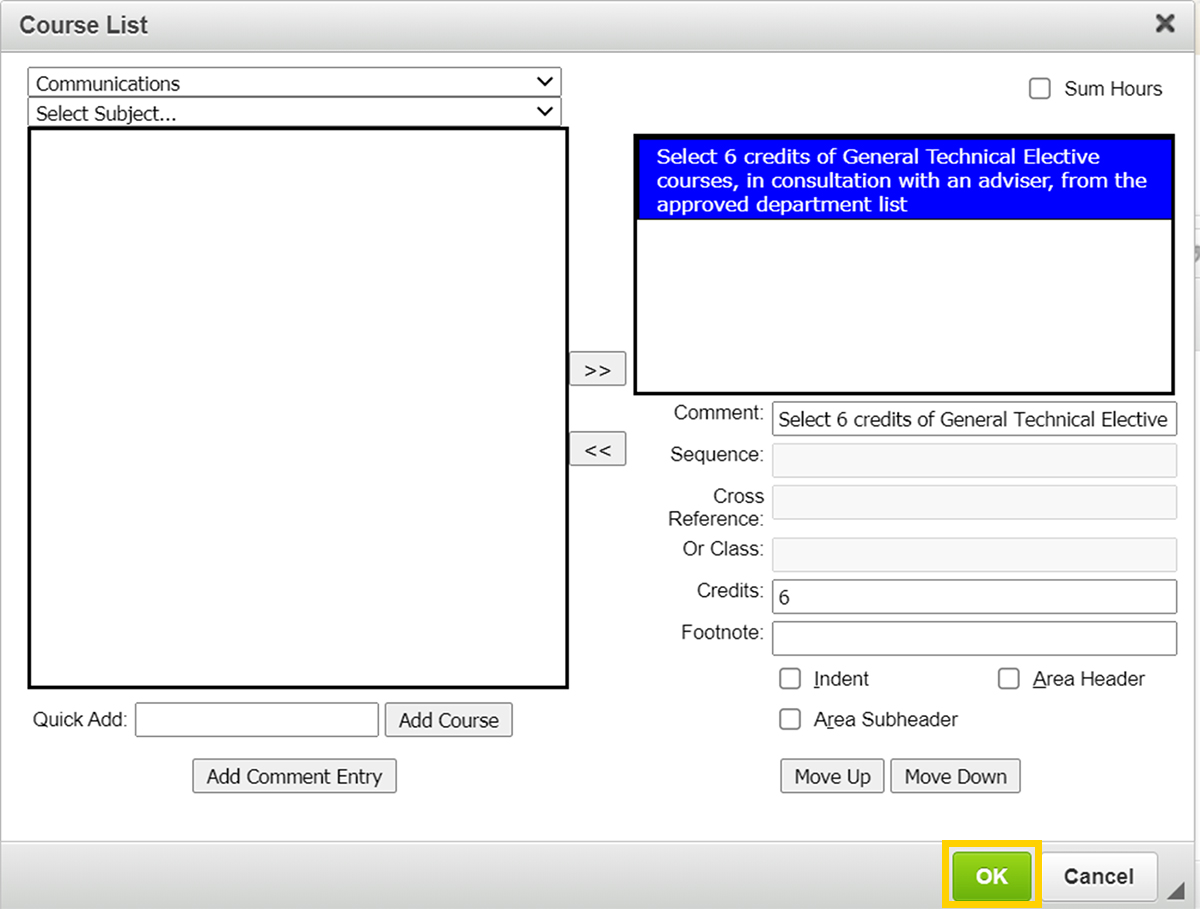
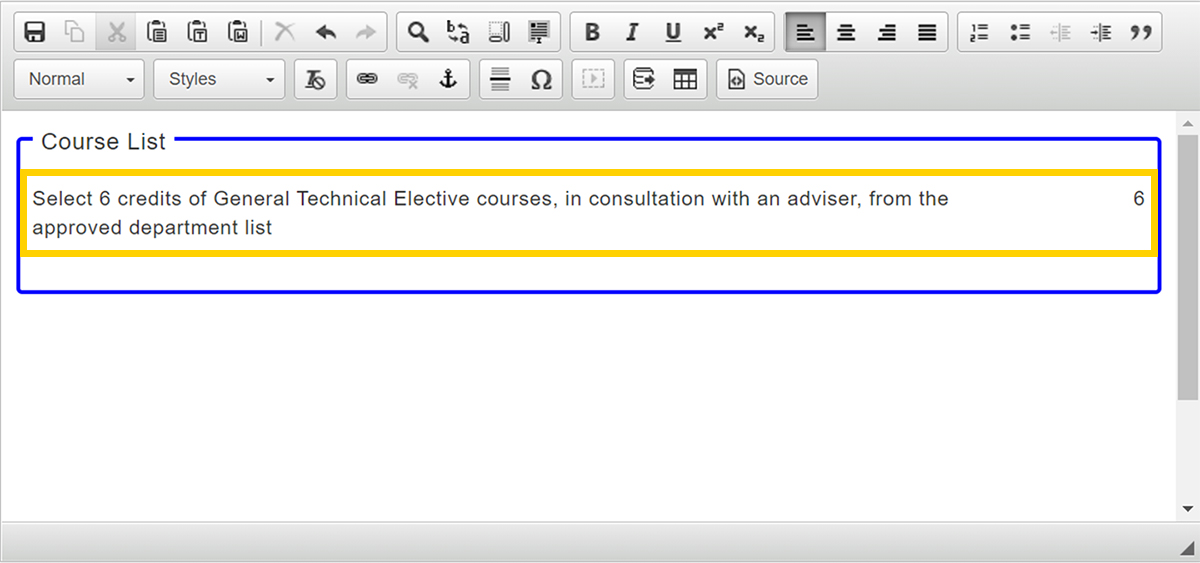
The select statement now appears in the course list on your proposal.
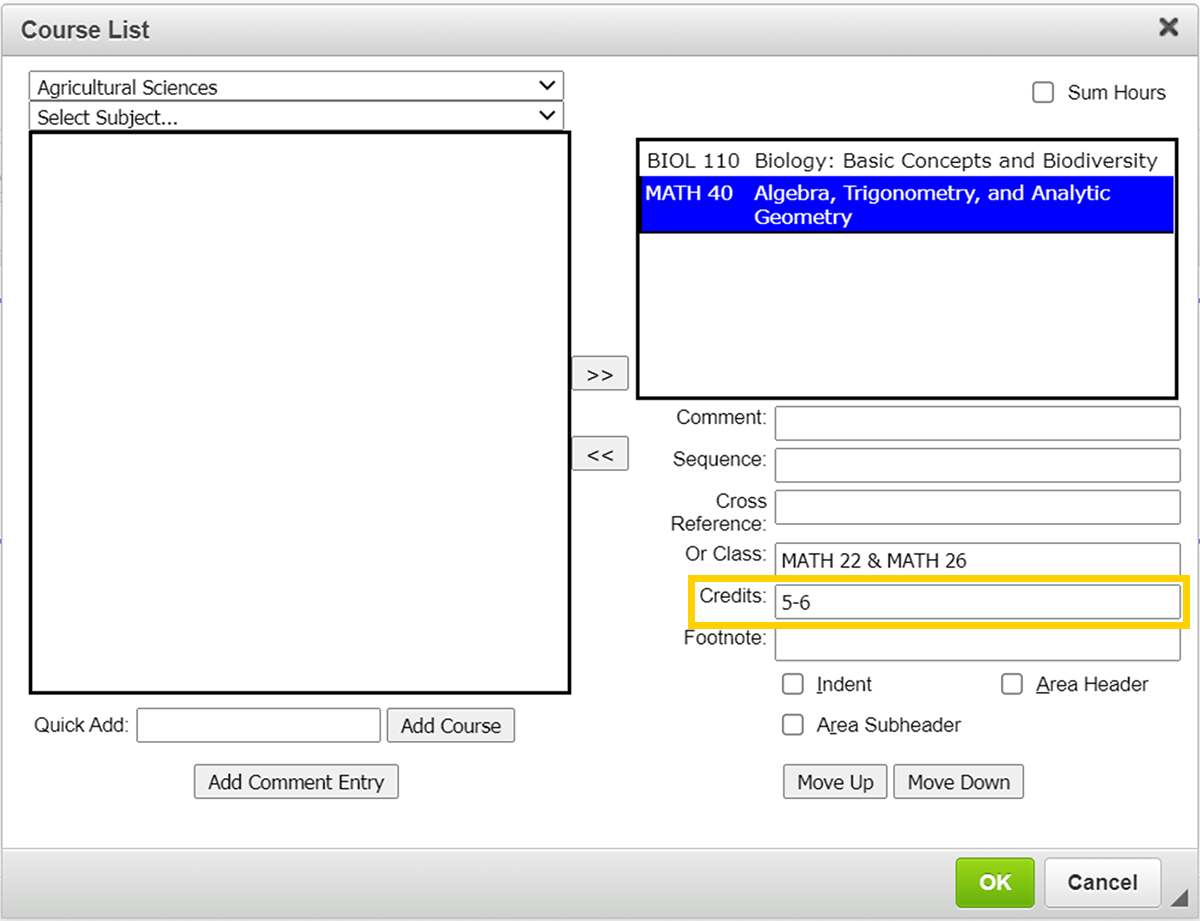
If the course requirements instruct the student to select between a single course or a two-course sequence, this can be denoted in the course list by using the Or Class field in the Course List editor.
In the Course List Editor, add the single course using the Quick Add method (described above).

The course now appears in your Course List.
With the single course selected, type the two-course sequence in the Or Class field in the following order: first course followed by an ampersand (&) followed by the second course. The two-course sequence should appear as: "COURSE 1 & COURSE 2".
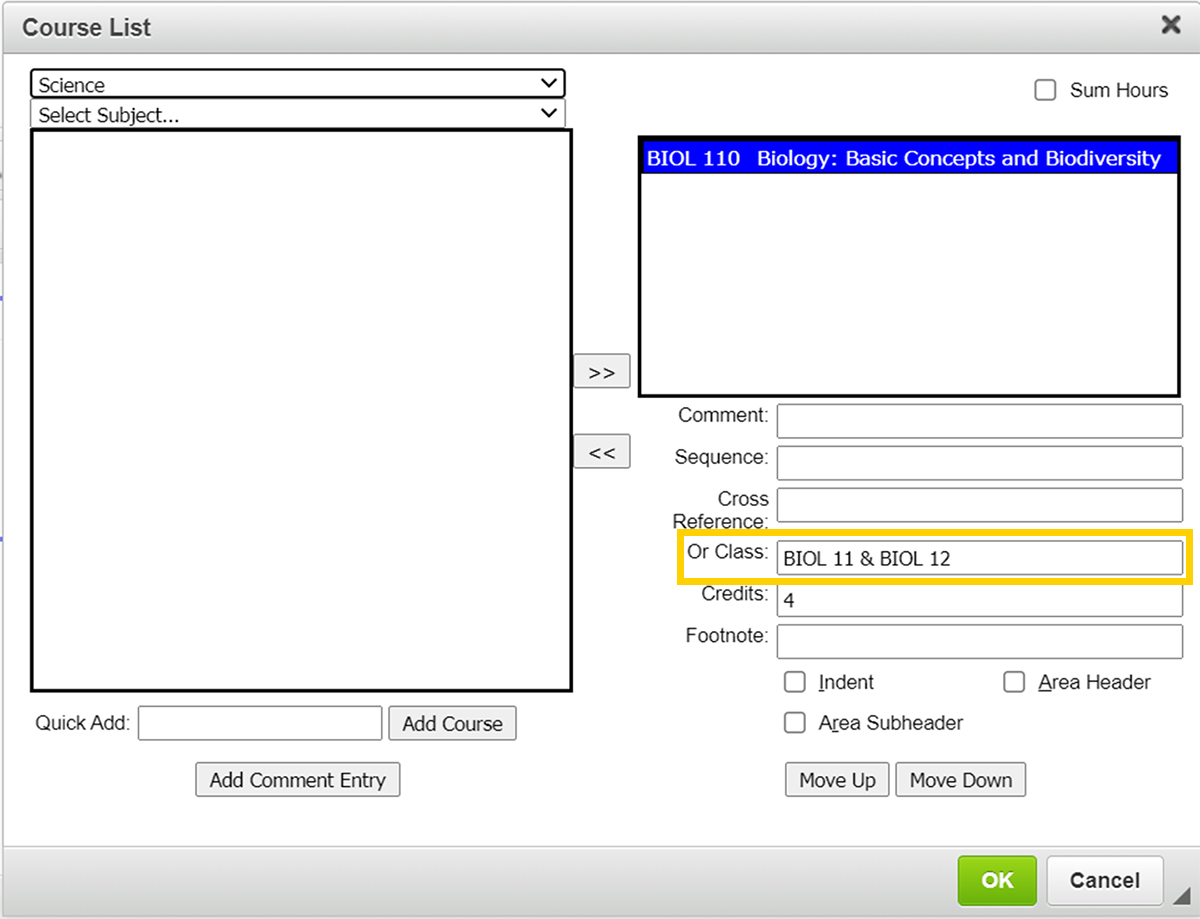
Next, view the credit value listed in the Credits field. The current value is the number of credits for the single course entered via the Quick Add method. If students can earn the same number of credits from both the single course and the two-course sequence the credit value entered does not need to be modified. However, if the two-course sequence has a different credit value, the value in the Credits field should be modified to reflect the range of credits that can be earned from this sequence selection.
For example, if students can select between the single course MATH 40 or the two-course sequence of MATH 22 and MATH 26, they will earn either 5 credits if they take MATH 40 or 6 credits if they take MATH 22 and MATH 26. The credit range that should be entered for this selection is "5-6".
Click the green OK Button in the Course List Editor to save your changes back to the proposal.
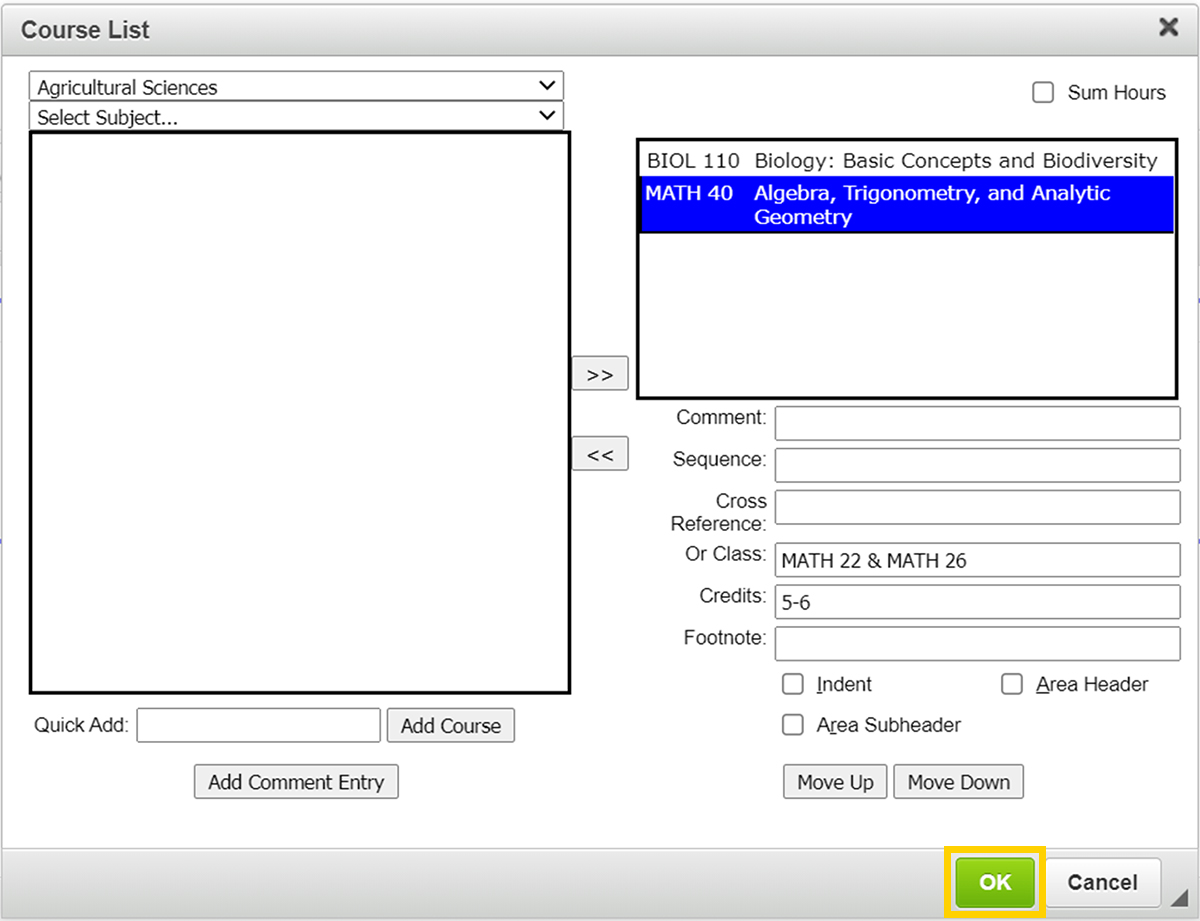
The single course/two-course sequence select statement now appears in your course list on your proposal with "or" between the single course and two-course sequence students must choose from. The two-course sequence also has an ampersand (&) connecting the two courses that must be taken as part of the sequence.

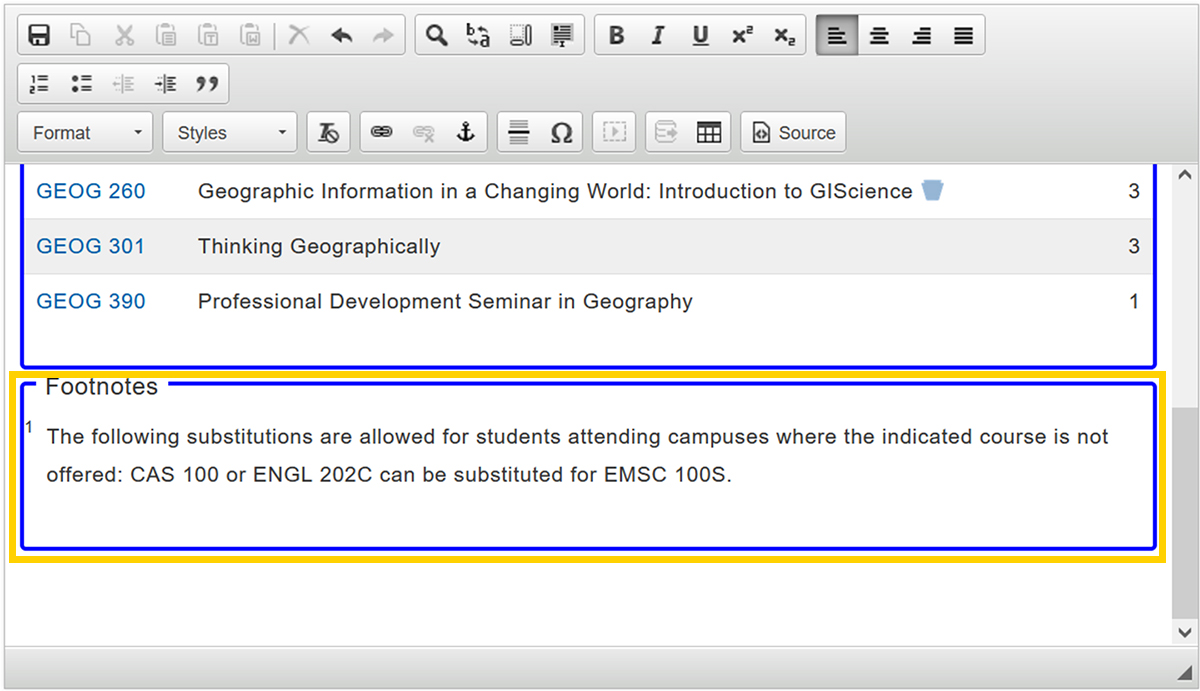
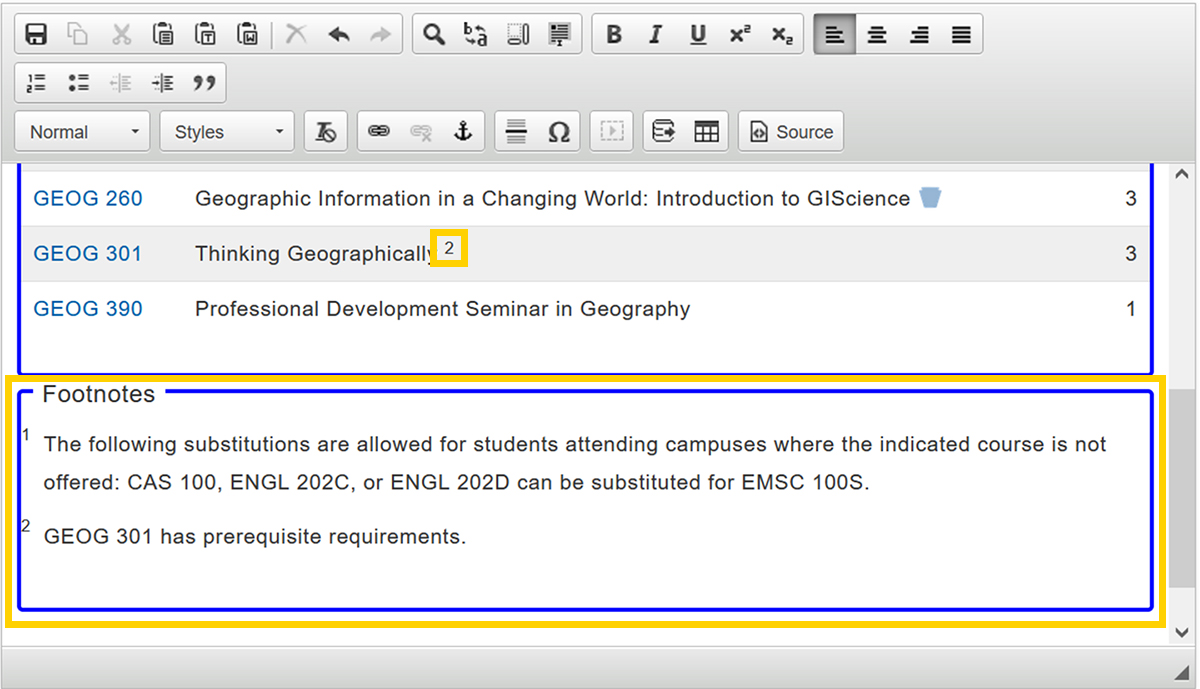
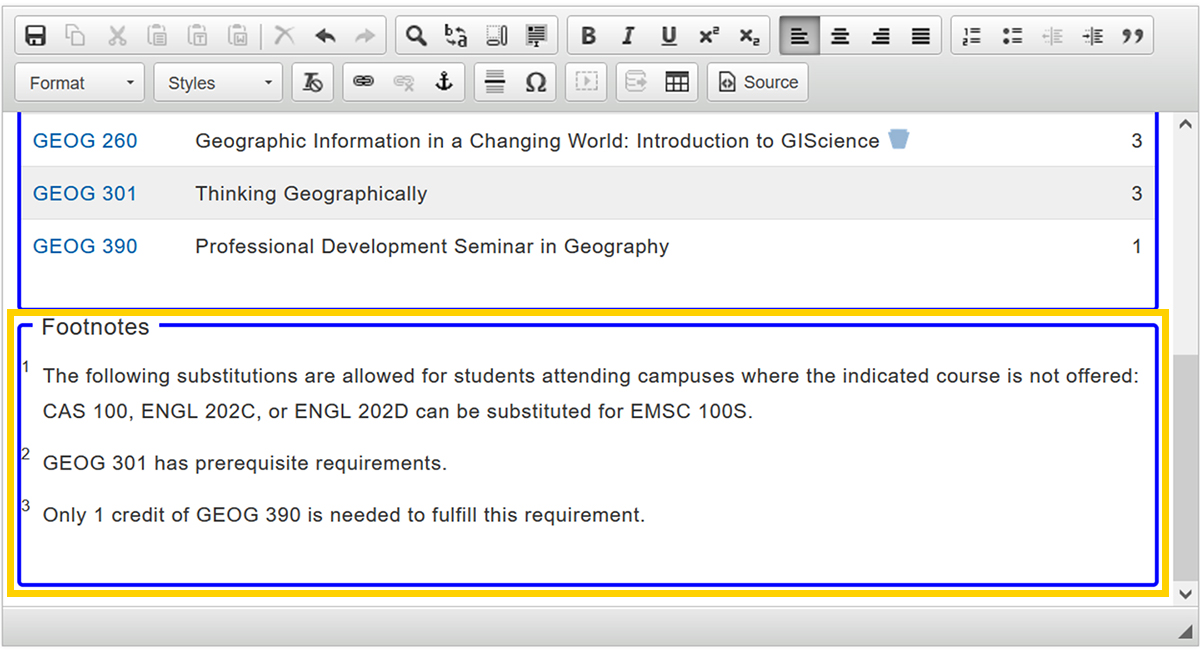
Footnotes are used within the course list to include additional information or specification to a course requirement.
Footnotes have two parts: a footnote indicator (1 2) and a footnote table. Footnote indicators go next to the course requirement in the course list, and footnote tables are used to articulate the text of the footnote. Footnote indicators should be numeric (1, 2, 3, etc.).
Footnote indicators and entries in the footnote table are not automatically linked. In other words, when a new indicator is added, you must manually add the footnote text to the table. Likewise, if the footnote text in the table is deleted, the indicator in the course list must also be deleted manually.
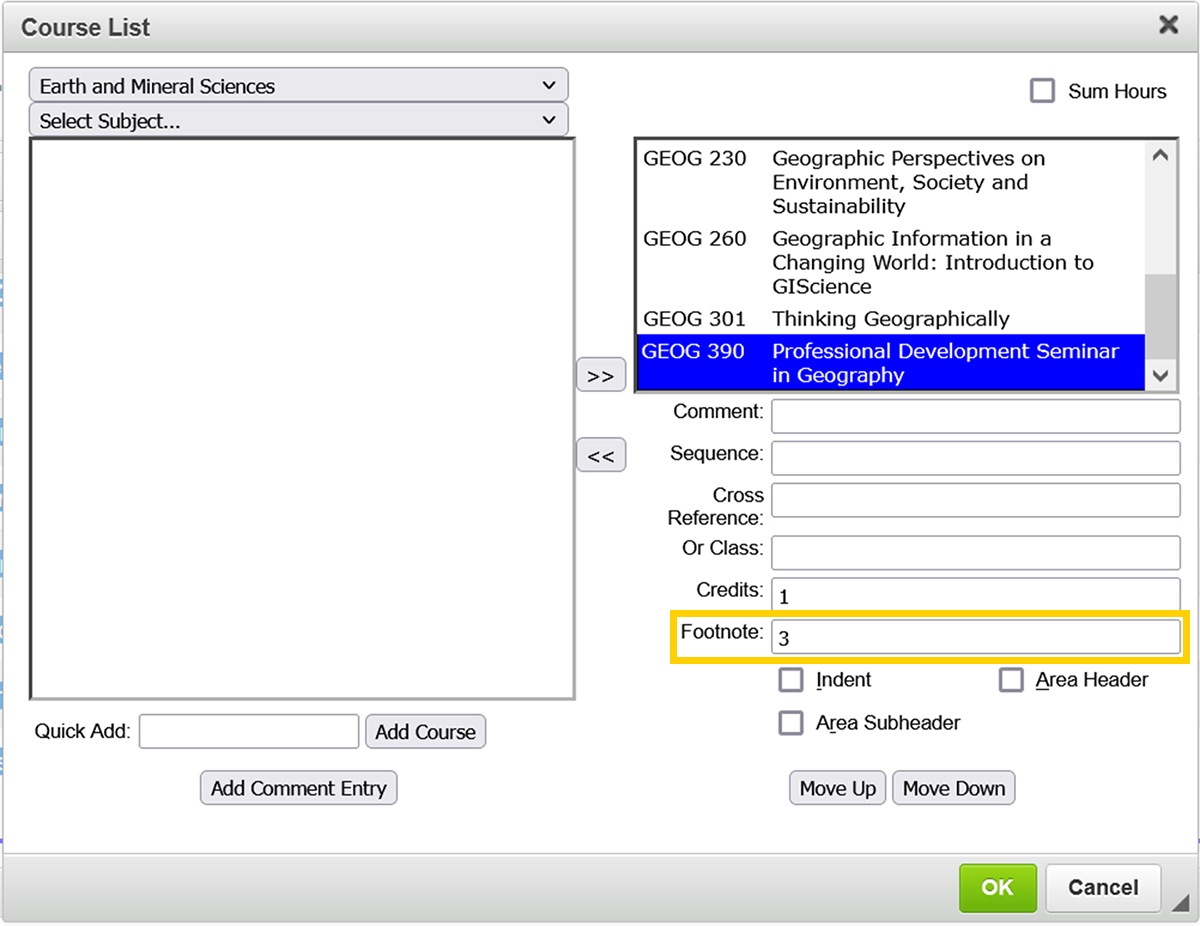
In the Course List Editor, select from your Course List the course or course requirement that requires a footnote.
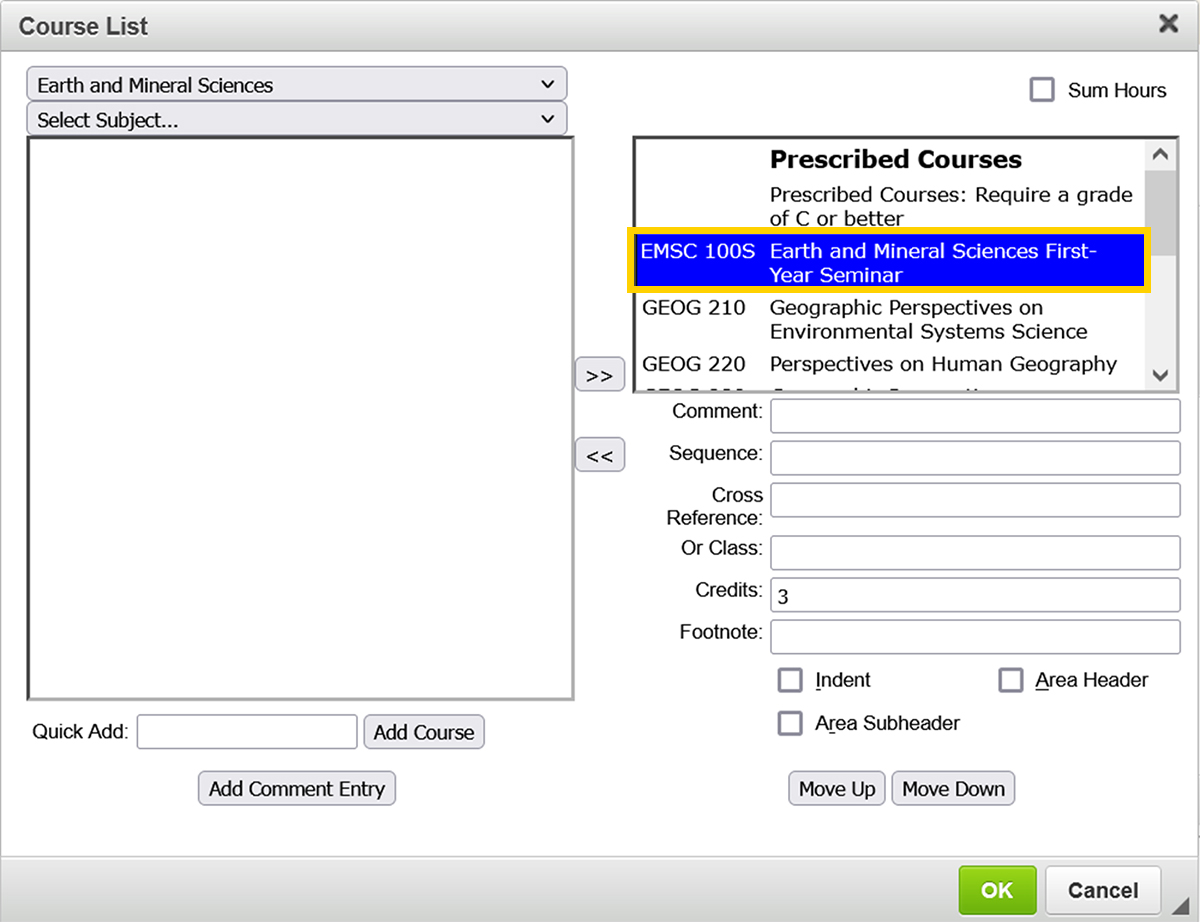
In the Footnote field, enter the appropriate footnote indicator number (1, 2, 3, etc.).
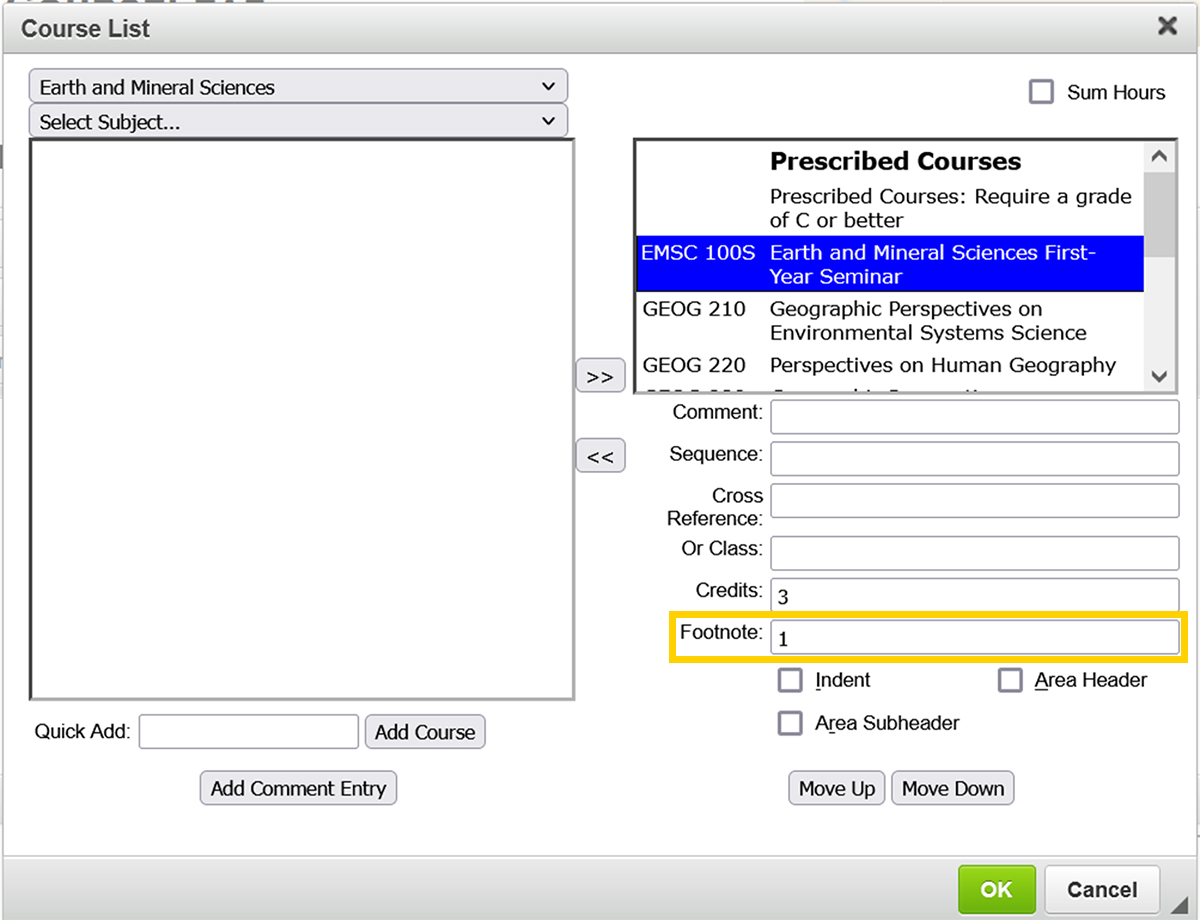
Click the green OK Button in the Course List Editor to save your changes back to the proposal.
The newly added footnote indicator now appears on your proposal at the end of the course description of the selected course requirement.
Next, scroll to the bottom of the course list in the Page Body Editor and click in the blank space to place your cursor there. If there is no blank space below the course list, hover your cursor below the course list and click on the Red Arrow box that appears to insert a blank new paragraph space. Then click in the blank space to place your cursor there.
With your cursor below the course list, click the Insert/Edit Formatted Table icon in the Page Body Editor toolbar.
In the Insert Formatted Table selection tool pop-up, select Footnotes from dropdown menu and click the OK Button.
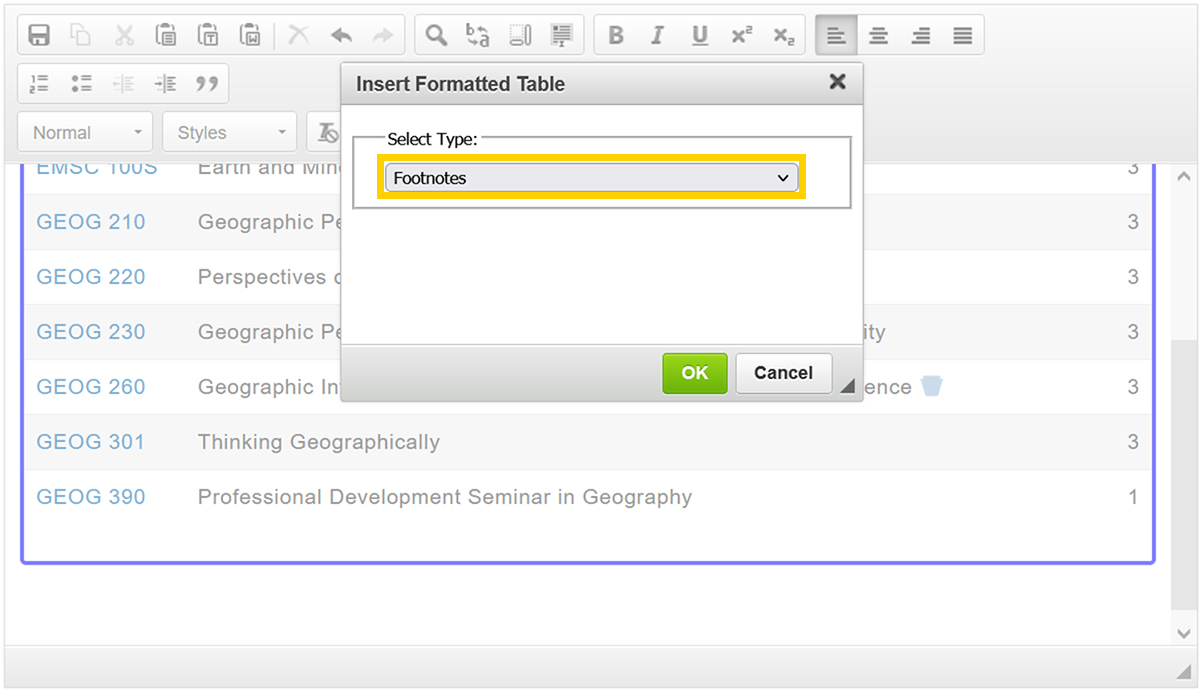
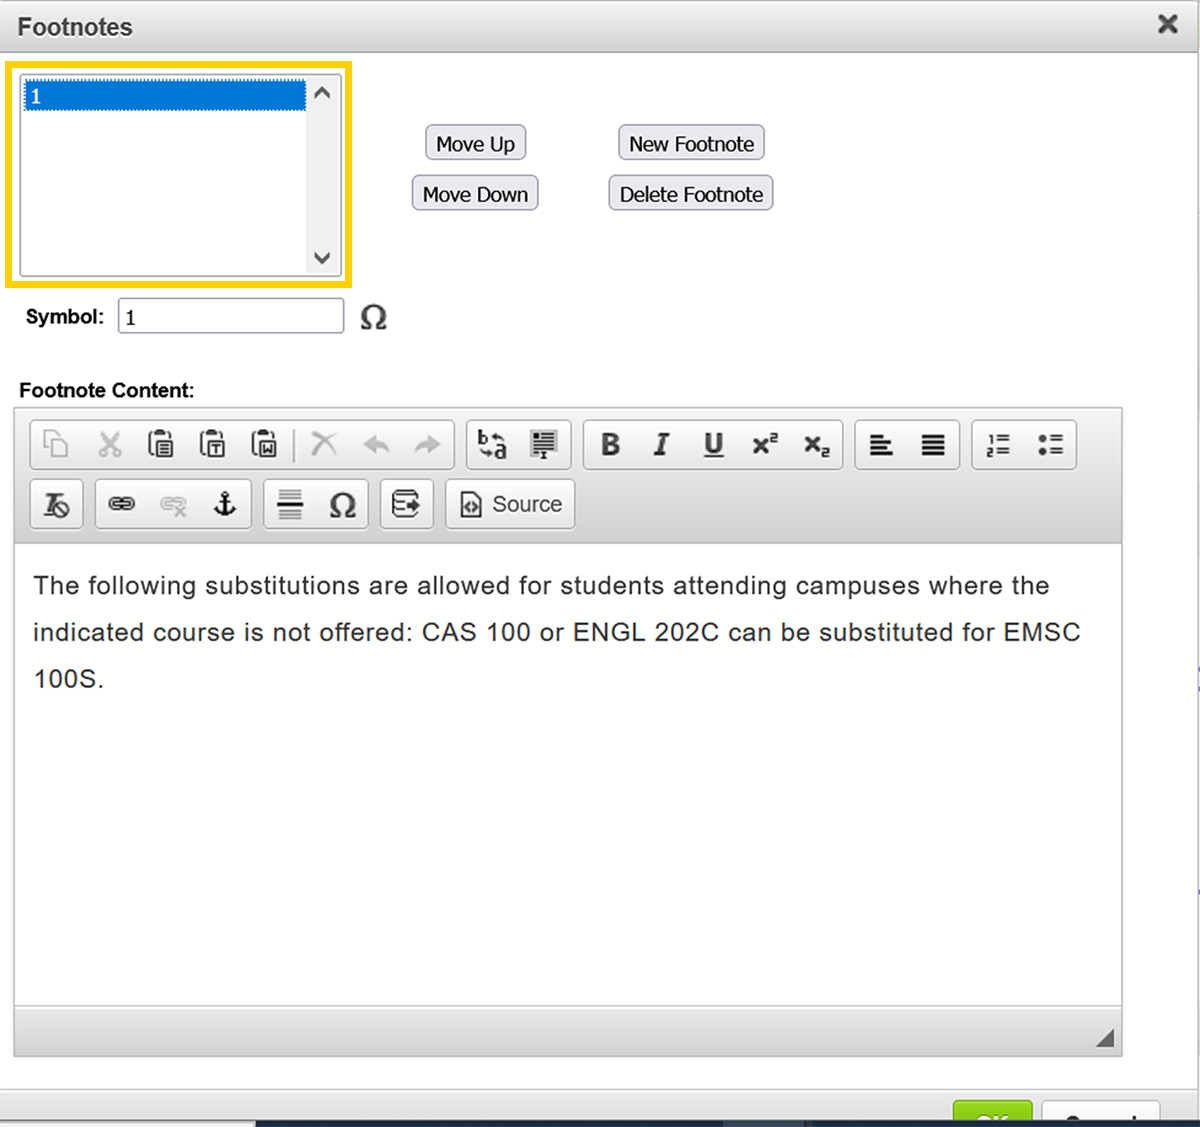
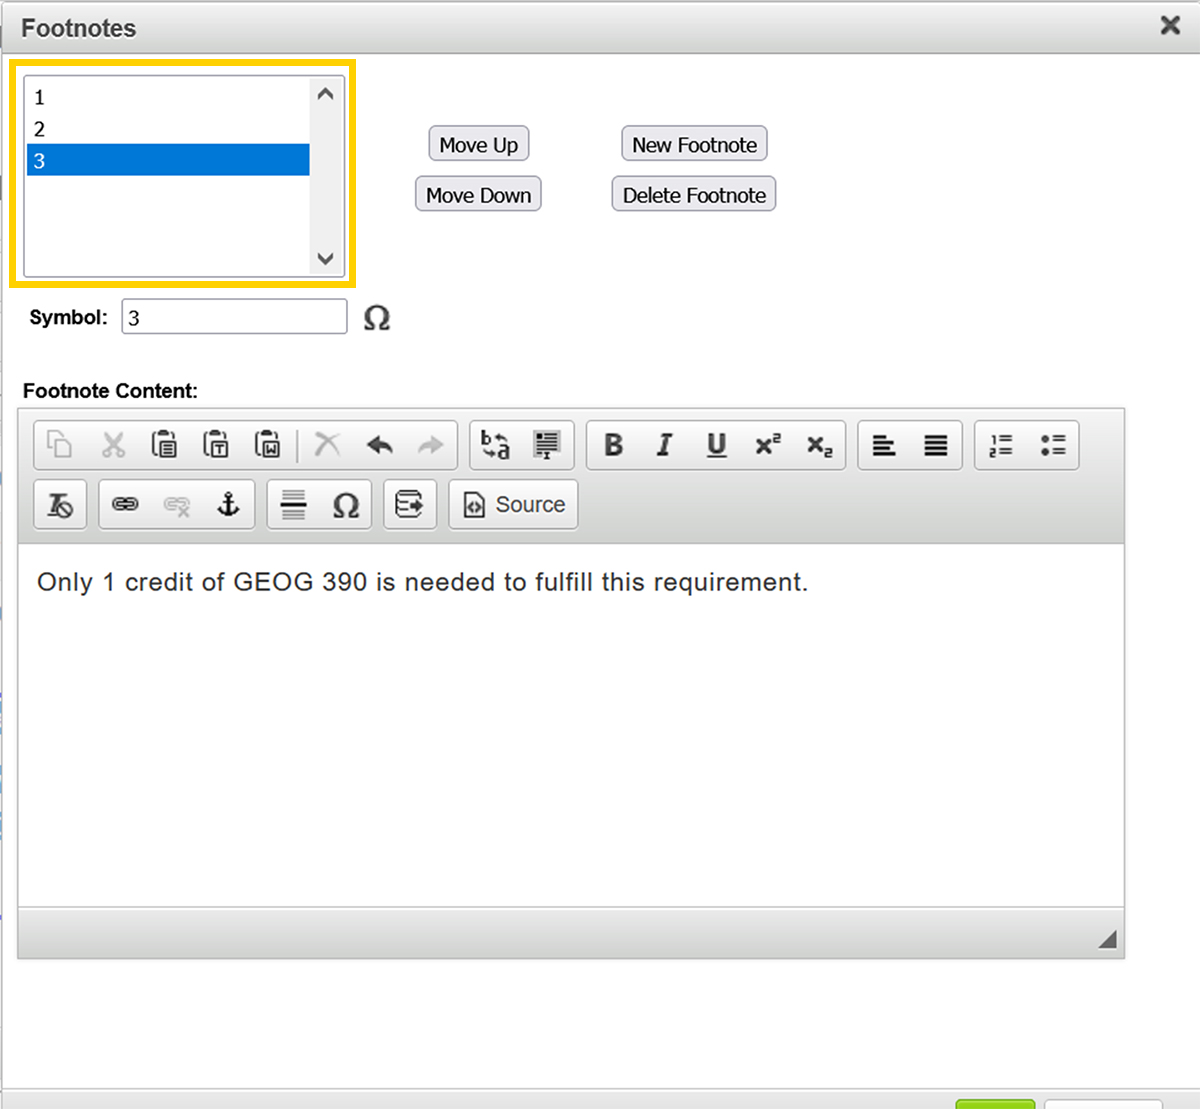
The Footnote Table Editor is now open.
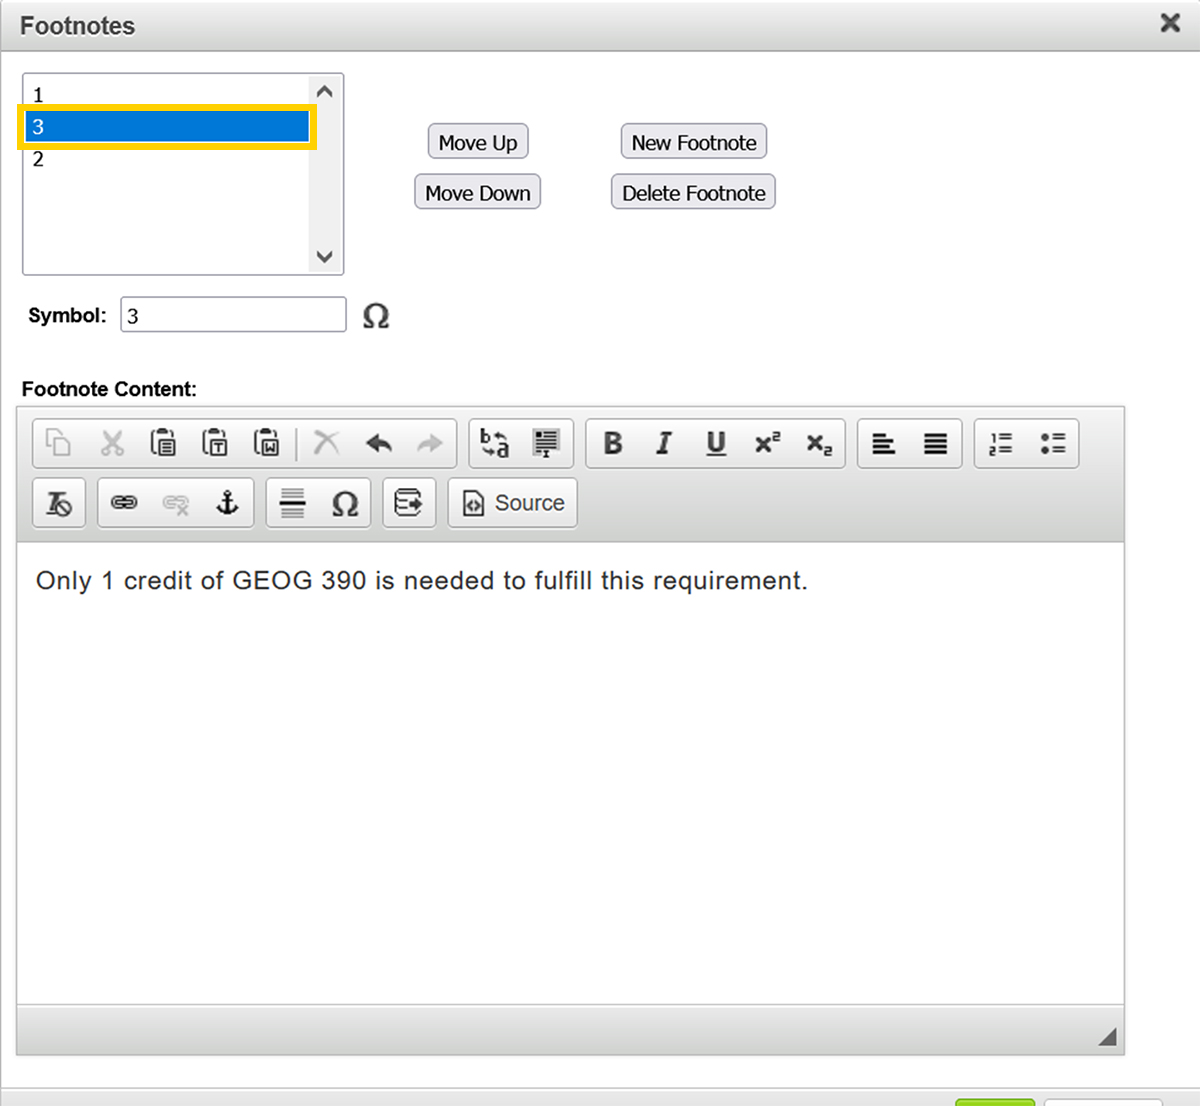
In the Footnote Table Editor, click the New Footnote Button.
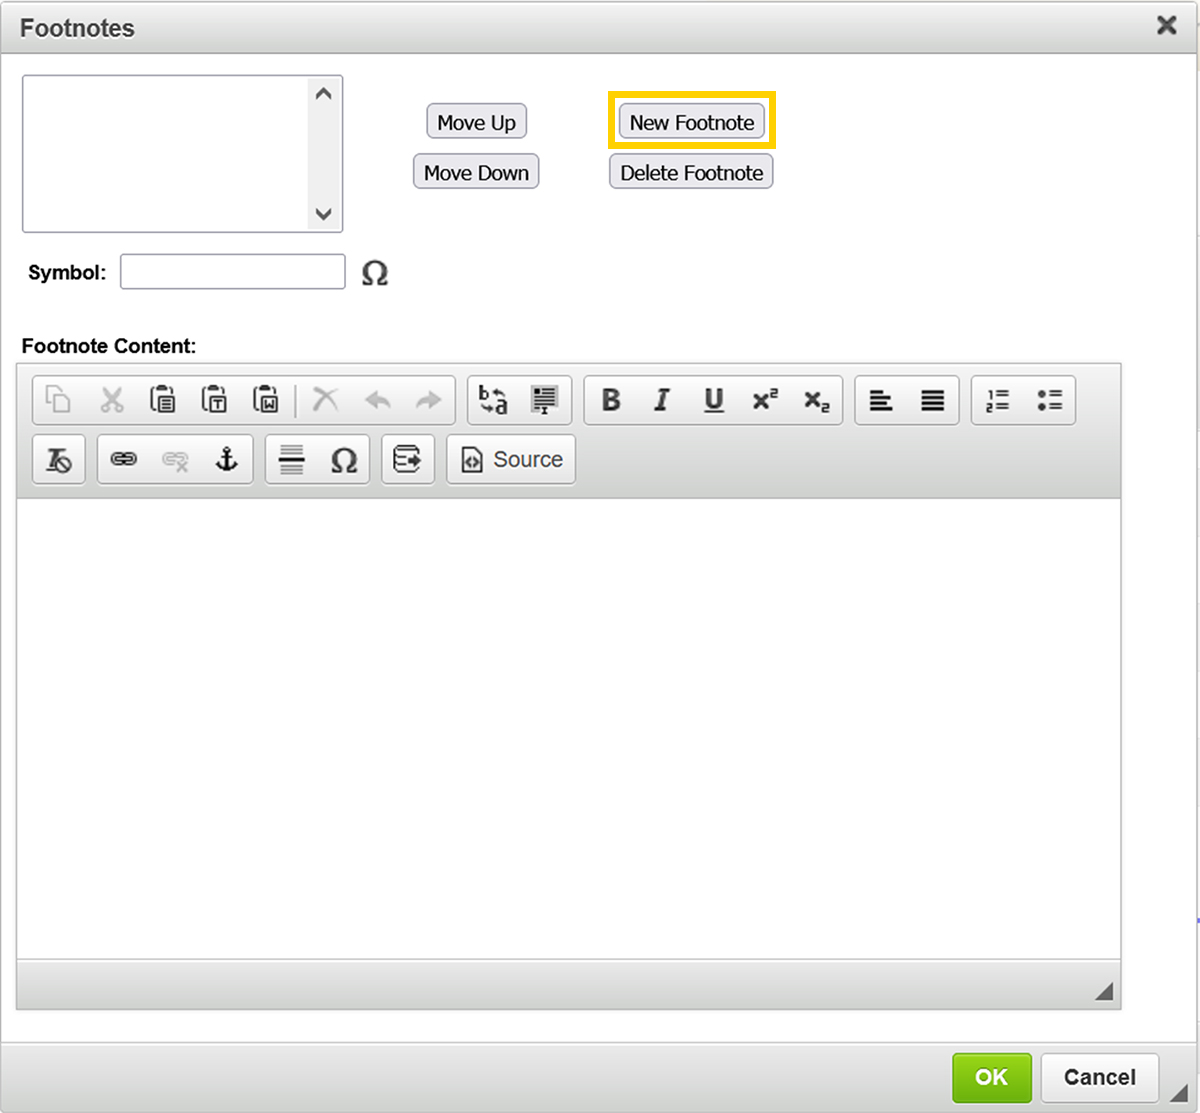
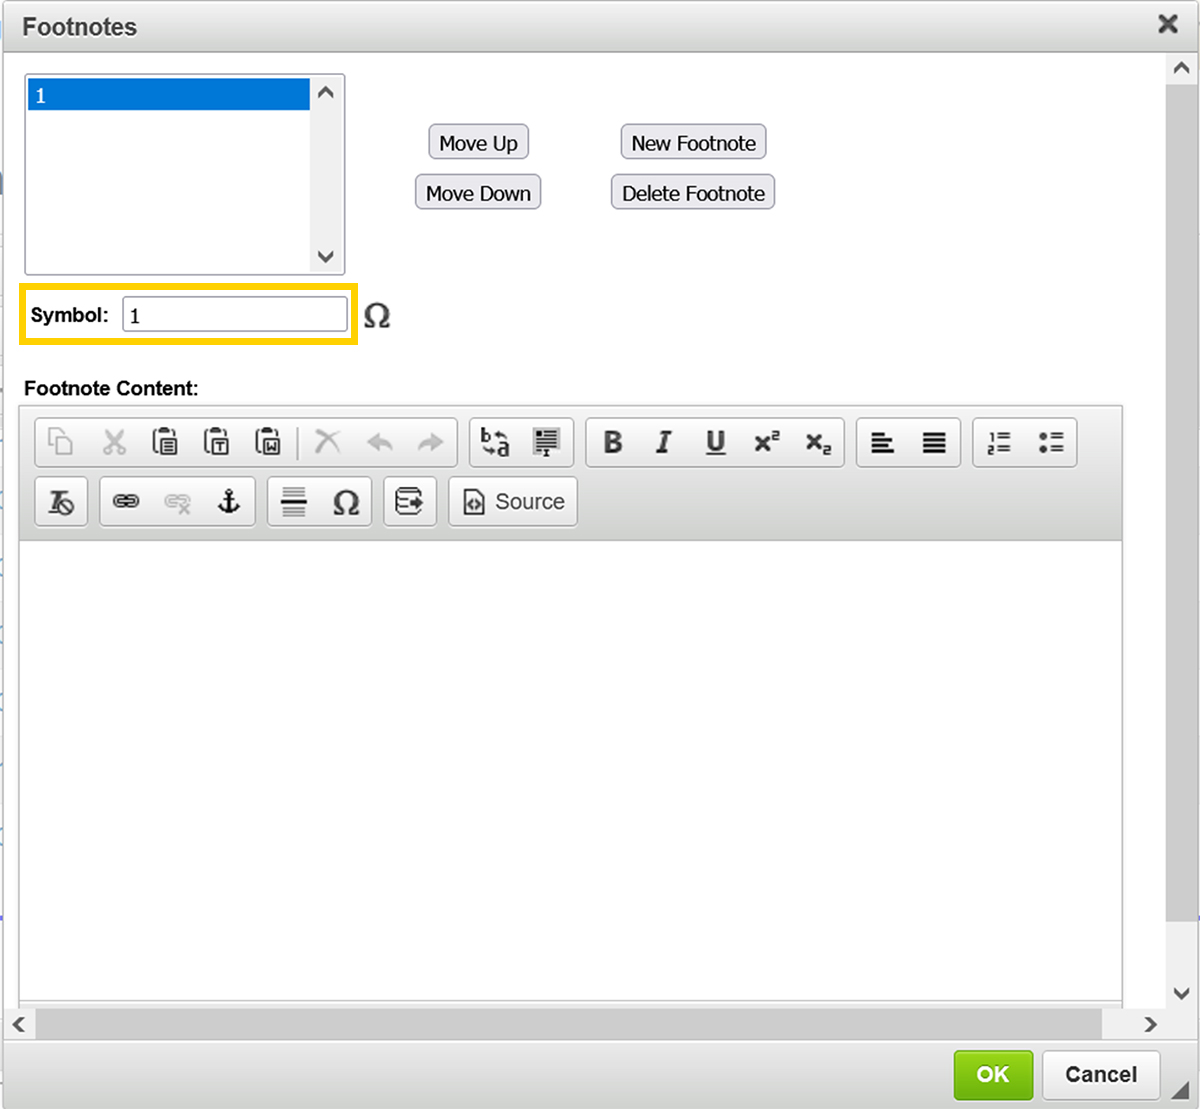
Enter the used footnote indicator in the Symbol field.
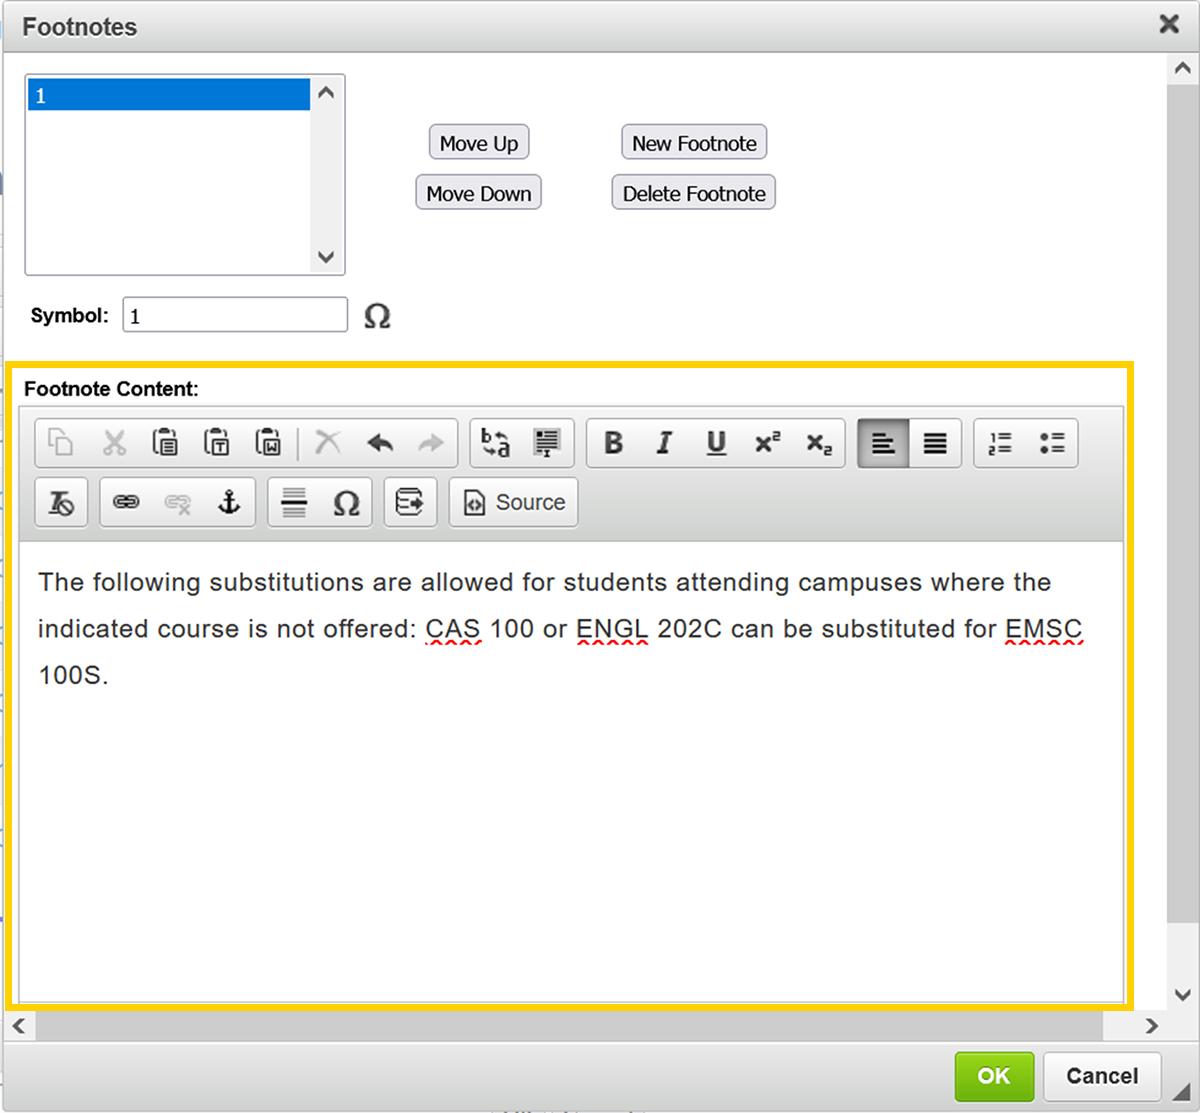
Enter the footnote text into the Footnote Content field.
Repeat the last two steps as necessary to add all needed footnotes.
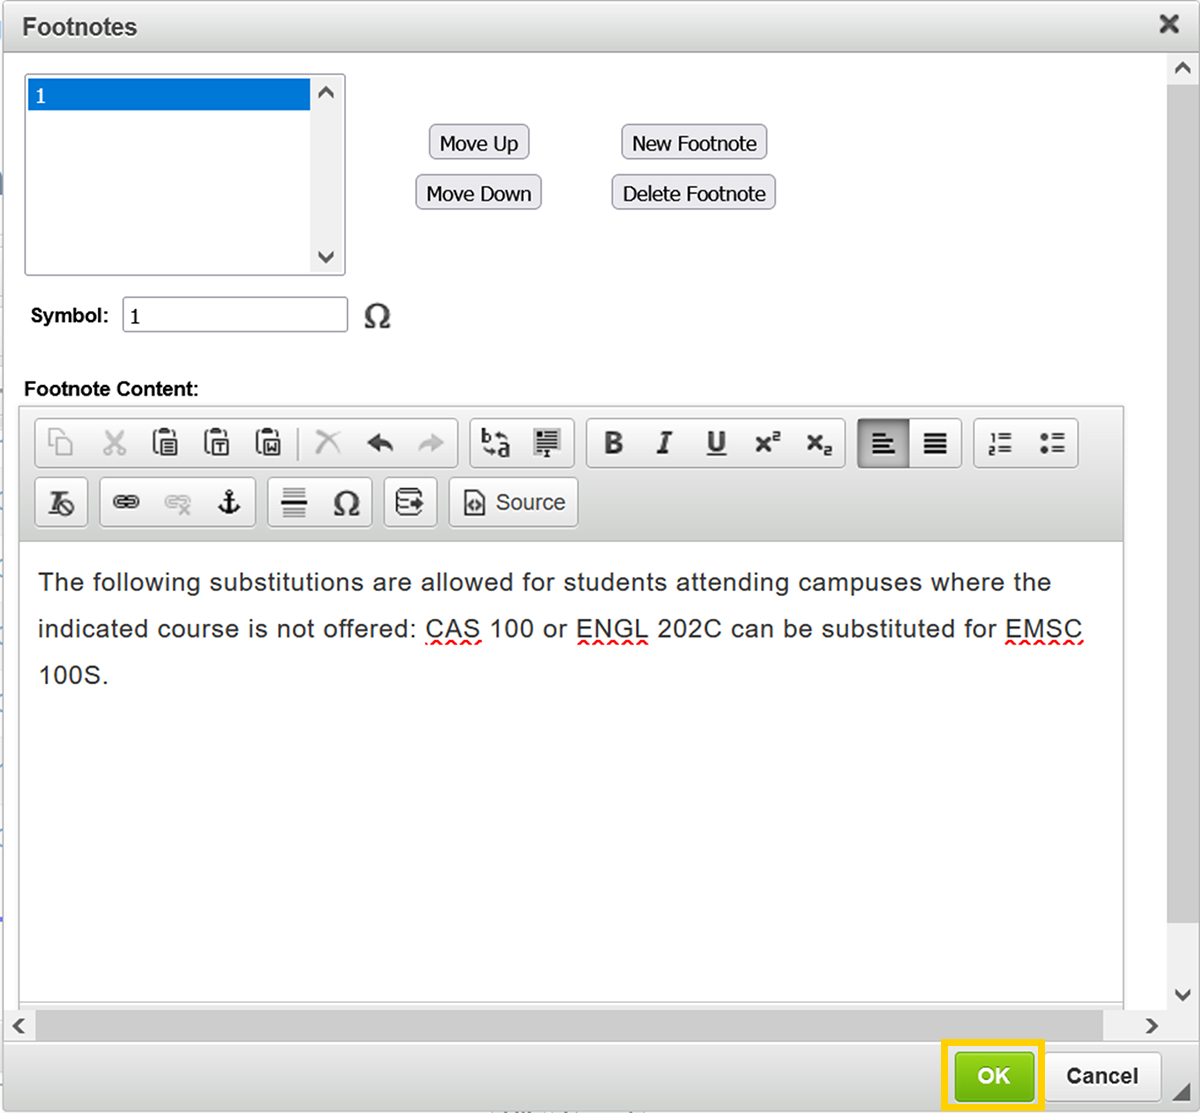
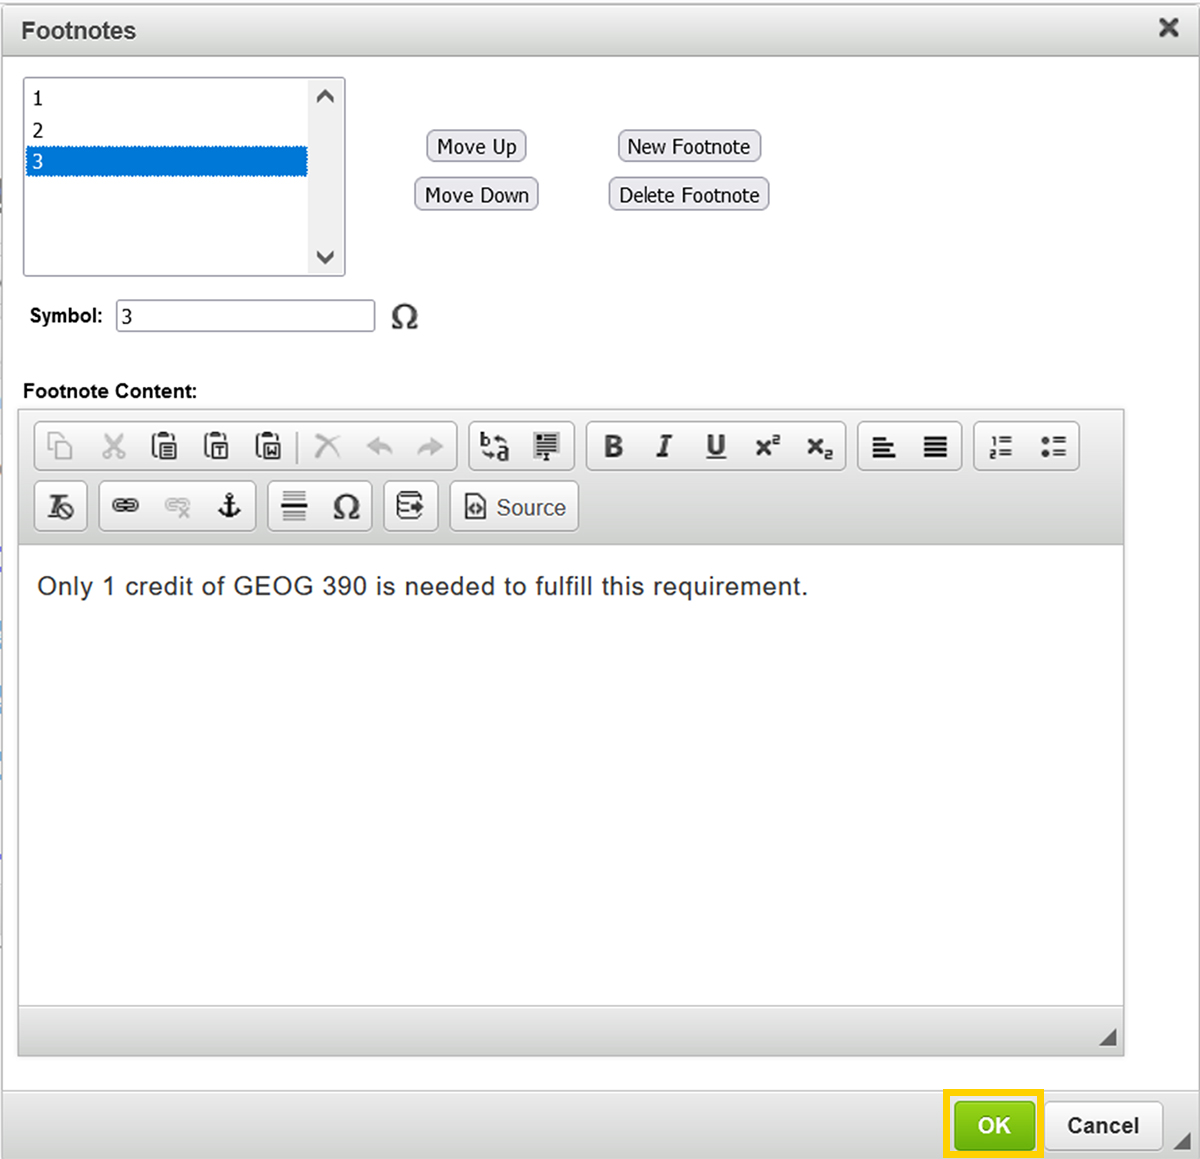
Once all footnotes are added, click the green OK Button to save the footnotes back to your proposal.
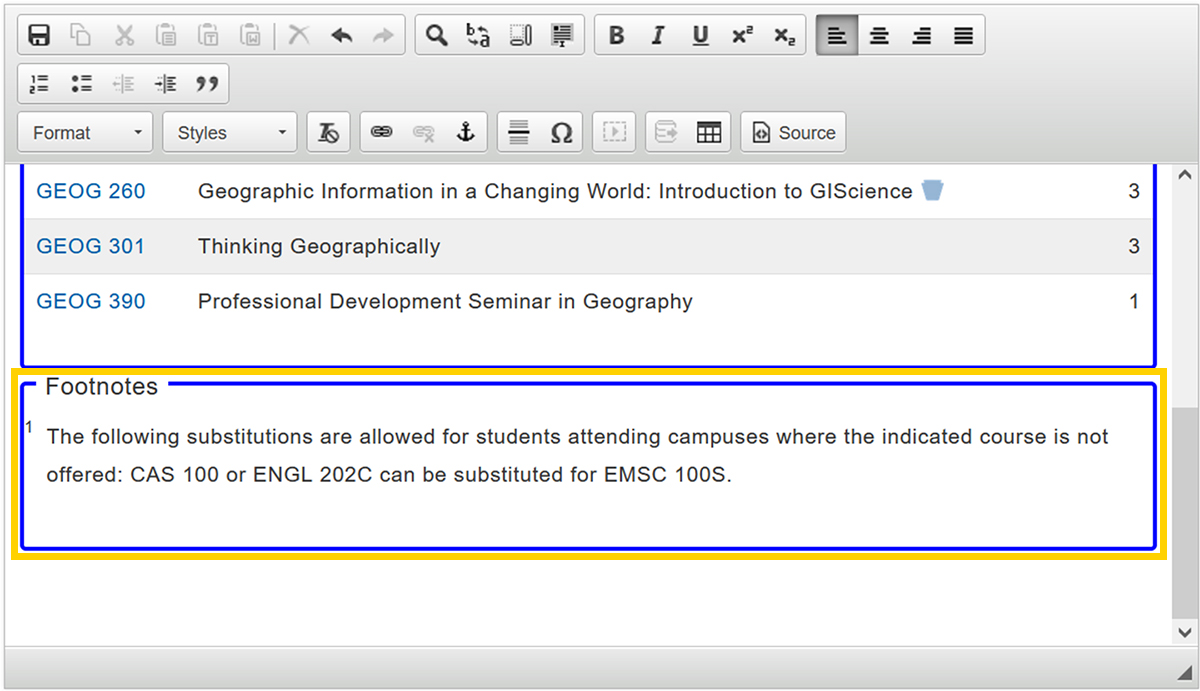
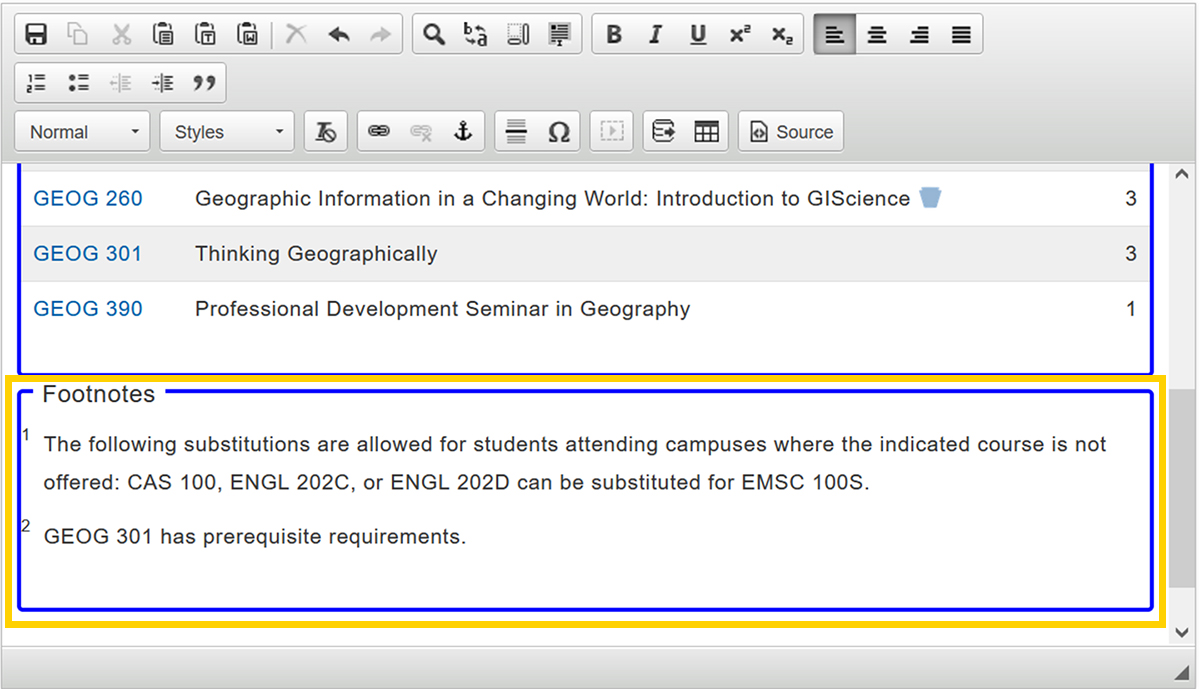
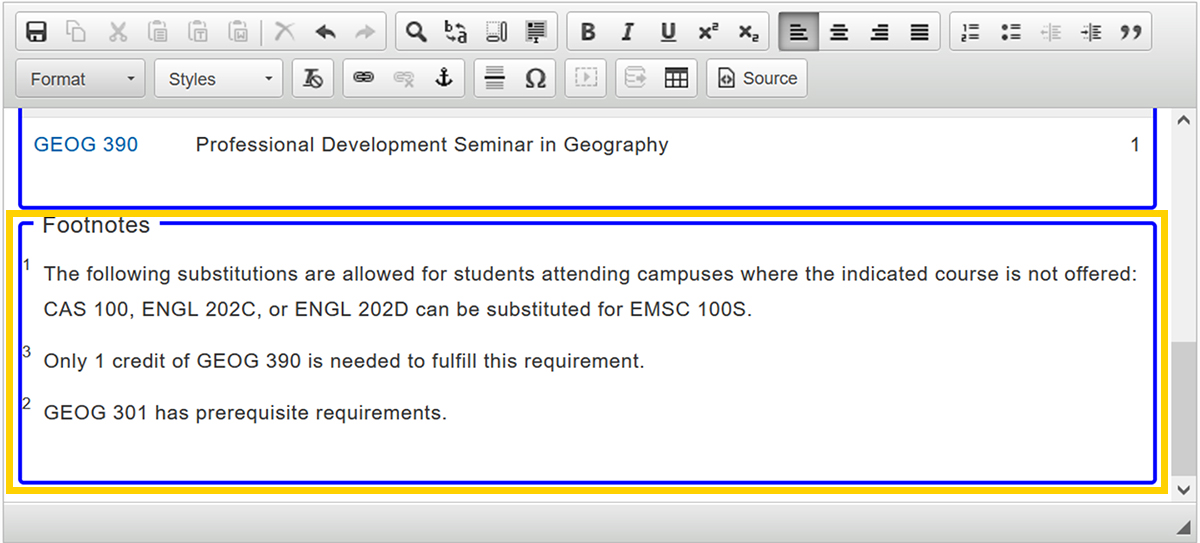
The footnote table now appears on your proposal.
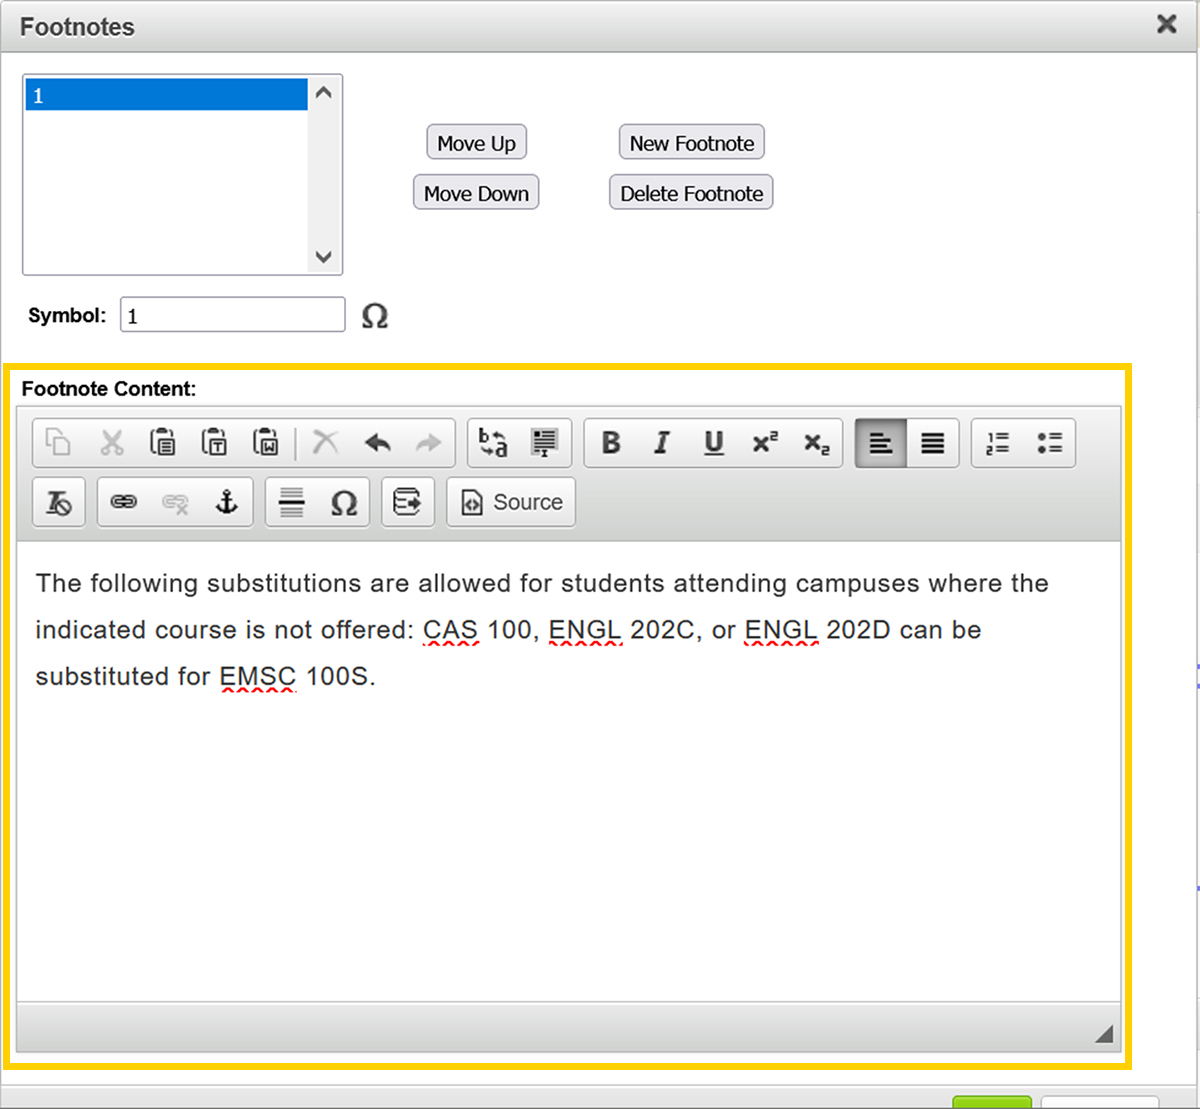
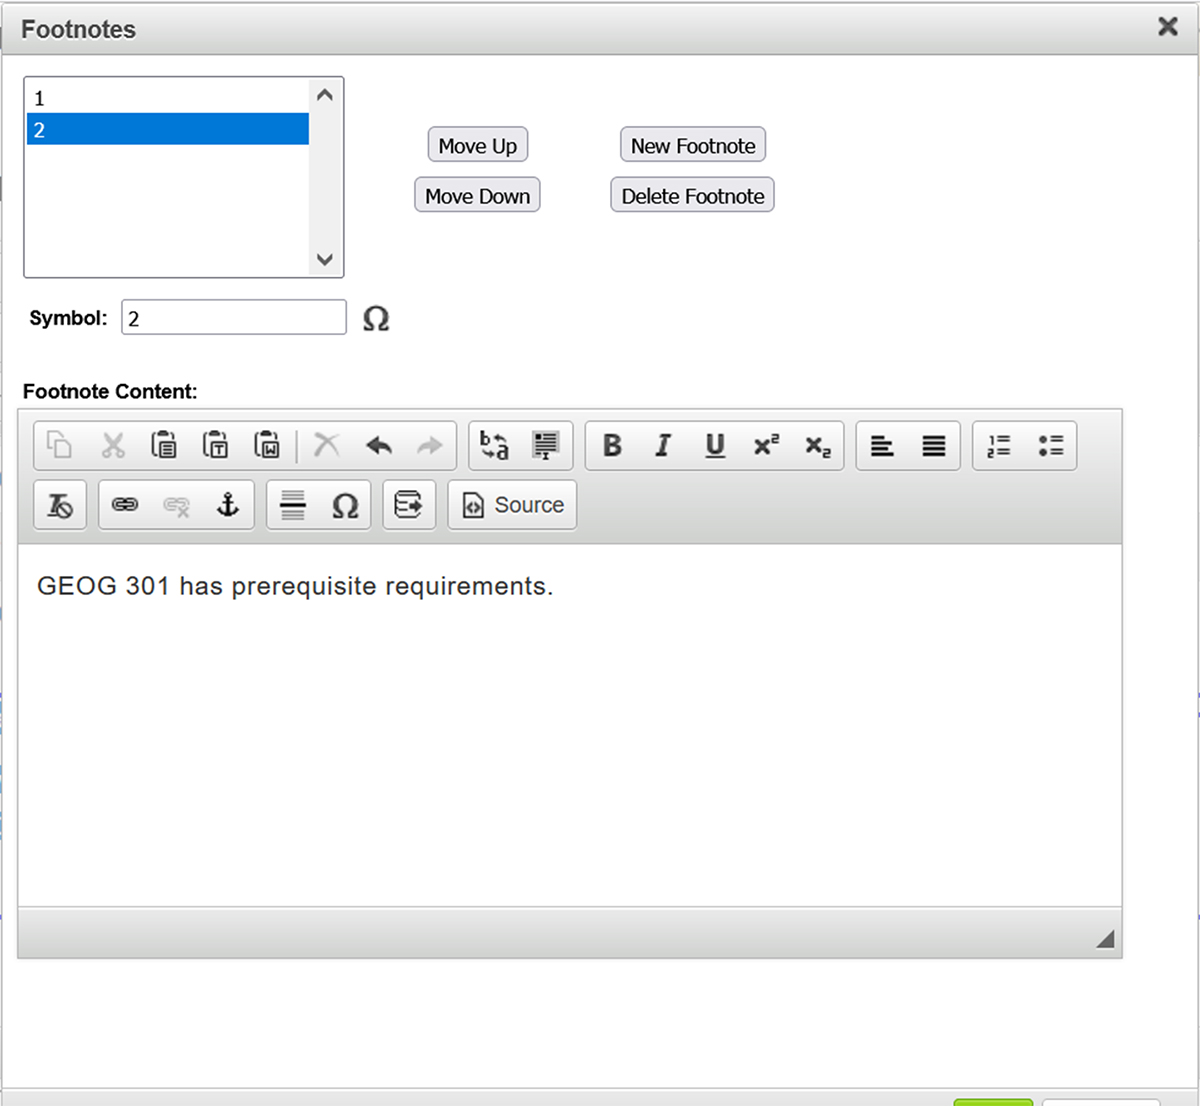
To edit an existing footnote, double click inside the Footnotes Table blue box in the Page Body Editor to open the Footnote Table Editor.
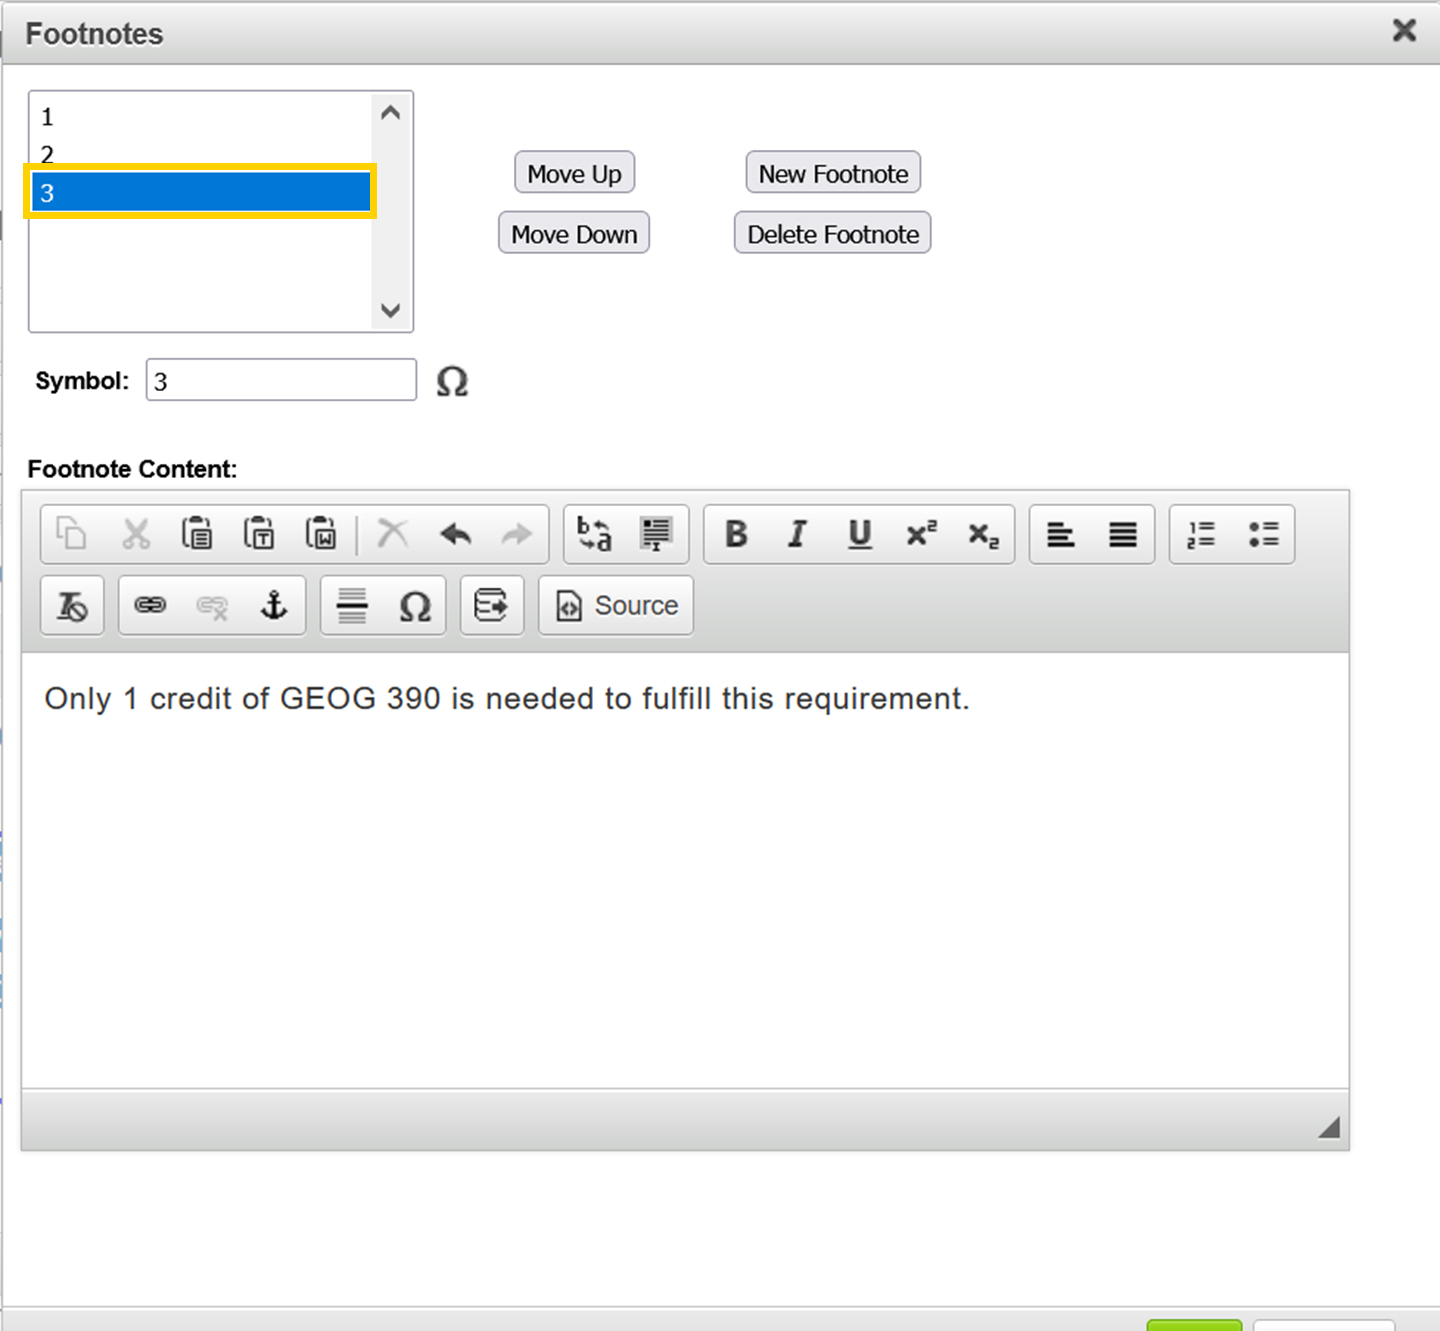
Select the footnote indicator of the footnote you wish to edit.
To edit, make changes to the existing text in the Footnote Content field.
To add an additional footnote, click the New Footnote Button.
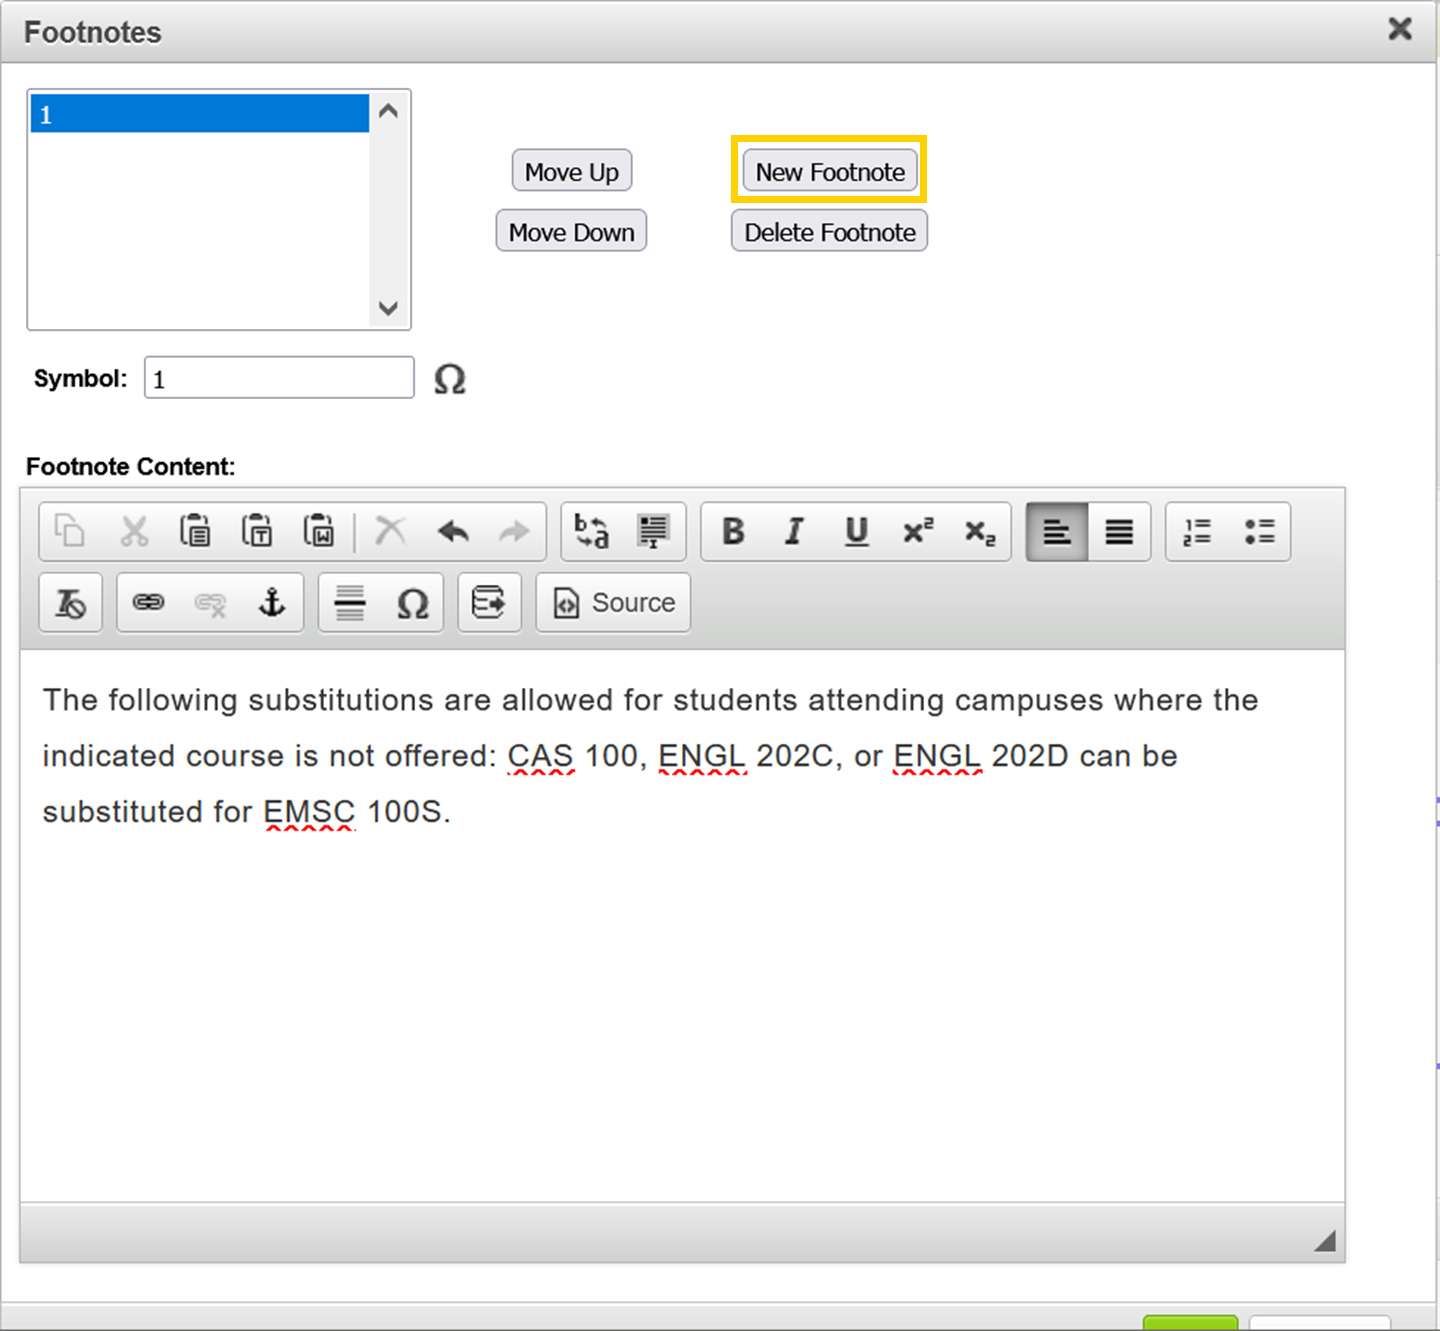
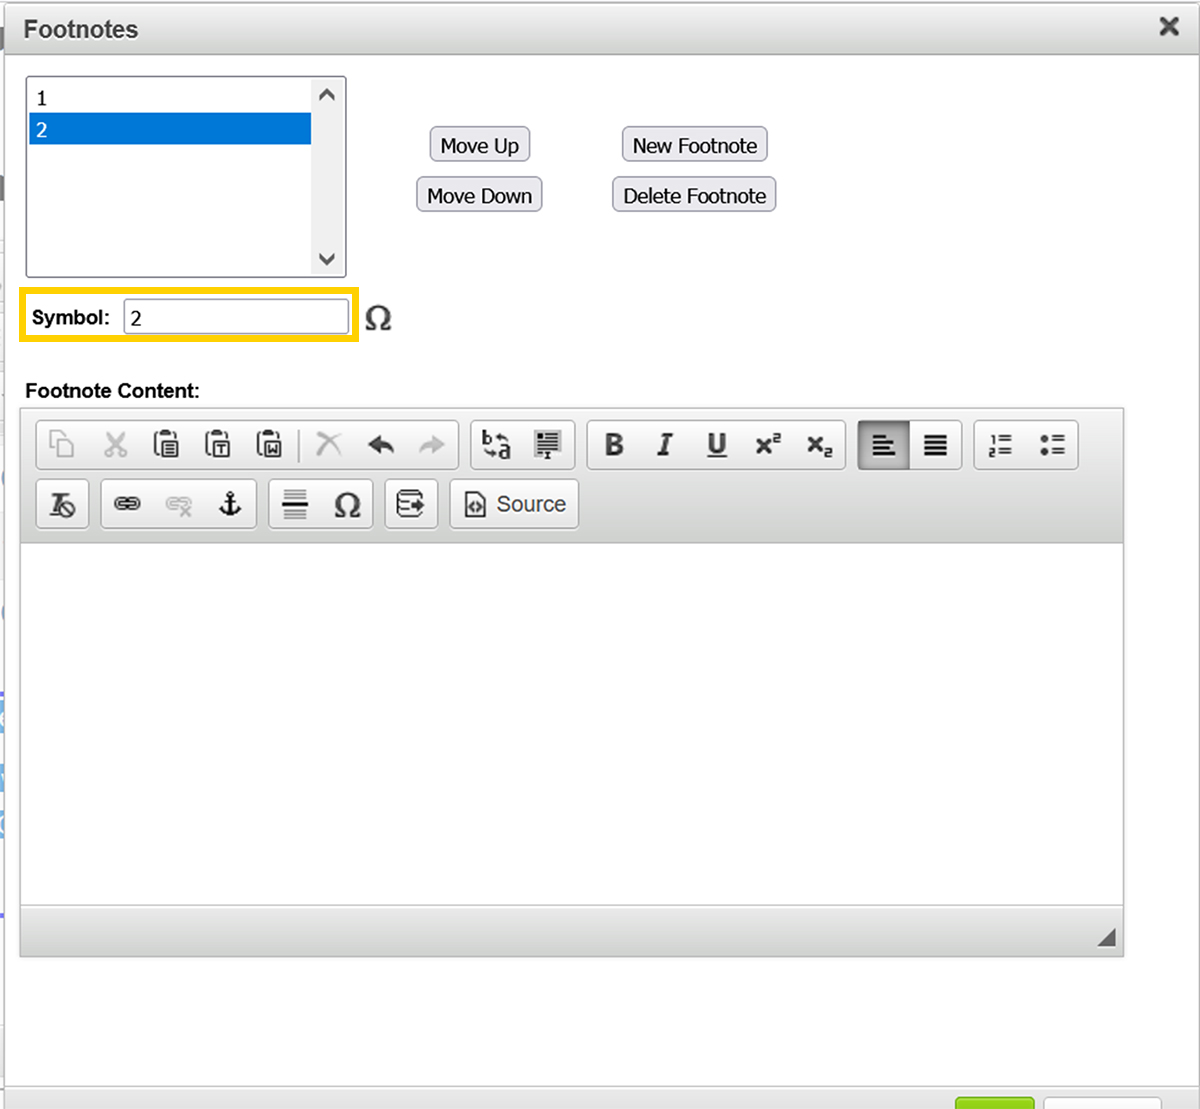
Enter the footnote indicator in the Symbol field.
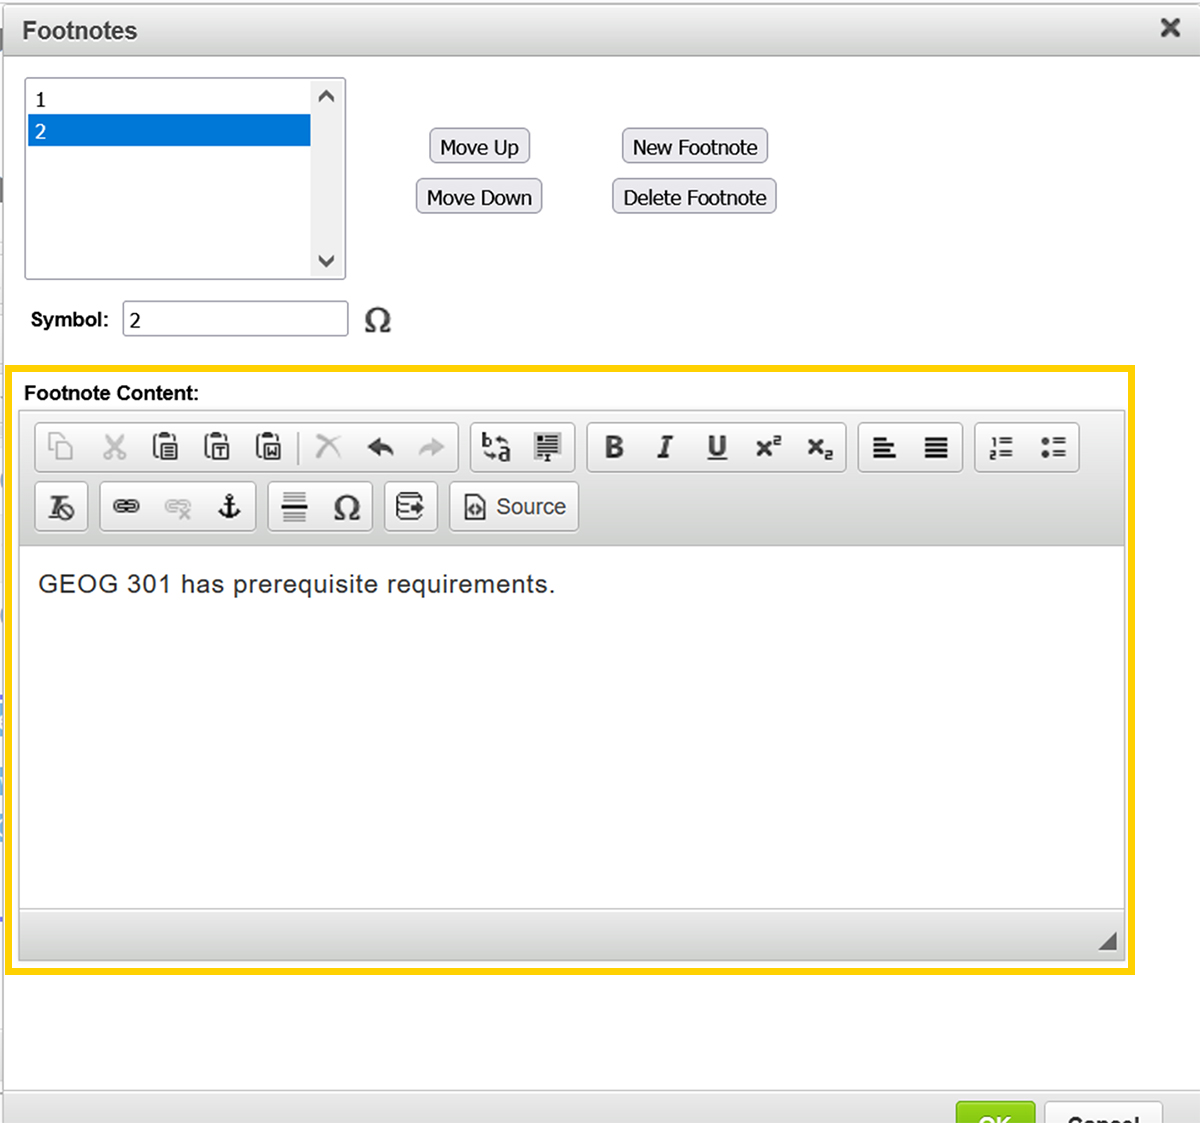
Enter the footnote text into the Footnote Content field.
Repeat the last three steps to add all additional footnotes.
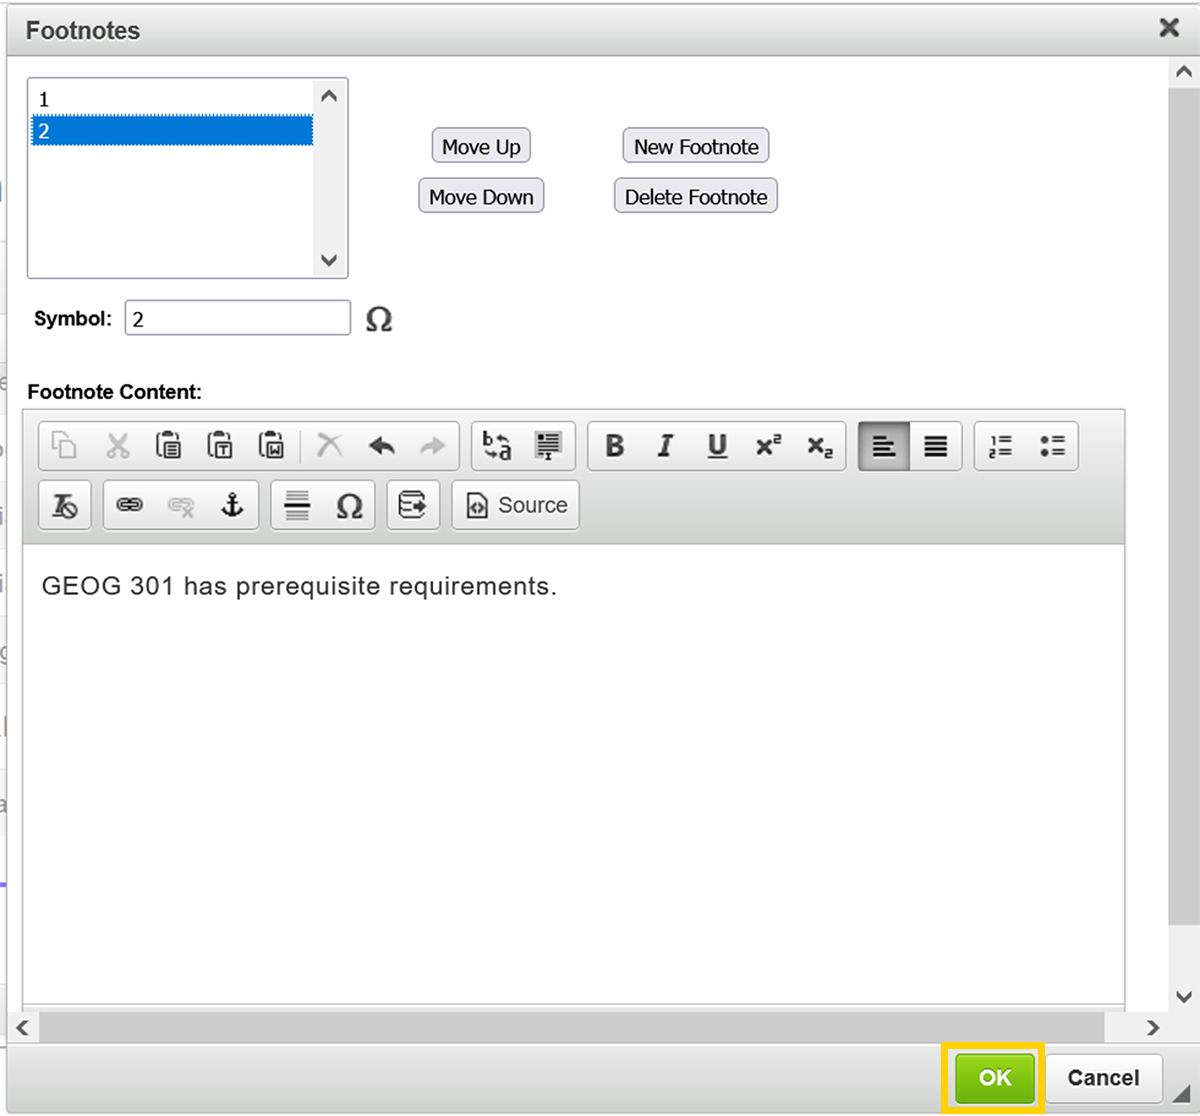
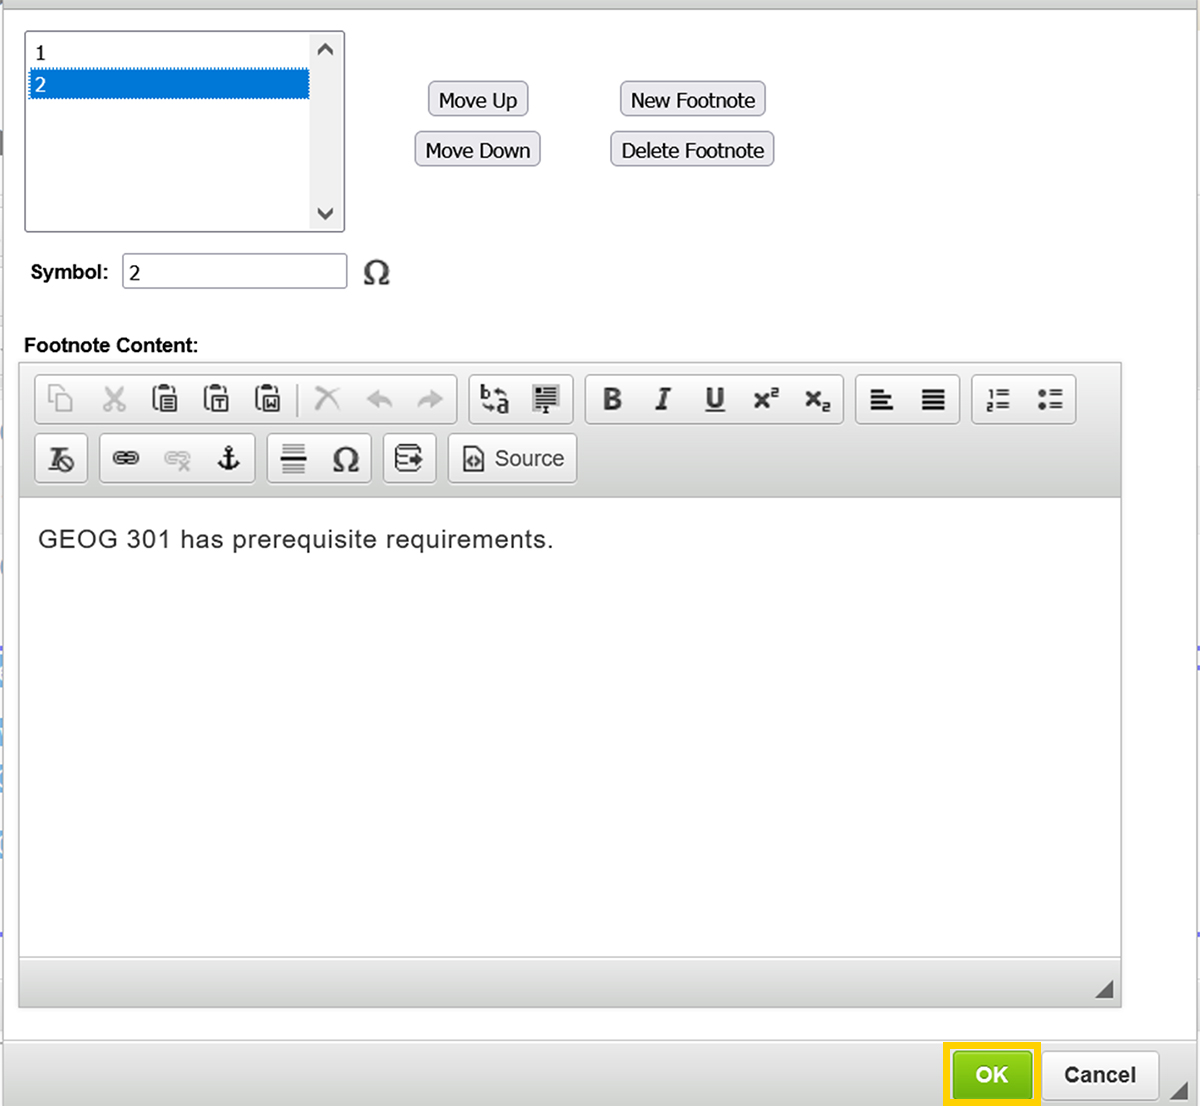
Once all footnotes are added, click the green OK Button to save the footnotes back to your proposal.
The edited footnote table now appears on your proposal.
Note: If you have added new footnotes to the table, be sure to add the appropriate corresponding footnote indicators to your course list (as described in the How to Add a Footnote instructions).
To change the order of existing footnotes, double click inside the Footnotes Table blue box in the Page Body Editor to open the Footnote Table Editor.
Select the footnote indicator of the footnote you wish to reorder.
Next, click the Move Up Button or Move Down Button to reorder the selected footnote.
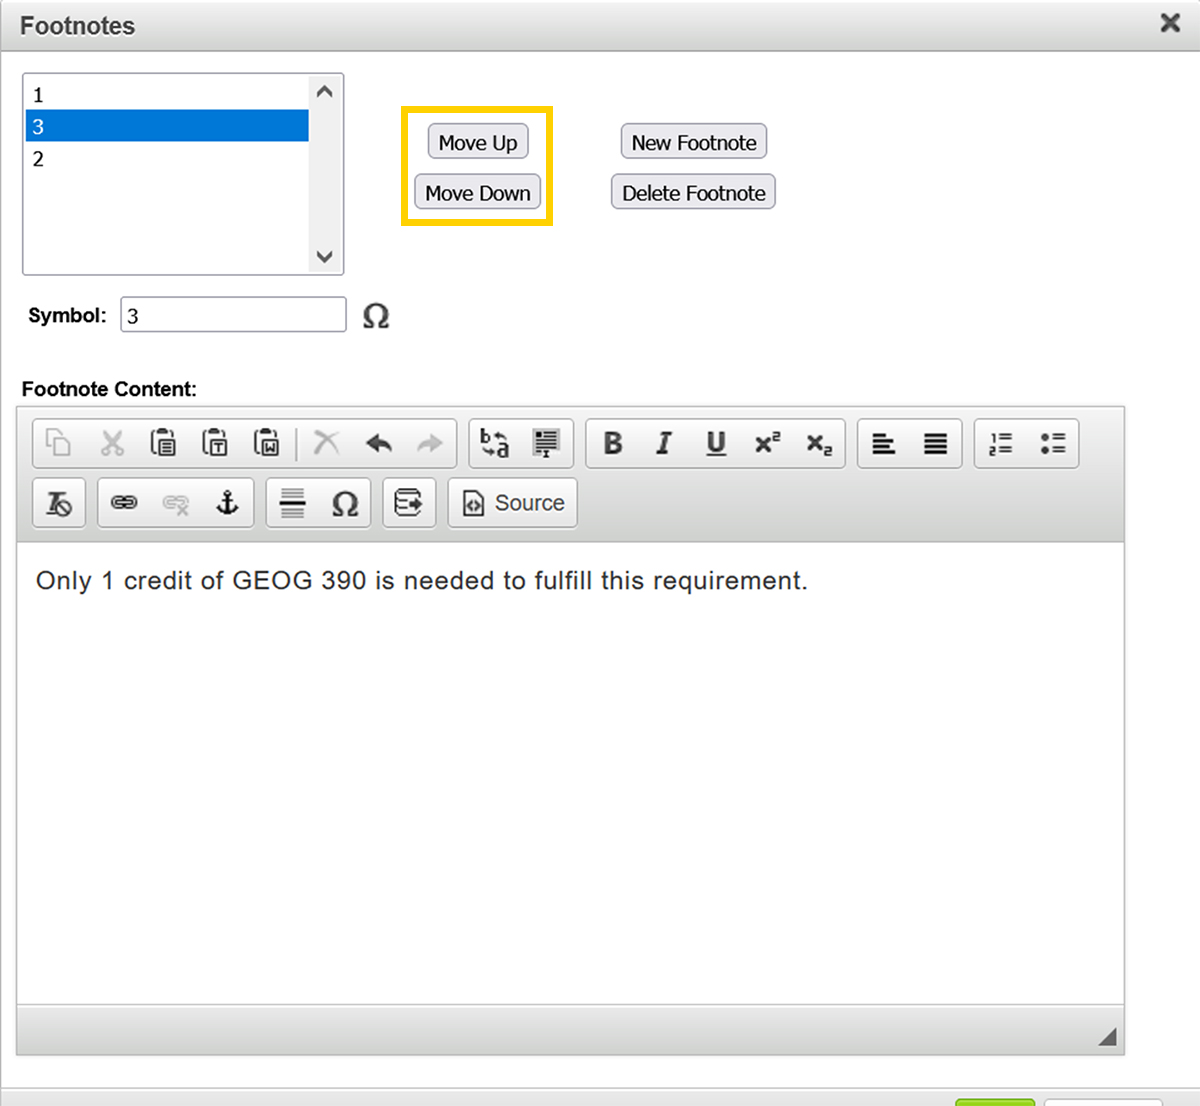
The footnote is now reordered.
Once the footnotes are in the correct order, click the green OK Button to save the changes back to your proposal.
The reordered footnote table now appears on your proposal.
To remove an existing footnote, double click inside the Footnotes Table blue box in the Page Body Editor to open the Footnote Table Editor.

Select the footnote indicator of the footnote you wish to remove.
Next, click the Delete Footnote Button to remove the selected footnote.
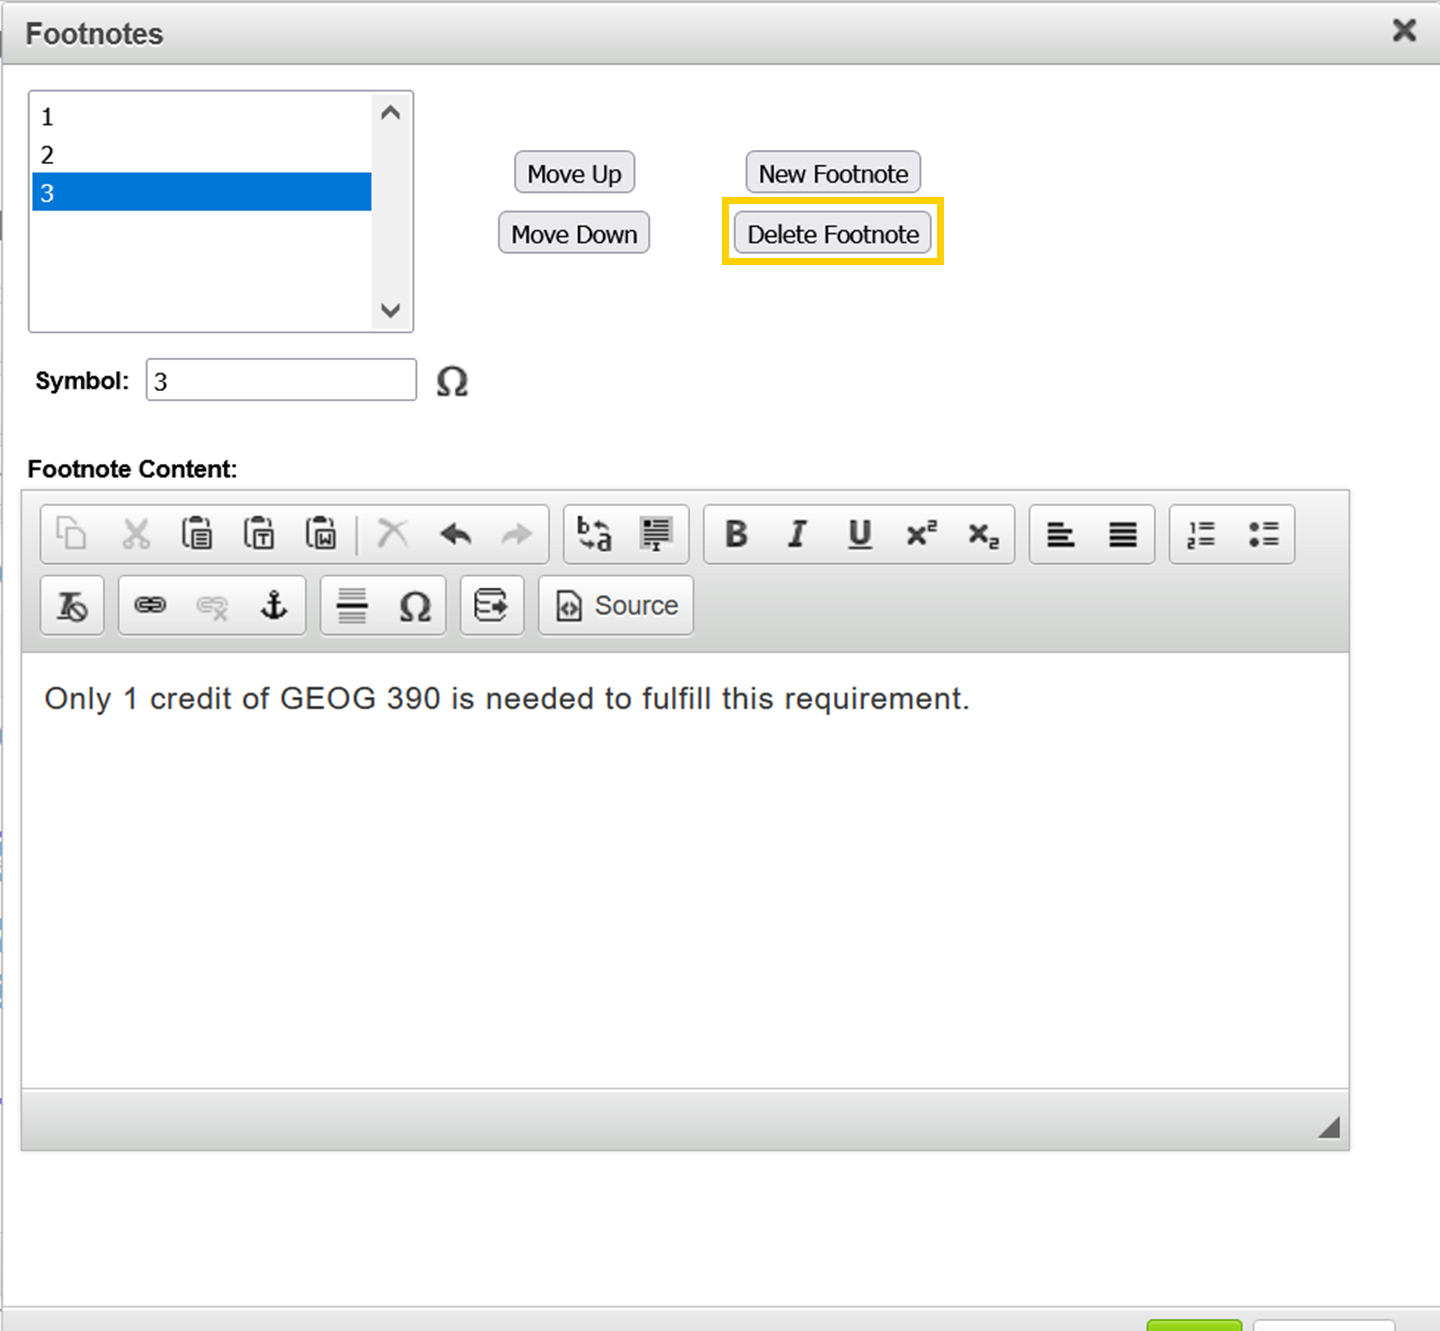
The footnote has been removed.
Once the footnote has been removed, click the green OK Button to save the changes back to your proposal.
The removed footnote no longer appears in the footnote table on your proposal.

Note: When you remove a footnote from the footnote table, be sure to remove the appropriate corresponding footnote indicator in your course list (located in the Footnote field as described in the How to Add a Footnote instructions).


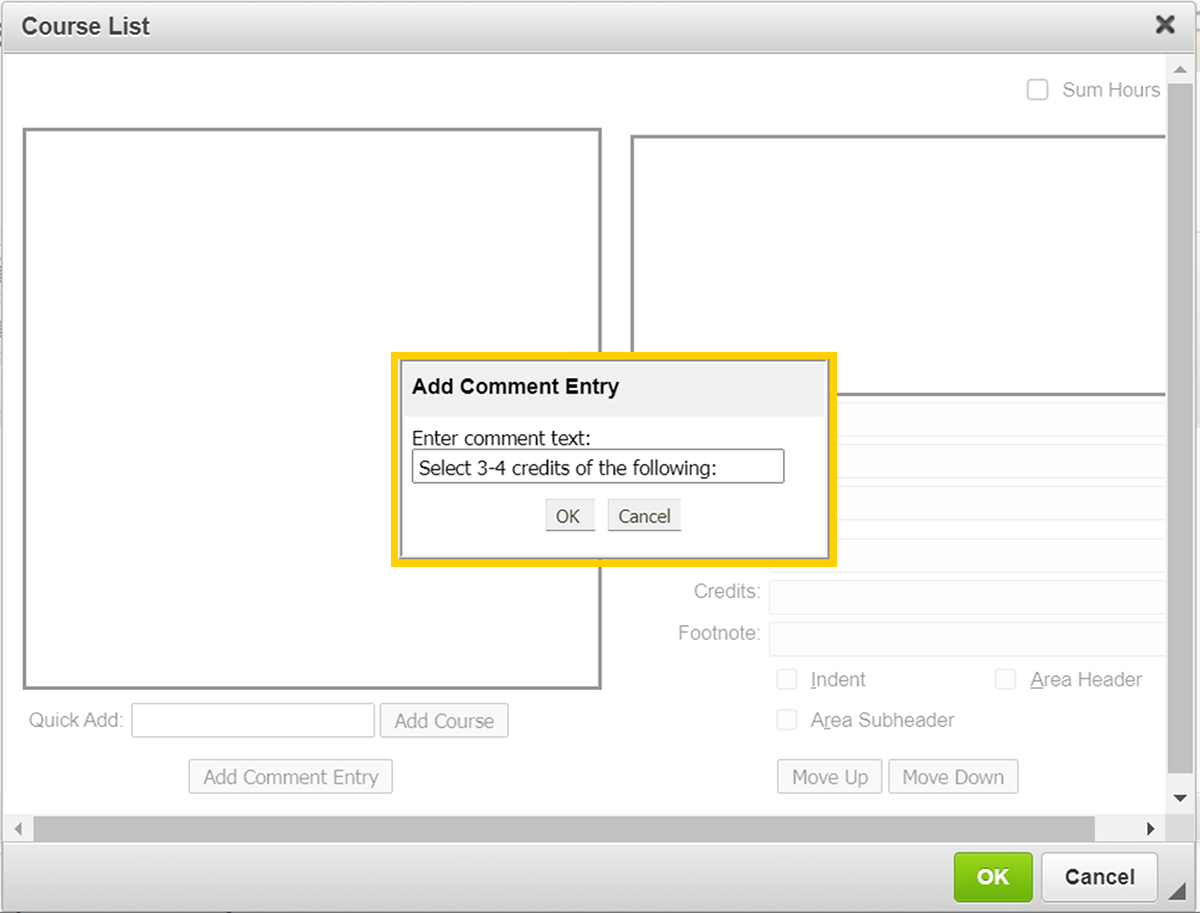
A comment entry is anything in a Course List that is not a course. Comment entries are often used to create headers within your table or to relay instructions such as "Select one of the following:". You can also use Comment Entry to indicate an open-ended course option for students, such as HIST 3XX.
How to Add a Comment Entry
In the Course List, select where the Comment Entry is to be placed. The Comment Entry will appear on the line below where you click in your list.
Click the Add Comment Entry Button.
The Add Comment Entry pop-up window will open. Enter the text to be placed in the Course List and then click the OK Button.
The Comment Entry now appears in your Course List.
Note: A comment can be modified at any time in the Comment field.
If the Comment Entry specifies a number of credits to be taken, enter the number of credits in Credits field.
Click the green OK Button in the Course List Editor to save your changes back to the proposal.
The Comment Entry now appears in the course list on your proposal.
How to Remove a Comment Entry
In the Course List, click on the comment you want to remove.
Click the Arrow Left Button to remove the selected comment from your Course List.
Click the green OK Button in the Course List Editor to save your changes back to the proposal.
The comment no longer appears in the course list on your proposal.
How to Reorder a Comment in a Course List
In the Course List, click on the comment you want to reorder.
Click the Move Up Button or Move Down Button to change the order of the comment.
Click the green OK Button in the Course List Editor to save your changes back to the proposal.
The comment is now reordered in the course list on your proposal.